Base de conhecimento
1000 perguntas frequentes, 500 tutoriais e vídeos explicativos. Aqui, você encontra apenas soluções!
Este guia aborda a instalação do kChat, a solução de mensagens instantâneas do kSuite. Consulte também o guia de início.
Obter o kChat
O kChat é oferecido com o kSuite, com funcionalidades adaptadas a cada versão do kSuite.
Depois de configurar o kSuite na sua organização:
- Acesse o aplicativo web kChat (serviço online ksuite.infomaniak.com/kchat).
- … ou clique aqui para baixar o aplicativo móvel (aplicativo para smartphone ou tablet iOS / Android) e o aplicativo desktop (aplicativo para computador em macOS / Windows / Linux).
Instalar o kChat
macOS
- O kChat pode solicitar acesso ao Keychain do macOS para “
Chromium Safe Storage”, que é usado para armazenar seu token de acesso. - Essa solicitação é normal e necessária para o bom funcionamento do kChat; nenhum dado sensível adicional é solicitado e nada é enviado para fora.
Linux
- No Linux, o kChat é distribuído no formato AppImage. Dependendo da configuração do seu sistema, pode ser necessário desativar o sandboxing para que o aplicativo funcione corretamente:
- Se o kChat não iniciar, execute-o a partir de um terminal com o seguinte comando:
./kchat.AppImage --no-sandbox - Você também pode criar um lançador ou um script que inclua esse parâmetro para evitar ter que digitá-lo a cada utilização.
- Se o kChat não iniciar, execute-o a partir de um terminal com o seguinte comando:
Link para esta FAQ: https://faq.infomaniak.com/144
Esta seção de perguntas frequentes foi útil?
Este guia detalha o uso de emojis e outros símbolos para reagir e interagir nas discussões do serviço kChat.
Introdução
- Consulte este outro guia para adicionar um emoji ao seu nome de usuário no kChat.
- Número máximo de emojis personalizados:
- kSuite Free = 5
- kSuite Standard = 100
- kSuite Business = 500
- kSuite Enterprise = ilimitado
Adicionar uma reação a uma mensagem
Para reagir a qualquer mensagem à qual tenha acesso no kChat, basta passar o cursor sobre a mensagem e selecionar…
- seja o emoji na seleção
- ou no ícone com o pequeno +:
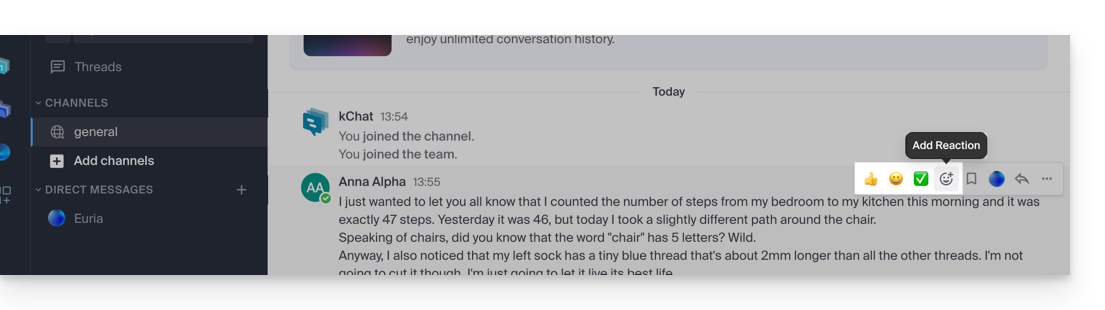
- Se já existirem reações (exibidas abaixo das mensagens), você pode adicionar uma reação no mesmo local:
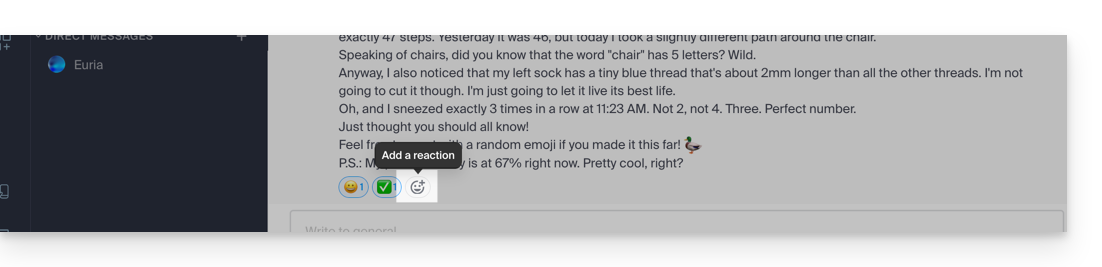
Assim, você abrirá o painel com centenas de emoticons disponíveis (e até mesmo emojis personalizados – leia mais abaixo).
Expresse-se com um emoji ou GIF
Adicionar um emoji dentro da mensagem que você está escrevendo é muito simples:
- Basta clicar no ícone do rosto sorridente na barra de formatação da sua mensagem:
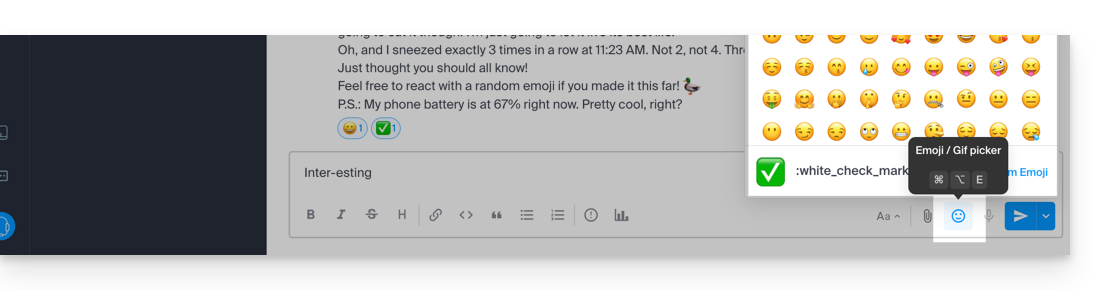
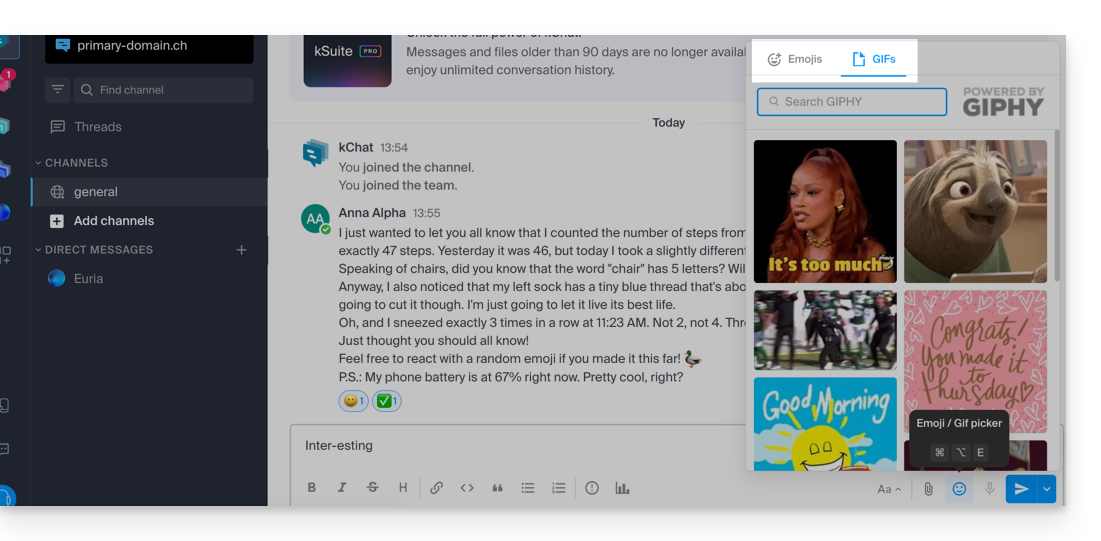
- A partir daí, pode escolher um emoji ou inserir GIFs animados curtos em vez de um emoticon, graças à guia localizada na parte superior do painel que aparece quando clica no rosto sorridente:
- Se você souber o nome do símbolo que deseja inserir, também pode digitar
:(dois pontos) seguido das 2 primeiras letras, no mínimo: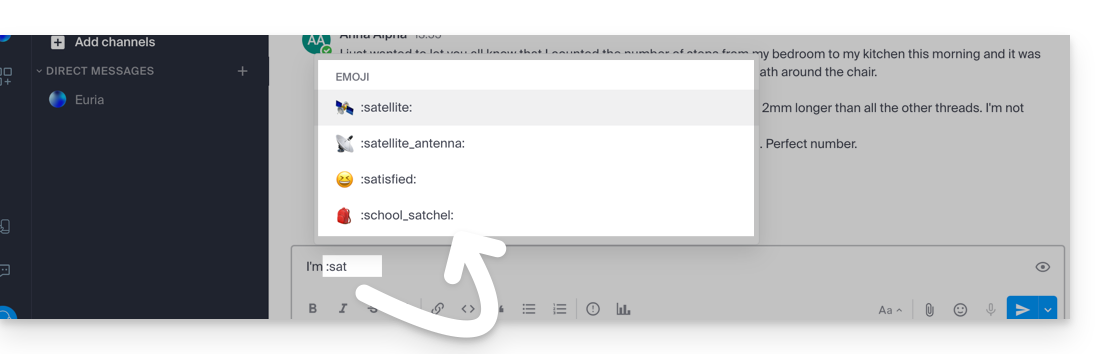
Dica: se você adicionar #, ## ou ### como o primeiro caractere de uma nova linha contendo um emoji, poderá usar um emoji maior. Para testar, envie uma mensagem como '# :smile:' (atenção: suas configurações personalizadas podem "desativar" essa funcionalidade de exibição na sua interface).
Para definir a tonalidade padrão dos emojis de pessoas, clique neste símbolo no painel de emojis: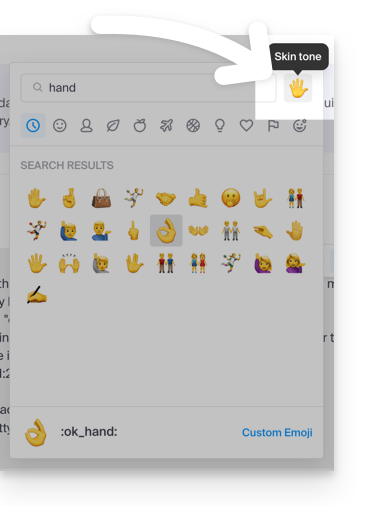
Emojis personalizados
Para gerenciar emojis adicionais, clique neste botão no painel de emojis: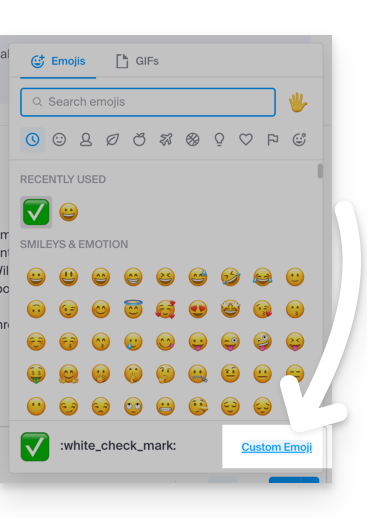
Especifique um nome com até 64 caracteres. Ele pode conter letras minúsculas, números e os caracteres «-», «+» e «_».
Especifique um arquivo .gif, .png ou .jpg para o seu emoji. O arquivo pode ter até 1 MB. O tamanho é redimensionado automaticamente para 128 x 128 pixels, mantendo a proporção original.
O emoji poderá então ser usado por todos os utilizadores do kChat da sua organização, através do nome único que lhe atribuiu: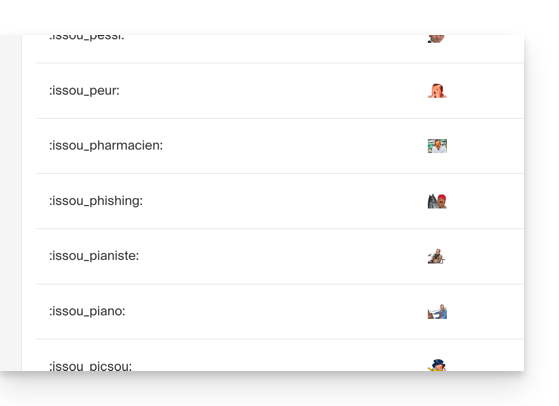
Link para esta FAQ: https://faq.infomaniak.com/1190
Esta seção de perguntas frequentes foi útil?
Este guia explica como inserir texto formatado e imagens nas suas mensagens no kChat.
Formatar o texto da mensagem (markdown)
Aqui estão os símbolos que devem ser adicionados antes e depois do seu texto para formatá-lo no estilo desejado:
| Símbolos | Resultado | Exemplo |
|---|---|---|
* | itálico | *Isto estará em itálico* |
** | negrito | **Isto estará em negrito** |
*** | itálico+negrito | ***Isto estará em itálico+negrito*** |
~~ | riscado | ~~Isto será riscado~~ |
``` | | ```Este é um código``` |
Você também pode inserir o seguinte:
| Símbolos | Resultado | Exemplo |
|---|---|---|
*** | (separador / linha horizontal) | 1ª parte***2ª parte |
Inserir uma imagem na mensagem…
… a partir de uma URL
Insira o seguinte código na sua mensagem, substituindo o texto alternativo e o endereço (URL) da imagem pelo link da imagem (esta última deve ser acessível e visível na Web):

Exemplo
Mensagem com a sintaxe de inserção de imagem:
se o URL da imagem estiver armazenado na área de transferência, basta colar o link em uma conversa e a imagem será adicionada à sua mensagem.
… a partir do disco rígido ou do kDrive
Clique no ícone do clipe de papel para inserir uma imagem existente no seu disco rígido ou no kDrive:
A imagem será inserida na mensagem, que você pode enviar diretamente na conversa sem necessariamente adicionar texto adicional.
Link para esta FAQ: https://faq.infomaniak.com/1407
Esta seção de perguntas frequentes foi útil?
Este guia explica como convidar para o kChat um utilizador que ainda não faz parte da sua Organização, mas que será registado como um utilizador kSuite.
Introdução
- Consulte este outro guia para conceder acesso a um ou mais canais kChat a um utilizador externo, que poderá assim interagir com a sua equipa sem ser contabilizado como um utilizador kSuitee sem ter direitos especiais na Organização (da qual não fará parte).
- Você também pode convidar um Grupo completo diretamente do kChat.
- Consulte este outro guia se desejar gerenciar os canais aos quais os novos membros devem ser automaticamente adicionados.
Convidar para usar o kSuite
Pré-requisitos
- Ser administrador do kChat:
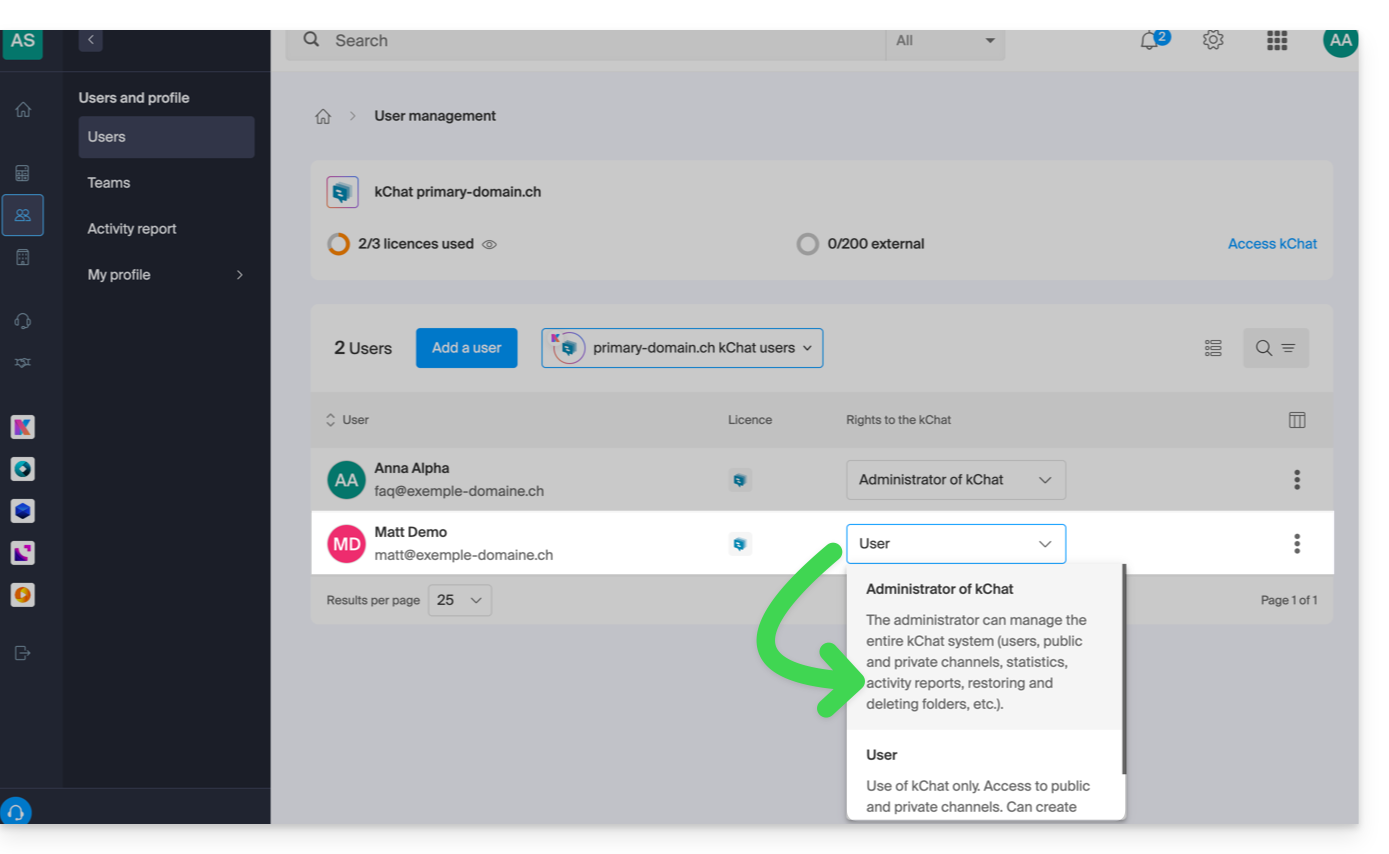
- Não importa o cargo na Organização; ser administrador da Organização na qual existe a kSuite (e, portanto, o kChat) não é obrigatório e, de qualquer forma, não é suficiente:
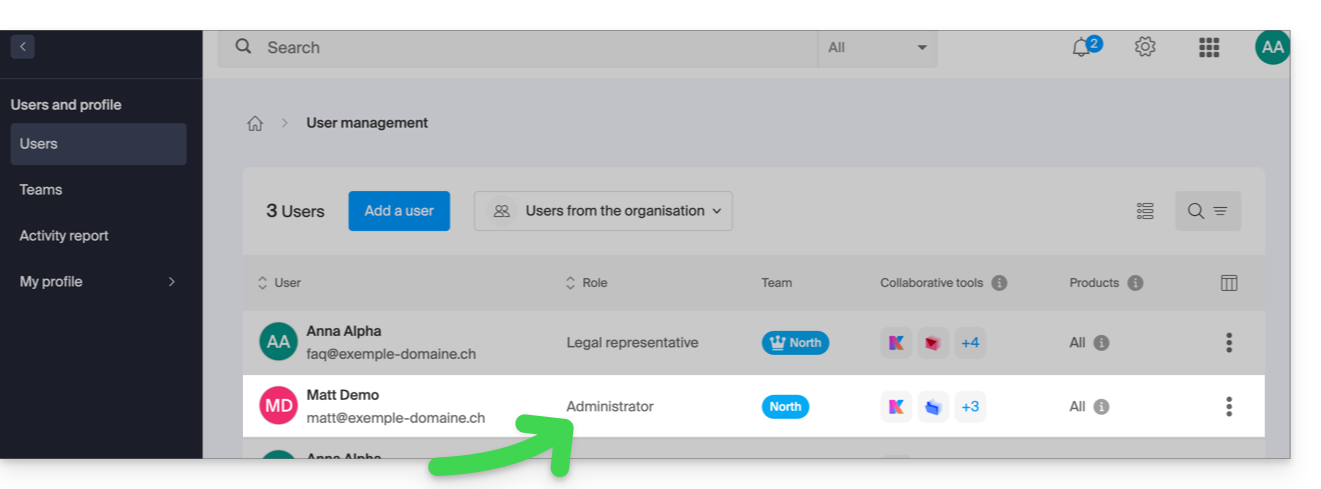
- Não importa o cargo na Organização; ser administrador da Organização na qual existe a kSuite (e, portanto, o kChat) não é obrigatório e, de qualquer forma, não é suficiente:
Em seguida, convide o utilizador seguindo o procedimento abaixo. Após o convite, o utilizador poderá confirmar a sua adesão e acederá ao kChat com as permissões limitadas que lhe tiver concedido:
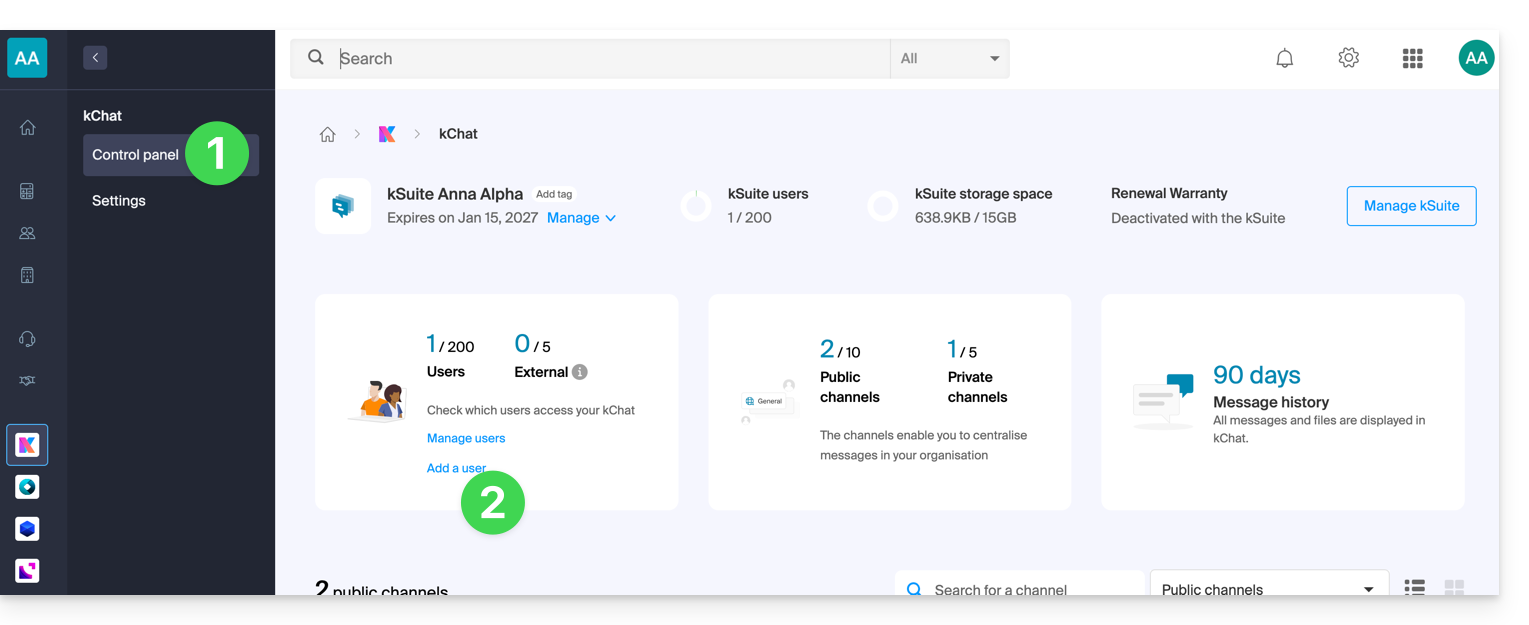
- Clique aqui para aceder à gestão do kChat no painel de controlo Infomaniak (precisa de ajuda?).
- Clique em Adicionar um utilizador:
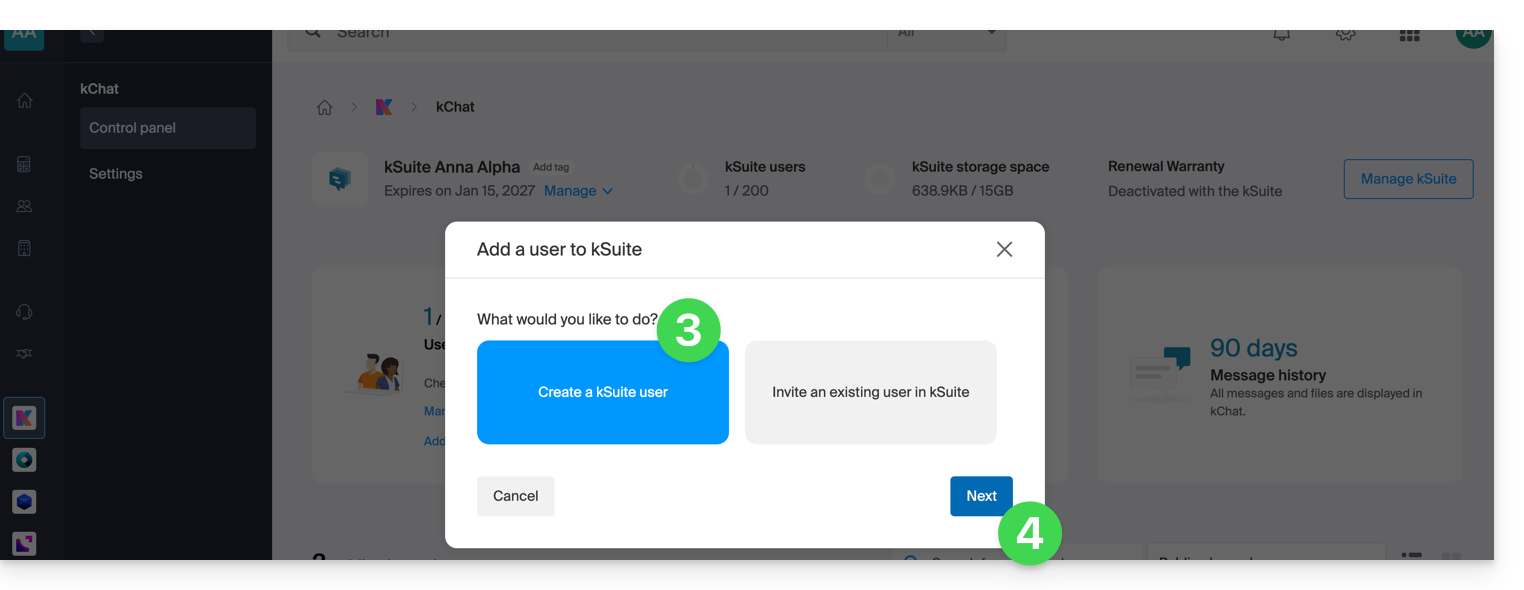
- Clique em Criar um utilizador kSuite.
- Clique em Seguinte:
- Insira o nome e o sobrenome do usuário e defina seu papel como usuário comum:
- Representante legal
- Responsabilidade legal da organização
- Pode gerenciar todos os produtos e usuários
- Pode gerenciar a contabilidade e os pedidos de novos produtos
- Administrador
- Pode gerenciar todos os produtos e usuários
- Pode gerenciar a contabilidade e os pedidos de novos produtos
- Usuário
- Pode gerenciar os produtos que você autorizar
- Pode gerenciar a contabilidade se você autorizar
- Representante legal
- Não crie um endereço de e-mail para o utilizador e indique o endereço de e-mail existente para o qual enviar o convite:
- Pode forçar este futuro utilizador a ter de se conectar com este endereço de e-mail ou permitir que especifique outro endereço de e-mail (útil, nomeadamente, se já tiver uma conta de utilizador na Infomaniak com outro identificador de conexão).
- Adicione o utilizador à sua kSuite com o botão de alternância.
- Clique no botão Convidar:
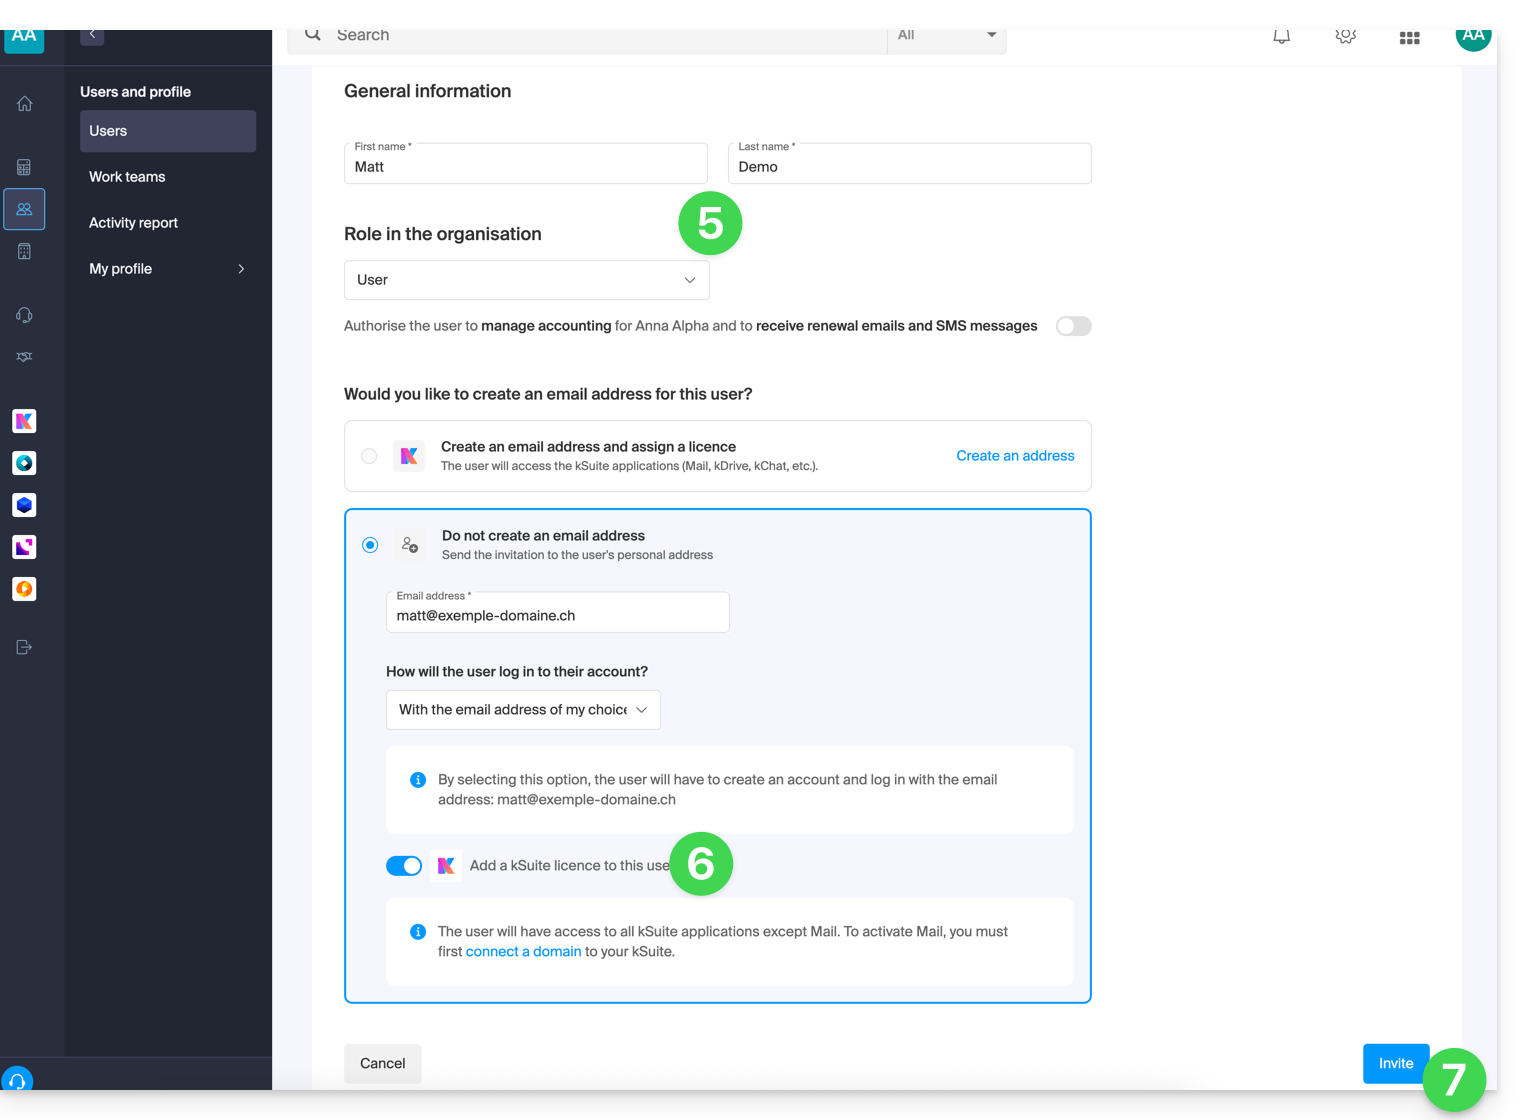
- O convite está pendente até ao registo definitivo do utilizador convidado (consulte abaixo). O painel de controlo dos utilizadores da Organização indica este estado:
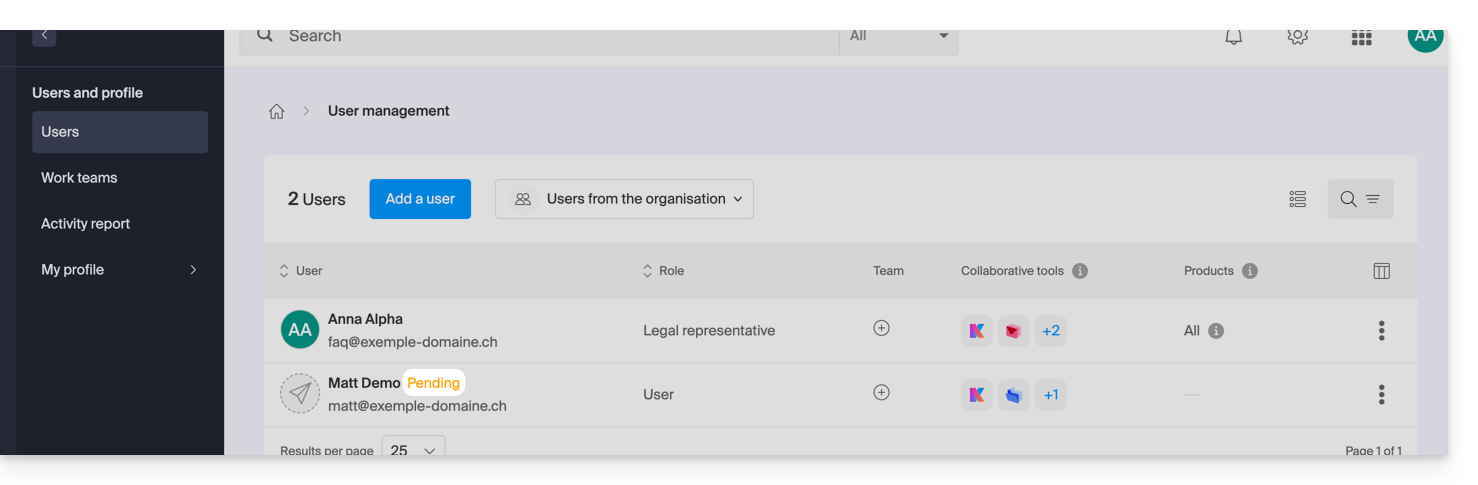
- O convite está pendente até ao registo definitivo do utilizador convidado (consulte abaixo). O painel de controlo dos utilizadores da Organização indica este estado:
Aceitar o convite
Para aceder à Organização que detém o kChat:
- O utilizador convidado recebe o convite no seu endereço de e-mail e clica no botão Aceitar o convite:
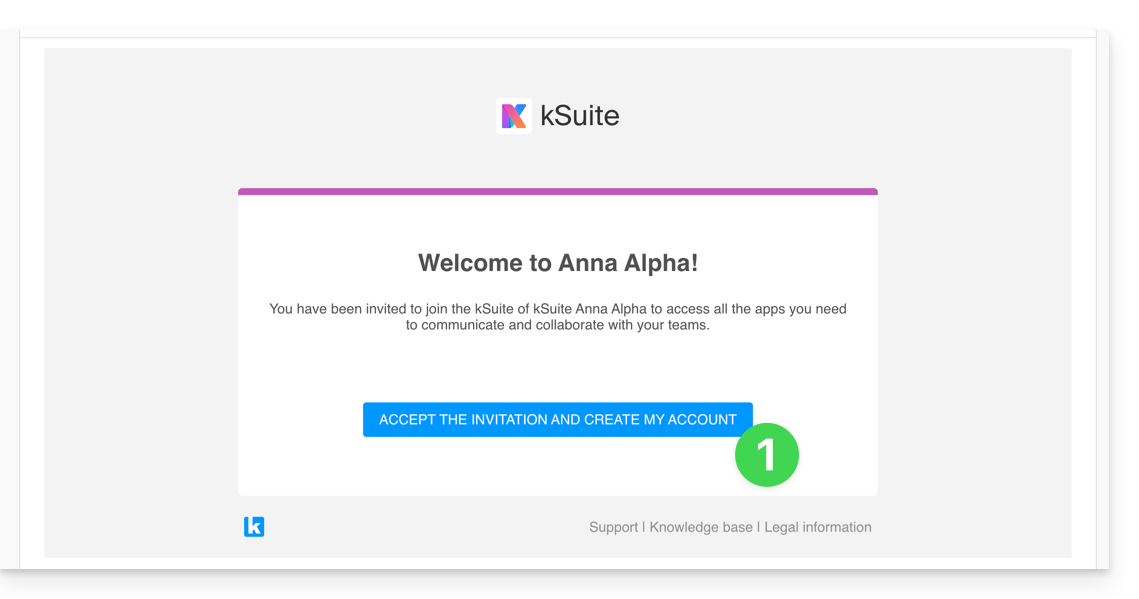
- Ele especifica os seus dados de contacto, bem como o endereço de e-mail e a palavra-passe que pretende utilizar, e conclui o registo:
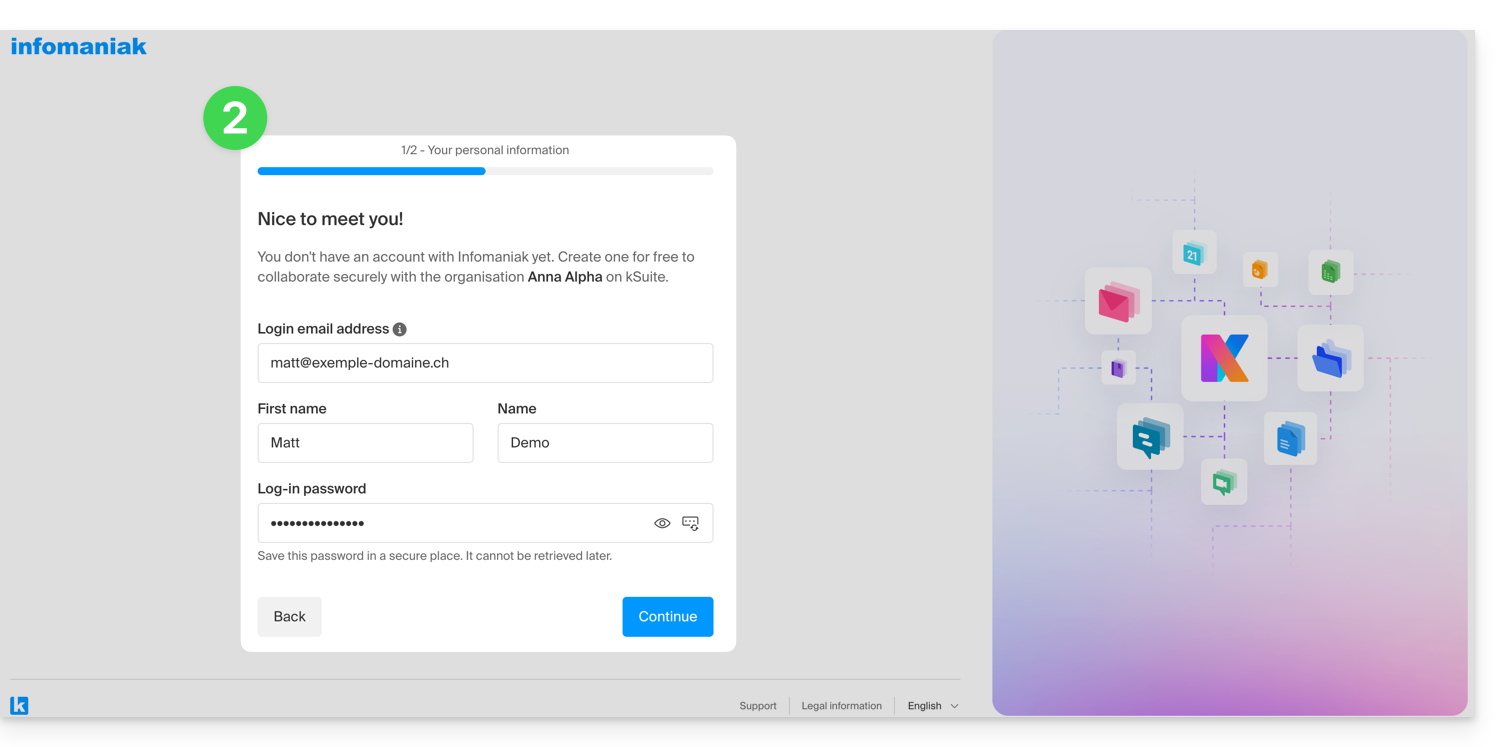
- Após a conclusão do registo, o utilizador recém-registado pode iniciar sessão no seu Painel de controlo e aceder ao kChat para o qual foi convidado.
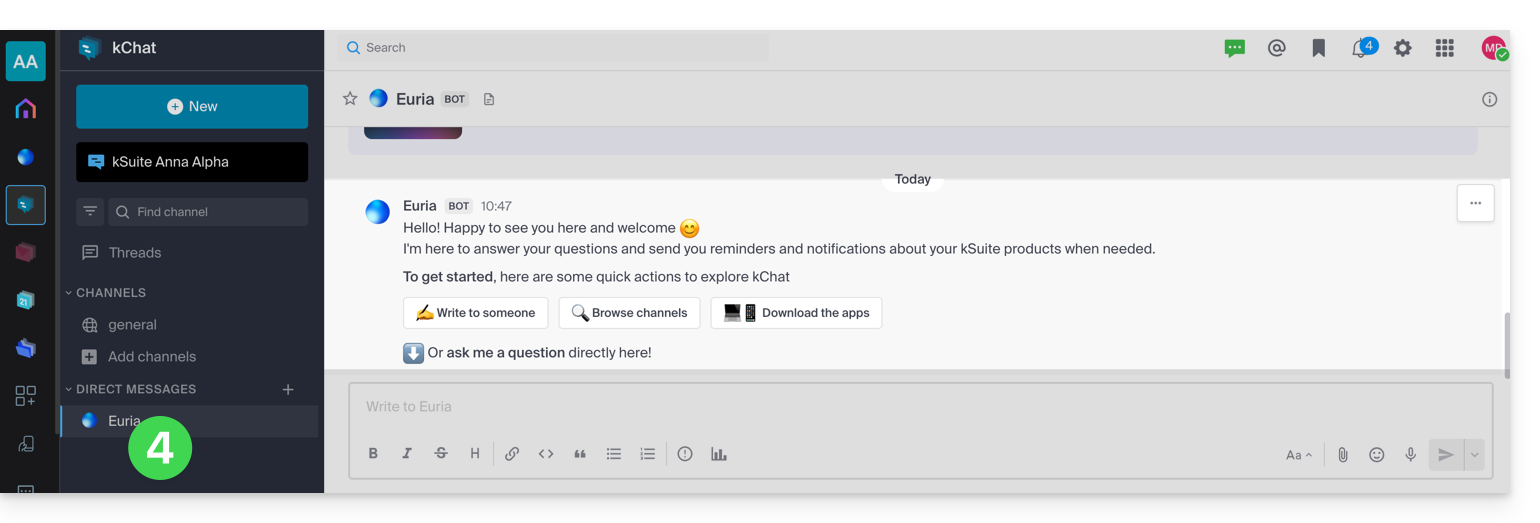
- Os utilizadores existentes são automaticamente notificados da chegada do novo participante e podem agora conversar com ele; assim que é adicionado, o novo utilizador recebe uma mensagem da Euria (Bot de IA da Infomaniak) que lhe dá as boas-vindas:
Acesso ao kSuite, e não ao gerenciamento do kSuite!
É importante distinguir entre o uso do aplicativo kChat (dentro do kSuite) e o gerenciamento do kSuite em si.
No exemplo de convite acima, o novo usuário foi convidado a participar do kChat, portanto, agora ele é contado como um usuário da kSuite quando um administrador acessa o gerenciamento de usuários do kChat: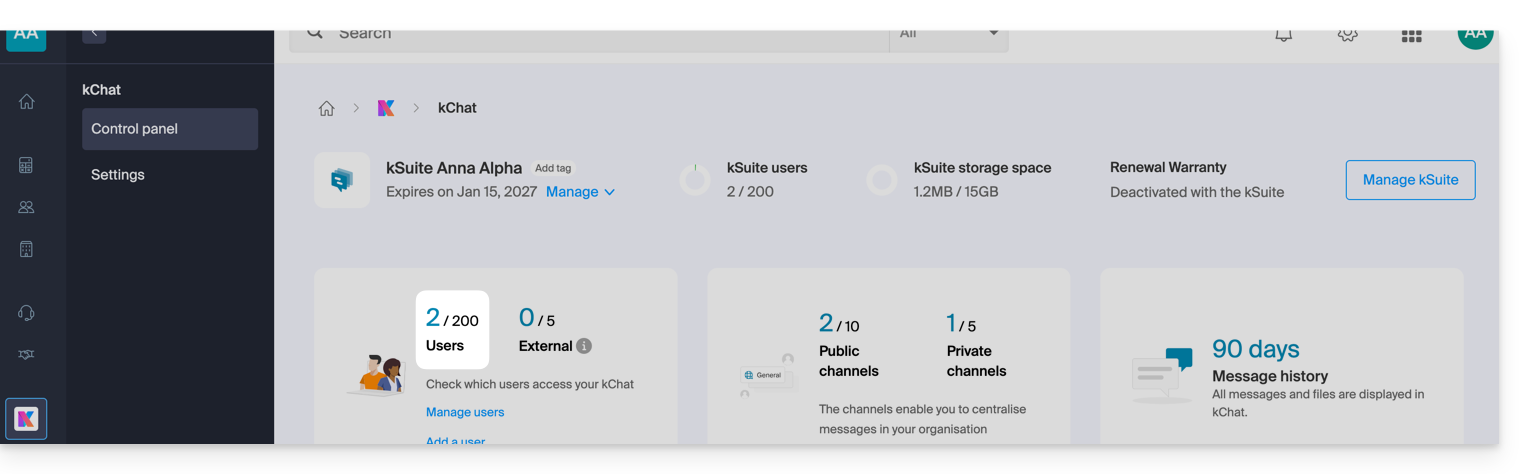
O mesmo se aplica, obviamente, ao gerenciamento de usuários da kSuite: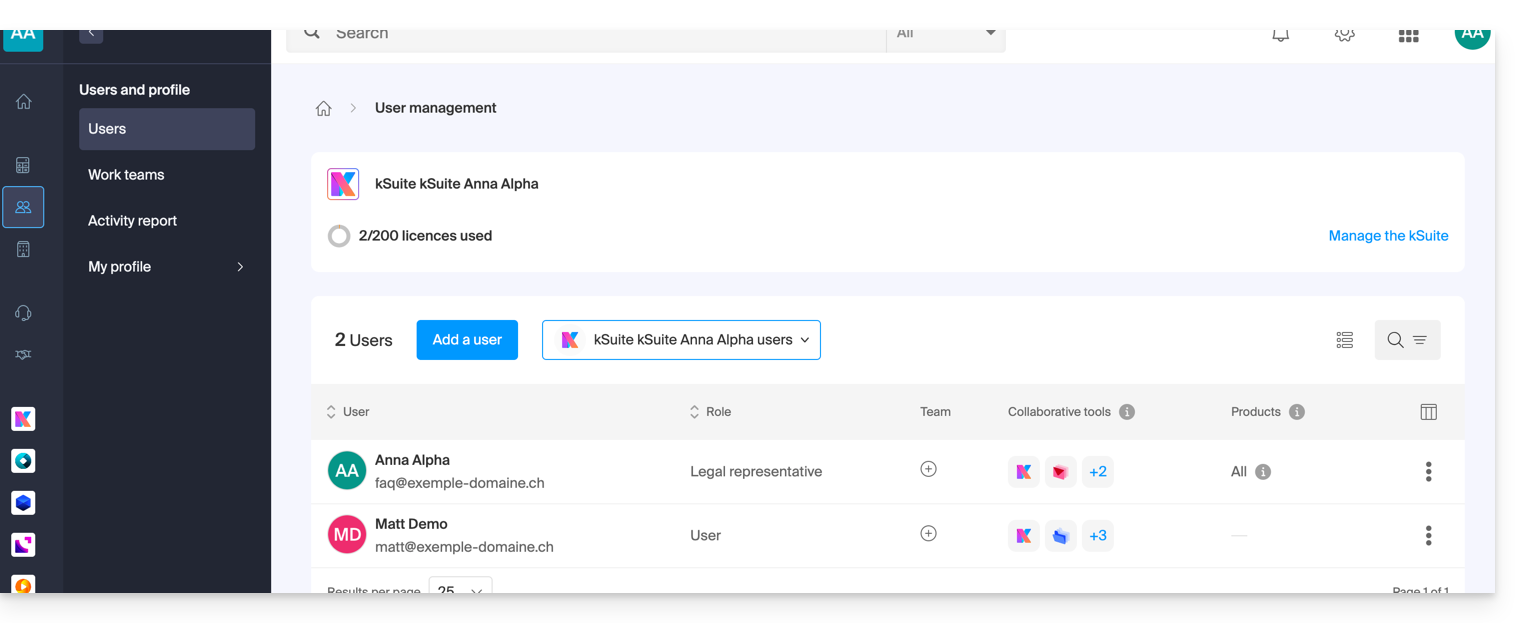
Por outro lado, este novo utilizador não poderá gerir diretamente a kSuite para a qual foi convidado, uma vez que o seu papel (definido no primeiro ponto 5 acima) não o autoriza a fazê-lo: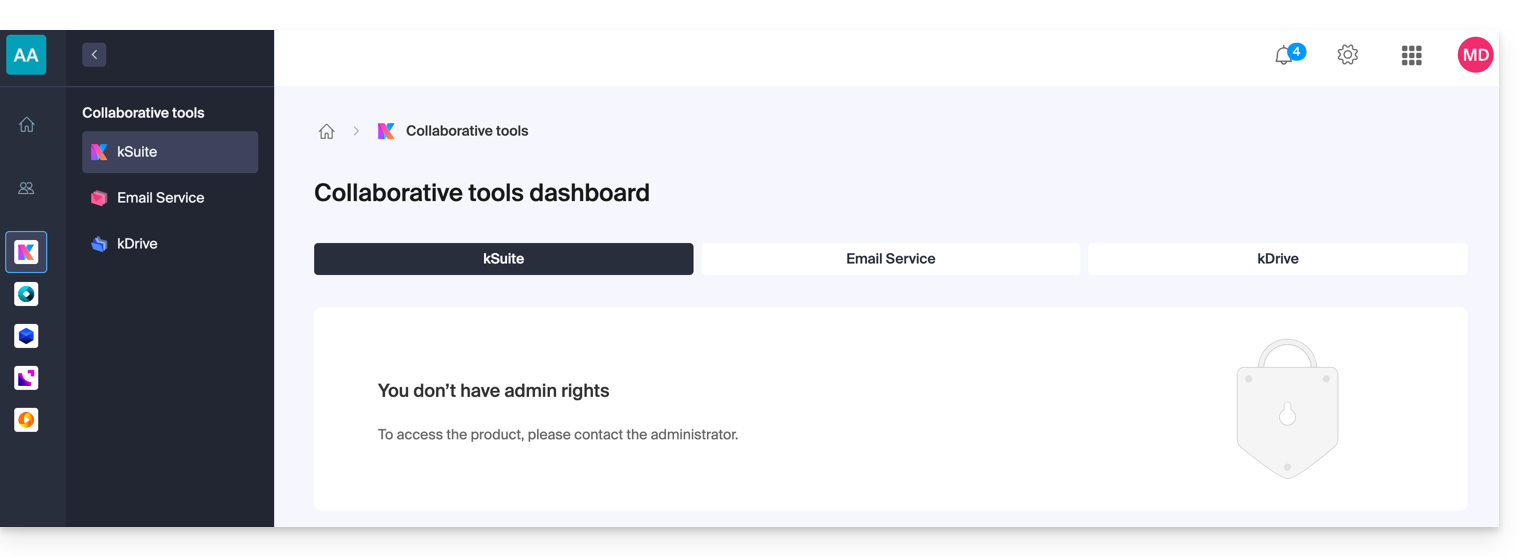
- É por esta razão que este utilizador não verá nenhum link ativo na secção Ferramentas de Colaboração → kSuite do seu Manager Infomaniak.
- Ele deverá migrar para os aplicativos Infomaniak através do menu no canto superior direito:
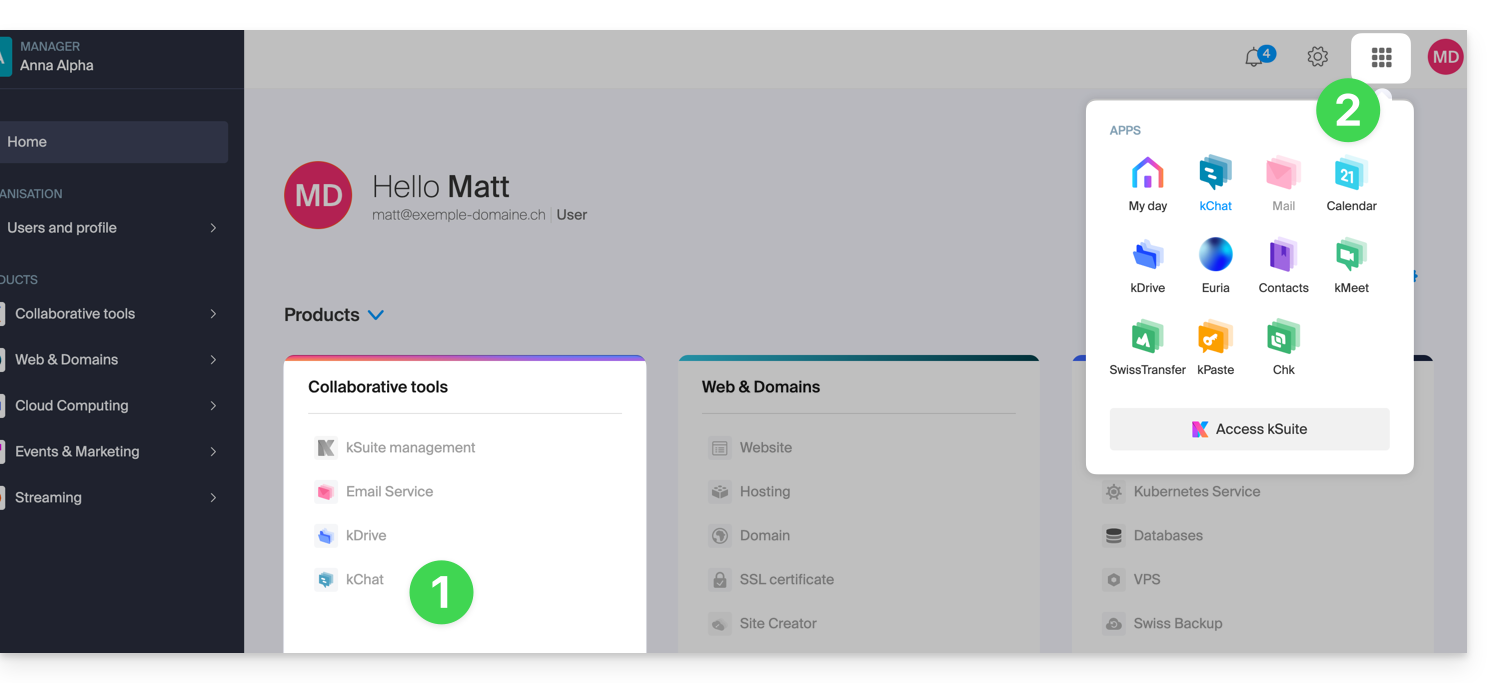
É importante notar que, se desejar, este usuário poderá solicitar sua própria kSuite, sem relação com a kSuite para a qual foi convidado.
Link para esta FAQ: https://faq.infomaniak.com/1455
Esta seção de perguntas frequentes foi útil?
Este guia detalha os elementos importantes para não perder nenhuma das discussões no kChat que sejam do seu interesse.
Introdução
- Se as notificações estiverem configuradas corretamente para funcionar no aplicativo móvel kChat, também funcionarão em smartwatches, como os modelos Garmin ou Apple Watch.
Gerenciar as notificações de conversas e eventos
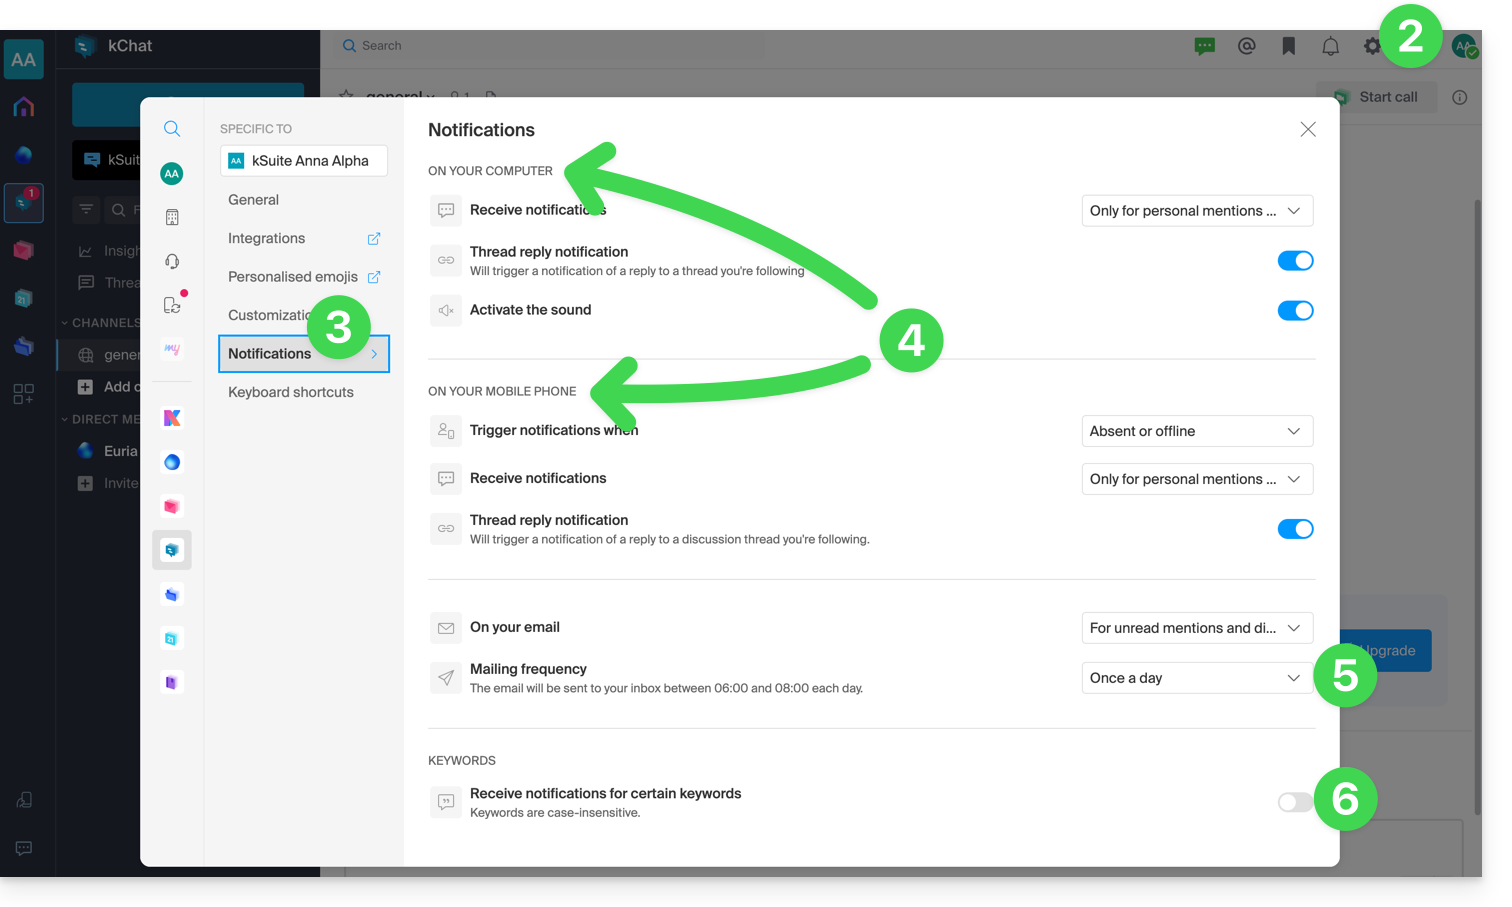
Para gerenciar as notificações do kChat e, assim, ser notificado, por exemplo, quando uma nova mensagem for enviada diretamente para você ou quando você acompanhar uma mensagem específica, inclusive de acordo com determinadas palavras-chave:
- Clique aqui para acessar o aplicativo web kChat (serviço online ksuite.infomaniak.com/kchat) ou abra o aplicativo móvel kChat (aplicativo para smartphone ou tablet iOS/Android) ou o aplicativo desktop kChat (aplicativo para computador em macOS/Windows/Linux).
- Clique em Configurações no canto superior direito.
- Clique em Notificações.
- Defina a forma como deseja ser notificado (computador/dispositivo móvel, presente/ausente, etc.) e em que casos (todas as mensagens ou apenas mensagens com menção, mensagens acompanhadas, etc.).
- Escolha receber notificações por e-mail regularmente:
- Este e-mail é enviado diariamente ou uma vez por semana, entre as 6 e as 8 horas da manhã, e informa o utilizador sobre as mensagens que não leu.
- O utilizador recebe um e-mail por produto kChat ao qual tem acesso.
- Defina uma palavra-chave para a qual deseja receber notificações quando uma nova mensagem for publicada:
Se necessário, autorize as notificações do navegador:
no Safari (❓: ajuda)
- Abra o Safari.
- Clique em Configurações (ou Preferências), selecione Sites e, em seguida, Notificações.
- Procure o site infomaniak.kchat.infomaniak.com e selecione Permitir.
no Firefox (❓: ajuda)
- Abra o Firefox.
- Acesse o menu principal e clique em Configurações (ou Preferências).
- Acesse Privacidade e segurança no painel esquerdo.
- Desça até à secção Permissões e localize a linha Notificações.
- Clique no botão Definições… à direita de Notificações.
- Procure o site https://infomaniak.kchat.infomaniak.com e selecione Permitir.
- Clique em Guardar alterações.
no Google Chrome (❓: ajuda)
- Abra o Google Chrome.
- Clique no menu Mais ⋮ no canto superior direito e, em seguida, em Configurações.
- Acesse Privacidade e segurança e clique em Configurações do site.
- Clique em Notificações e escolha permitir o site:
- Ao lado da opção Permitir, clique em Adicionar. Insira o URL:
https://infomaniak.kchat.infomaniak.come, em seguida, clique em Adicionar.
- Ao lado da opção Permitir, clique em Adicionar. Insira o URL:
no Microsoft Edge
- Abra o Microsoft Edge.
- Clique no menu … no canto superior direito e, em seguida, clique em Configurações.
- Acesse o menu Cookies e permissões do site.
- Clique em Notificações:
- Ao lado da opção Permitir, clique em Adicionar. Insira a URL:
https://infomaniak.kchat.infomaniak.come, em seguida, clique em Adicionar.
- Ao lado da opção Permitir, clique em Adicionar. Insira a URL:
Gerenciar as notificações do ícone do aplicativo para desktop
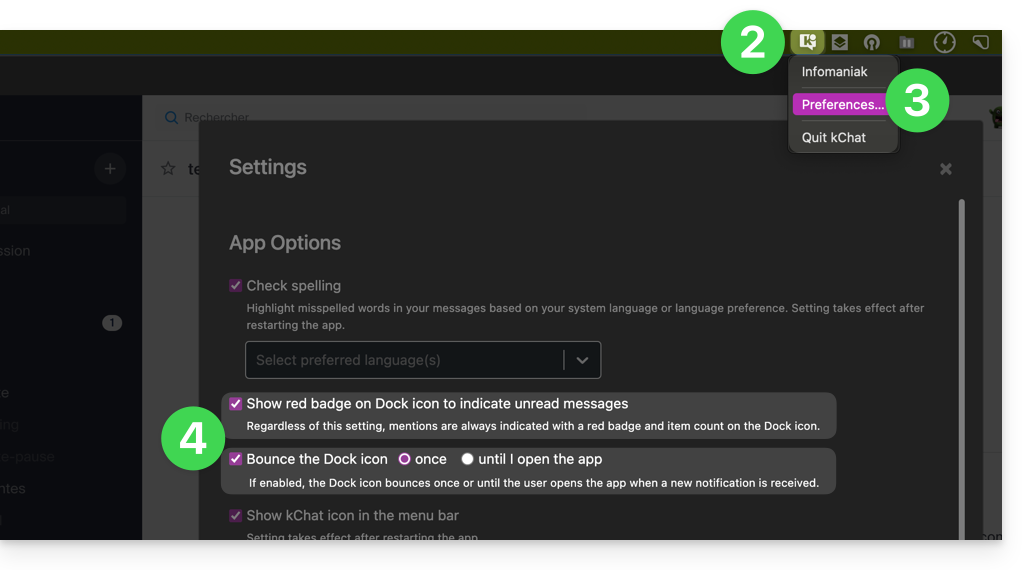
Você pode, por exemplo, decidir animar o ícone do aplicativo para desktop quando houver uma nova mensagem:
- Abra o aplicativo de desktop kChat (aplicativo para macOS / Windows / Linux).
- Clique com o botão esquerdo do mouse no ícone do aplicativo de desktop na área de notificação do seu computador (no canto superior direito no macOS, no canto inferior direito no Windows e clique duas vezes na barra de tarefas no Linux).
- Clique em Preferências...
- Em Opções do aplicativo, defina as preferências de notificação do sistema operacional:
Gerenciar as notificações de um canal específico
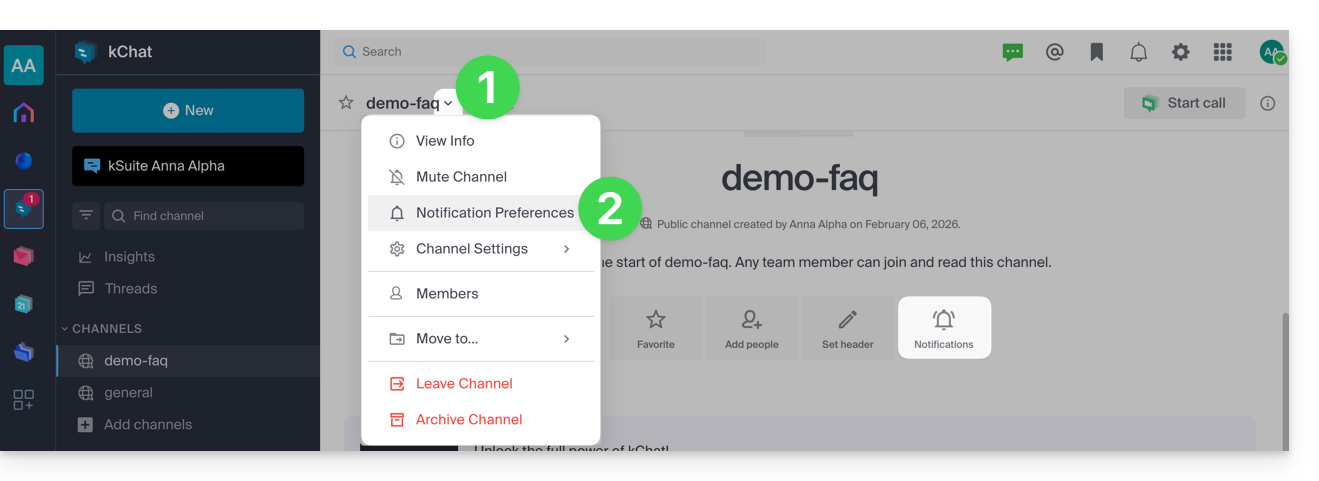
No canal de discussão em questão:
- Clique no ícone de seta para baixo à direita do nome do canal em questão.
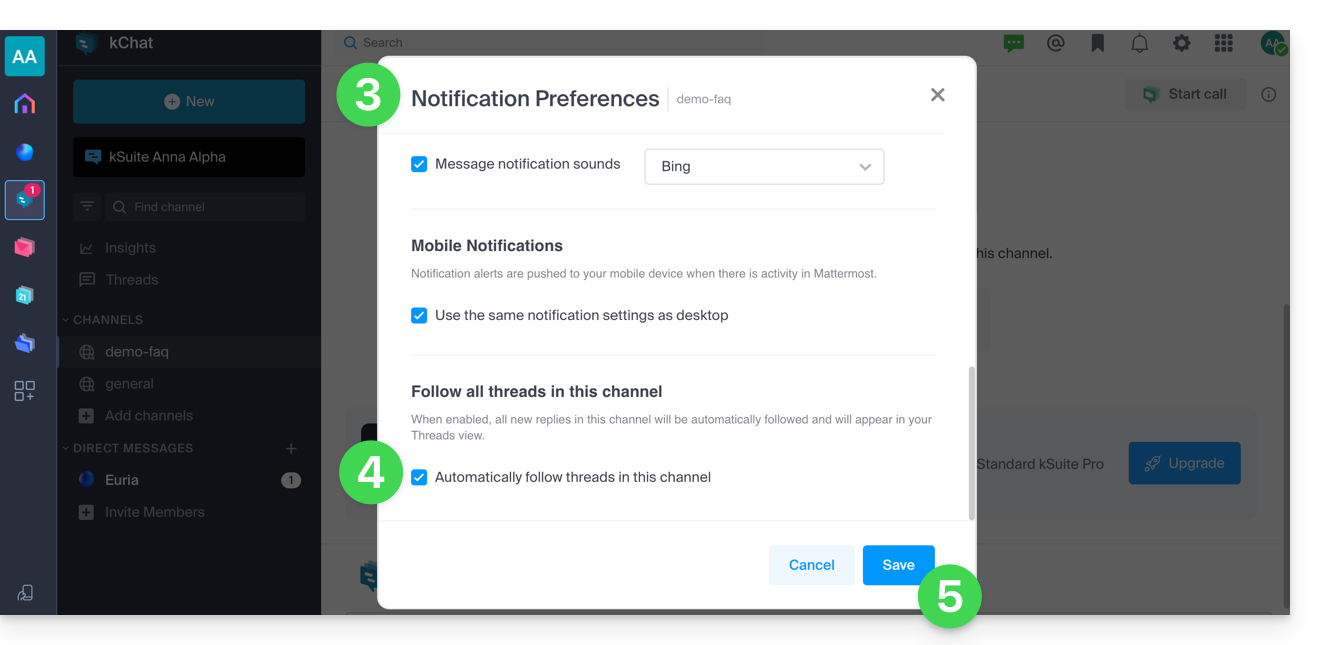
- Clique em Preferências de notificação (ou diretamente no ícone dedicado na parte superior do canal):
- Navegue e ative as diferentes notificações desejadas.
- Uma das opções disponíveis permite ser notificado automaticamente assim que um tópico de discussão (thread) for iniciado após uma mensagem ser publicada no canal correspondente.
- Salve suas preferências clicando no botão na parte inferior:
Gerenciar as notificações de uma conversa específica
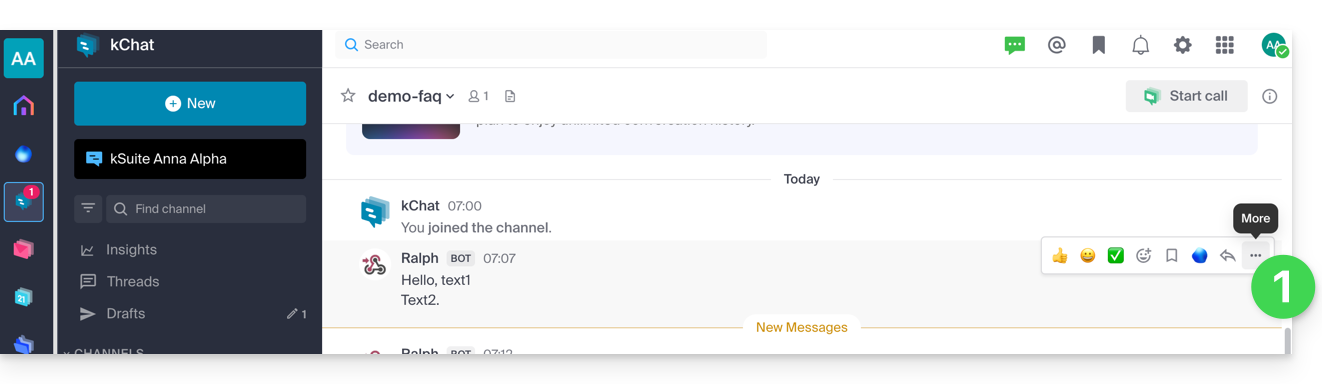
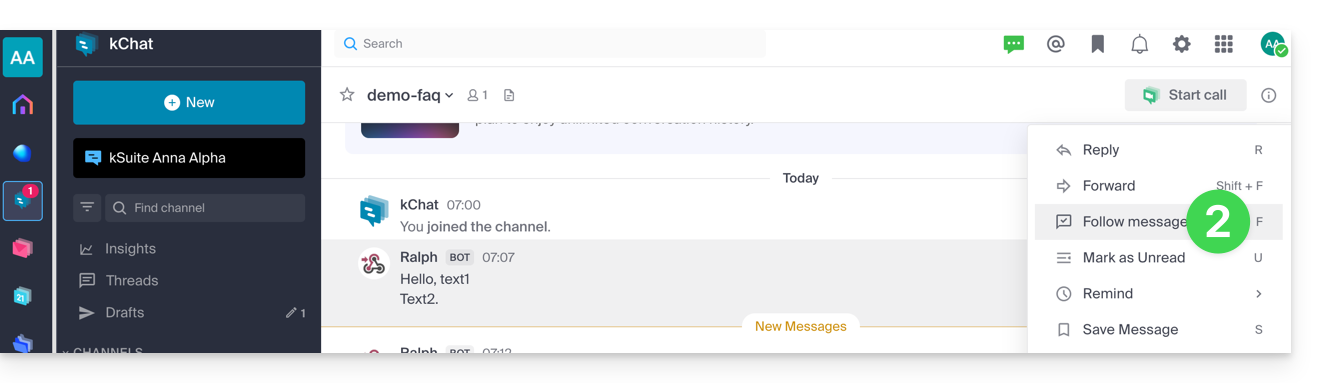
Para receber uma notificação sobre uma nova mensagem em um tópico de discussão (tópico) específico, mesmo que você não seja um participante direto, você precisa ativar o Acompanhamento:
- basta passar o mouse sobre o menu de ações ••• à direita de um usuário em uma discussão:
- e clicar em Mais…:
- e, em seguida, em Acompanhar mensagem:
- e clicar em Mais…:
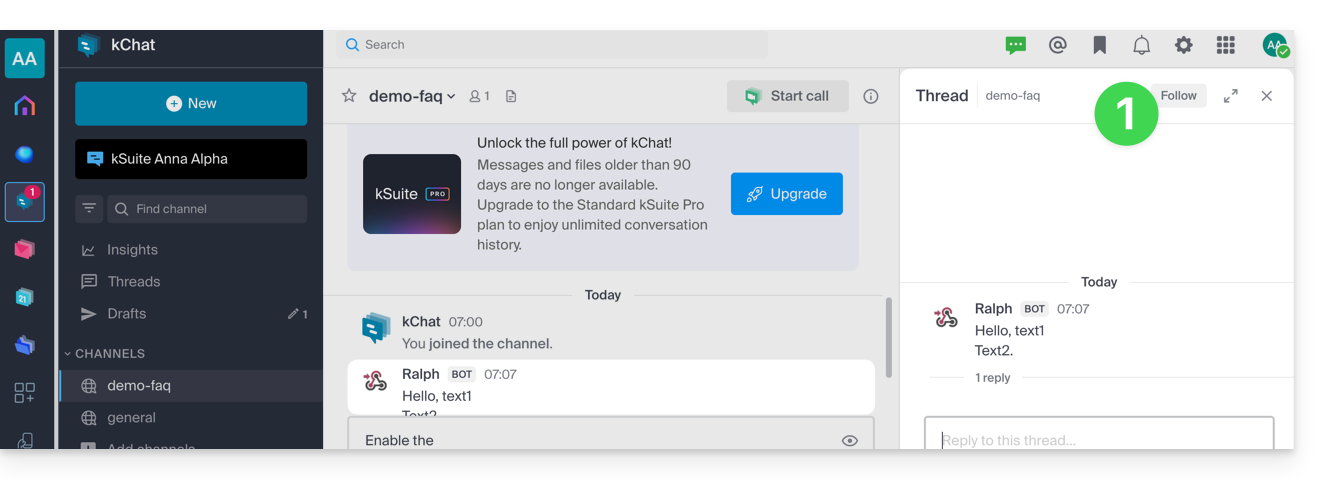
- seja em um tópico de discussão (resposta a uma mensagem):
- clique em Seguir no topo da discussão (você passa a seguir automaticamente a discussão a partir do momento em que publica uma mensagem e, em seguida, poderá clicar em Parar de seguir os comentários deste tópico):
- clique em Seguir no topo da discussão (você passa a seguir automaticamente a discussão a partir do momento em que publica uma mensagem e, em seguida, poderá clicar em Parar de seguir os comentários deste tópico):
Link para esta FAQ: https://faq.infomaniak.com/1460
Esta seção de perguntas frequentes foi útil?
Este guia detalha o serviço de tradução automática integrado no aplicativo kChat da Infomaniak.
Traduzir o texto durante a leitura
Para traduzir automaticamente para o seu idioma uma mensagem recebida redigida em um idioma estrangeiro:
- Clique aqui para acessar o aplicativo web kChat da Infomaniak (serviço online ksuite.infomaniak.com/kchat) ou abra o aplicativo móvel (aplicativo para smartphone ou tablet iOS / Android) ou o aplicativo para desktop (aplicativo para computador em macOS / Windows / Linux).
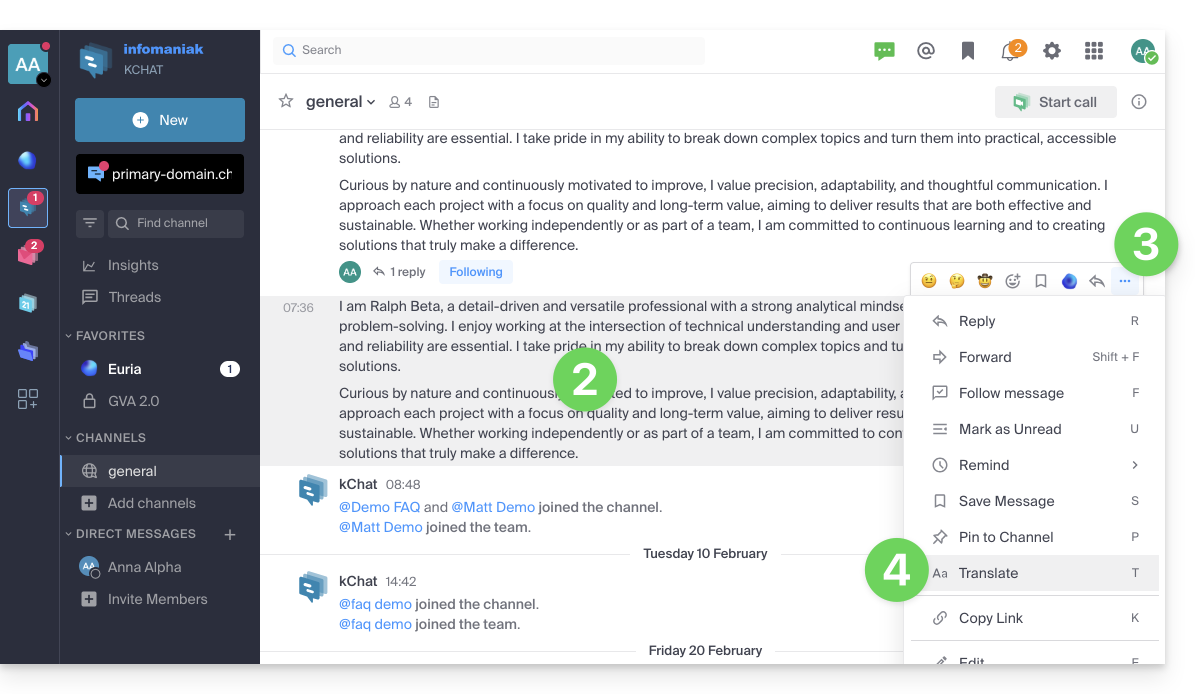
- Acesse a mensagem que deseja traduzir.
- Clique no menu de ações ••• localizado no canto superior direito do item em questão.
- Clique em Traduzir:
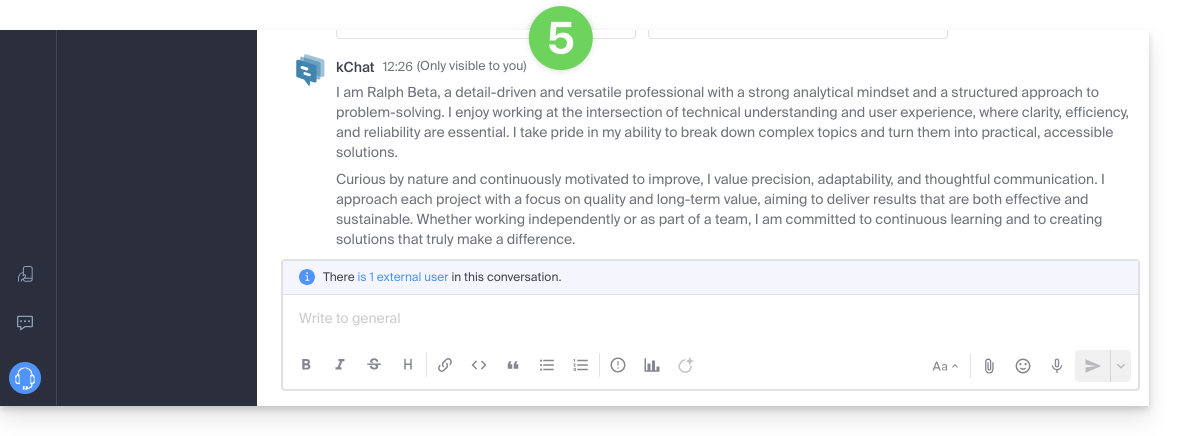
- A mensagem traduzida é exibida após a última mensagem da sua conversa e só é visível para você:
Traduzir o texto com o Euria durante a redação
Pode pedir ao Euria para traduzir o texto que está a redigir:
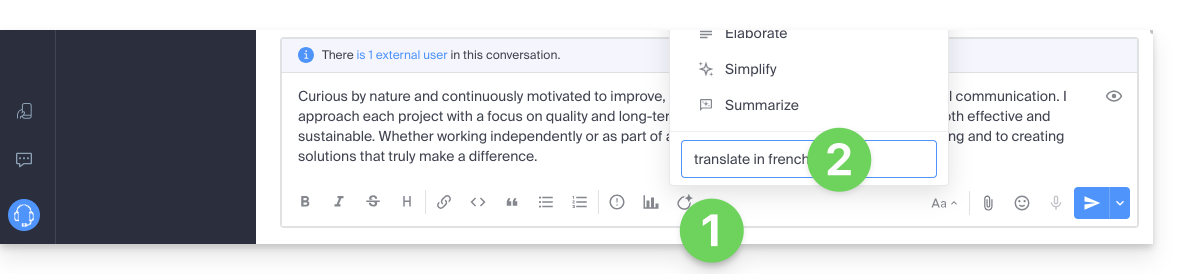
- Clique no ícone Euria.
- Indique as suas instruções:
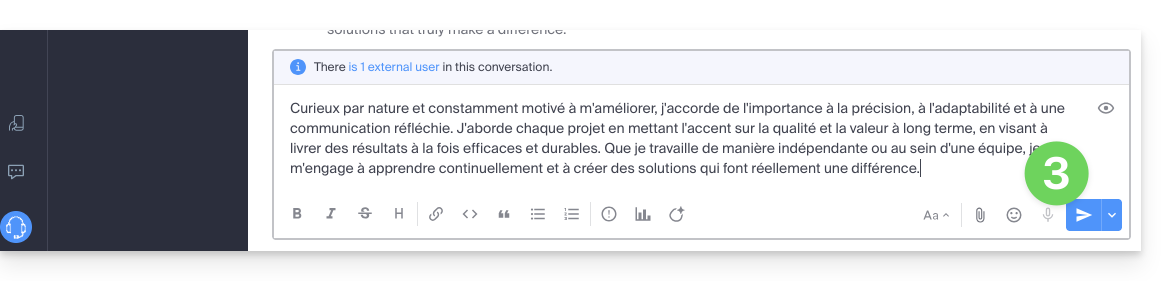
- O texto será então exibido no idioma desejado e você poderá enviá-lo da seguinte forma:
Link para esta FAQ: https://faq.infomaniak.com/1467
Esta seção de perguntas frequentes foi útil?
Este guia explica como receber automaticamente todas as manhãs na sua caixa de entrada Mail e/ou kChat o resumo das suas atividades registadas no Calendar Infomaniak.
Introdução
- Esta funcionalidade está desativada por defeito em todos os calendários.
- Este resumo é enviado para o seu endereço de e-mail, o mesmo que utiliza para aceder à sua conta Infomaniak (❓: ajuda).
- Contém a lista de todos os eventos do dia com as suas informações mais importantes (link do kMeet, localização, horários, etc.).
- Pode até enviar este calendário diário para a sua equipa ou para o seu assistente, para que saibam qual o melhor momento para o contactar, incluindo a criação de uma regra de envio automático com base nos critérios correspondentes ao e-mail recebido.
Obter um calendário de forma automática e diária
Pré-requisitos
- Para enviar um resumo no kChat, é necessário ter o kChat instalado na sua organização.
Para começar o dia consultando uma mensagem na sua caixa de entrada Infomaniak, que contém a programação baseada na sua agenda Infomaniak:
- Clique aqui para acessar as Configurações Calendário na sua kSuite Infomaniak (❓: ajuda).
- Verifique ou selecione a Organização correspondente no menu suspenso do menu lateral esquerdo.
- Se precisar modificá-la, volte às configurações clicando no item de lembrete diário para acessar as configurações:
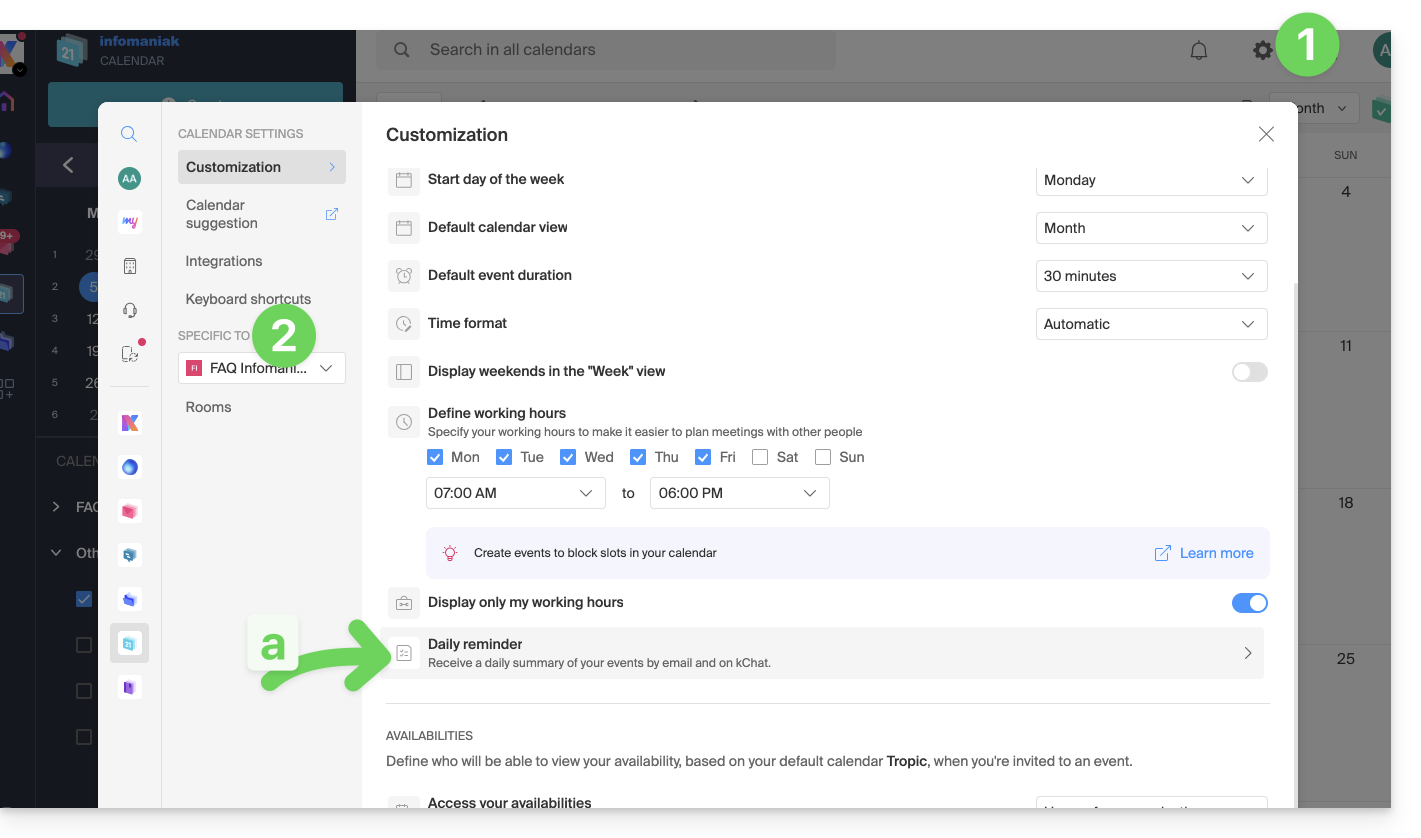
- Se precisar modificá-la, volte às configurações clicando no item de lembrete diário para acessar as configurações:
- Clique no botão para Adicionar um lembrete diário e configurá-lo:
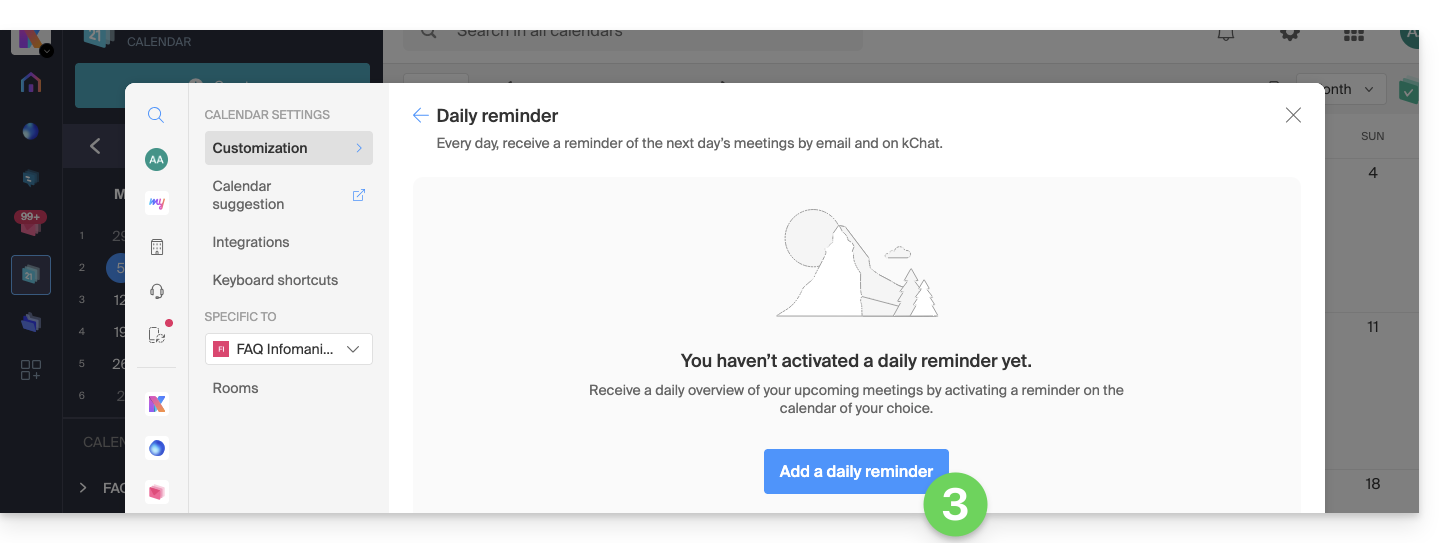
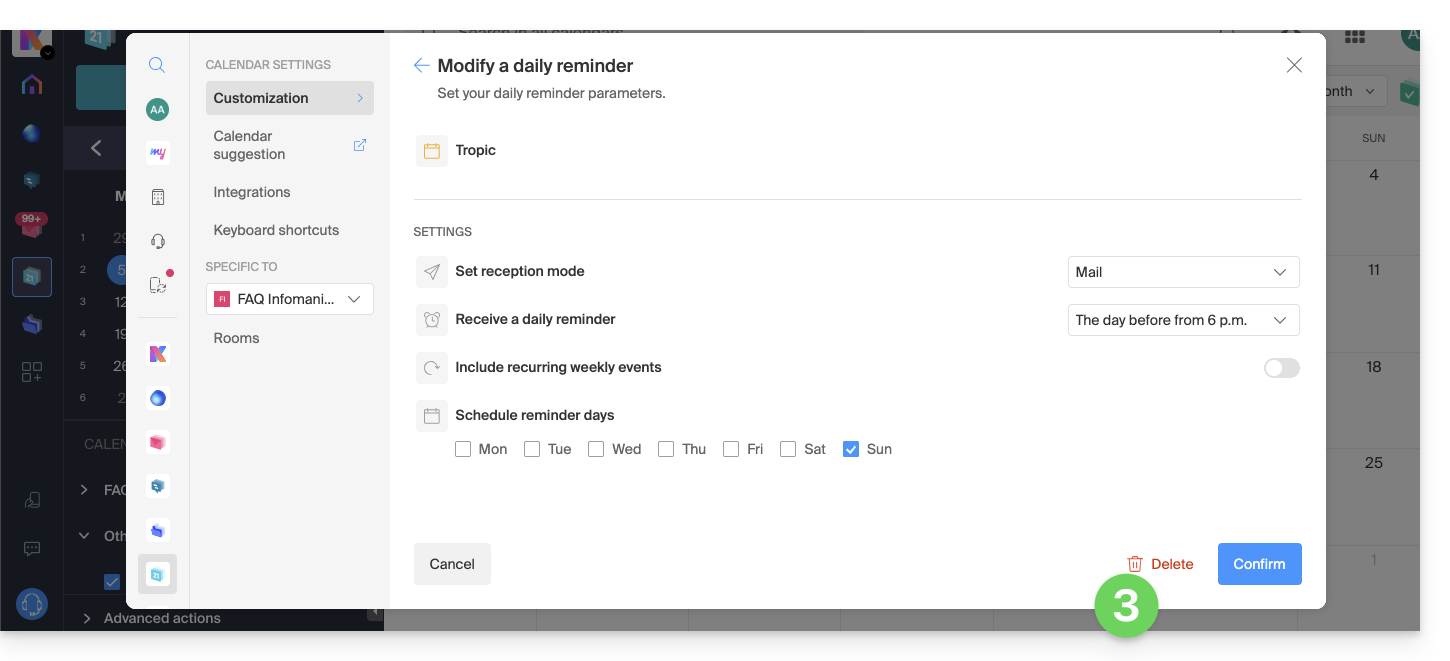
Para personalizar o seu lembrete de acordo com as suas necessidades:
- Selecione o calendário em questão.
- Escolha o modo de receção (E-mail, kChat ou ambos).
- Escolha o momento em que deseja receber o lembrete (na noite anterior ou no início do dia).
- Escolha se deseja incluir ou não os eventos recorrentes (❓: ajuda).
- Escolha os dias em que o lembrete diário será enviado.
- Confirme suas escolhas na parte inferior da página:
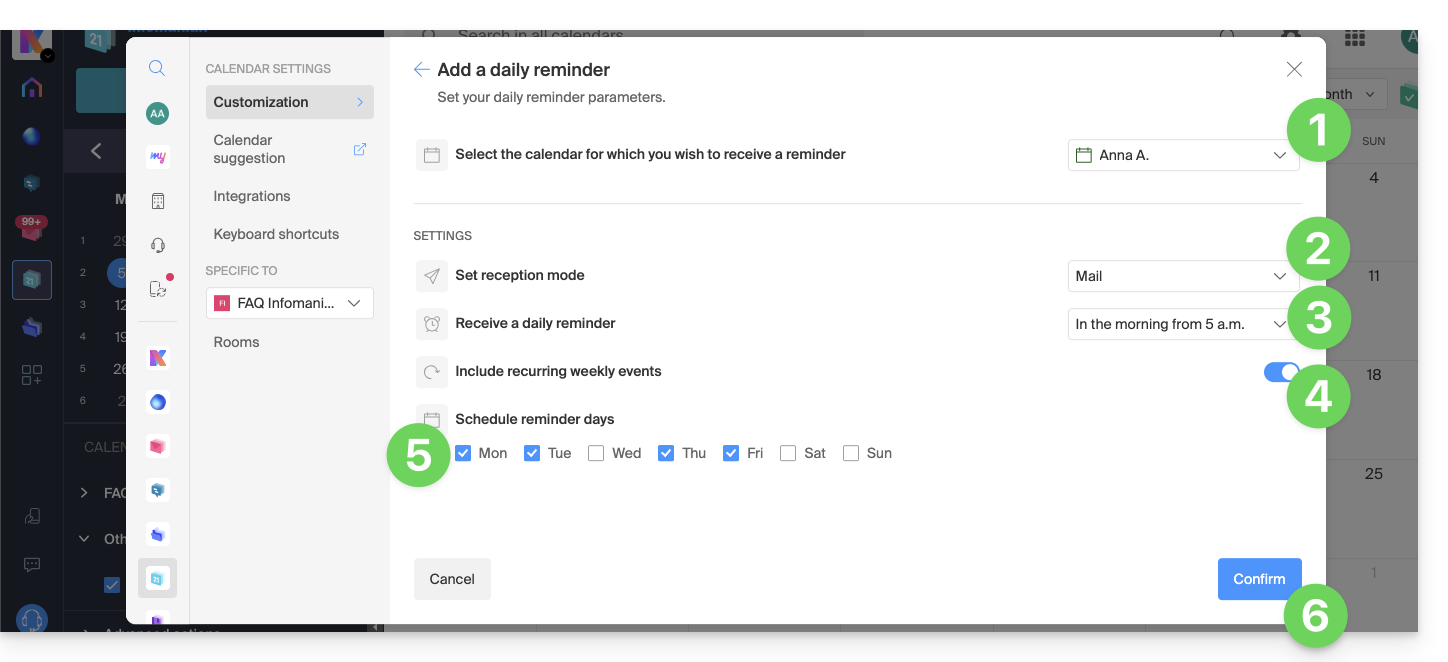
Desativar o lembrete diário
Para interromper o envio do resumo diário por e-mail ou por Euria no kChat:
- Clique no link localizado na parte inferior da notificação recebida:
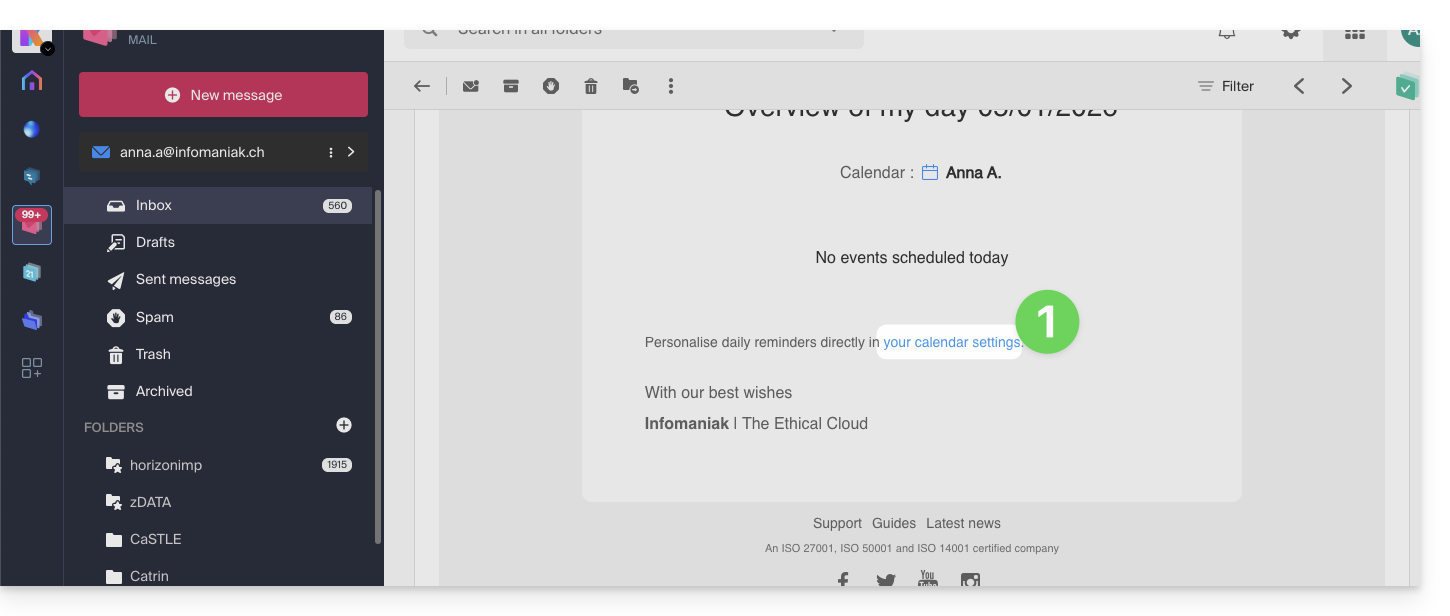
- Clique no lembrete para removê-lo:
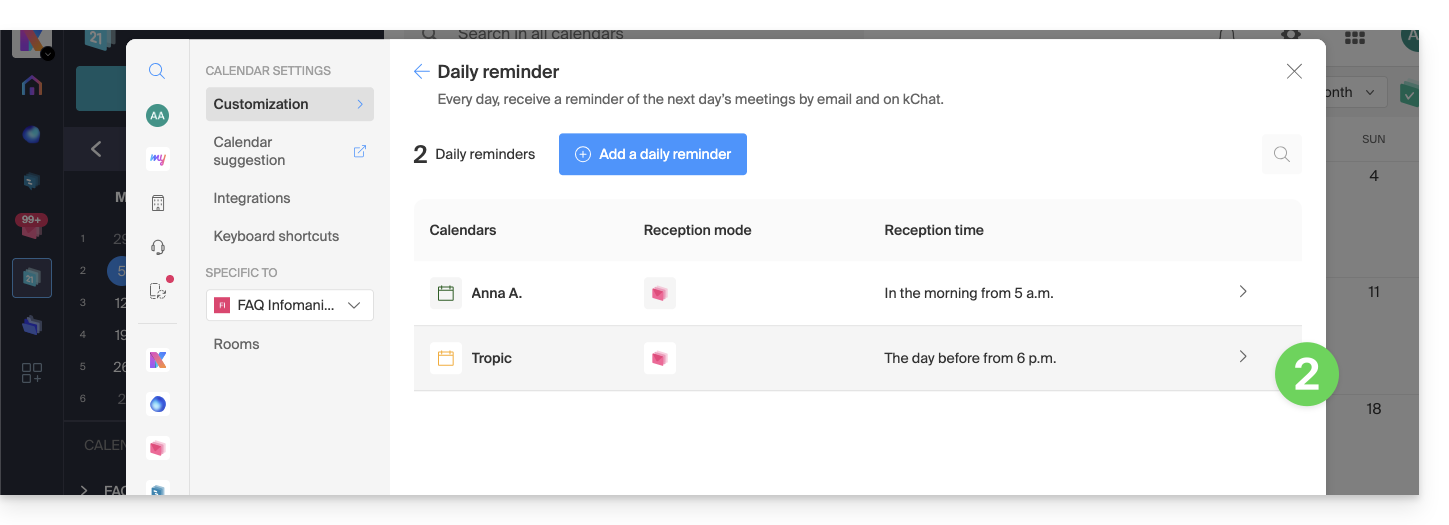
- Remova o lembrete a partir da página de edição:
Link para esta FAQ: https://faq.infomaniak.com/1622
Esta seção de perguntas frequentes foi útil?
Este guia explica como obter uma notificação para revisar uma mensagem específica do kChat em um horário determinado/personalizável (dependendo das ofertas, veja abaixo), em intervalos de 30 minutos.
✘ INDISPONÍVEL com
my kSuite / my kSuite+ (ik.me, etik.com, ikmail.com)
kSuite Free não permite a personalização do horário ao programar.
Agendar o envio de uma mensagem kChat para um horário específico
Para visualizar novamente uma mensagem por meio de uma notificação no futuro:
- Passe o cursor sobre a mensagem que deseja lembrar e selecione o ícone de ações adicionais ••• no canto superior direito.
- Clique em Lembrete.
- Escolha o momento em que deseja receber a notificação:
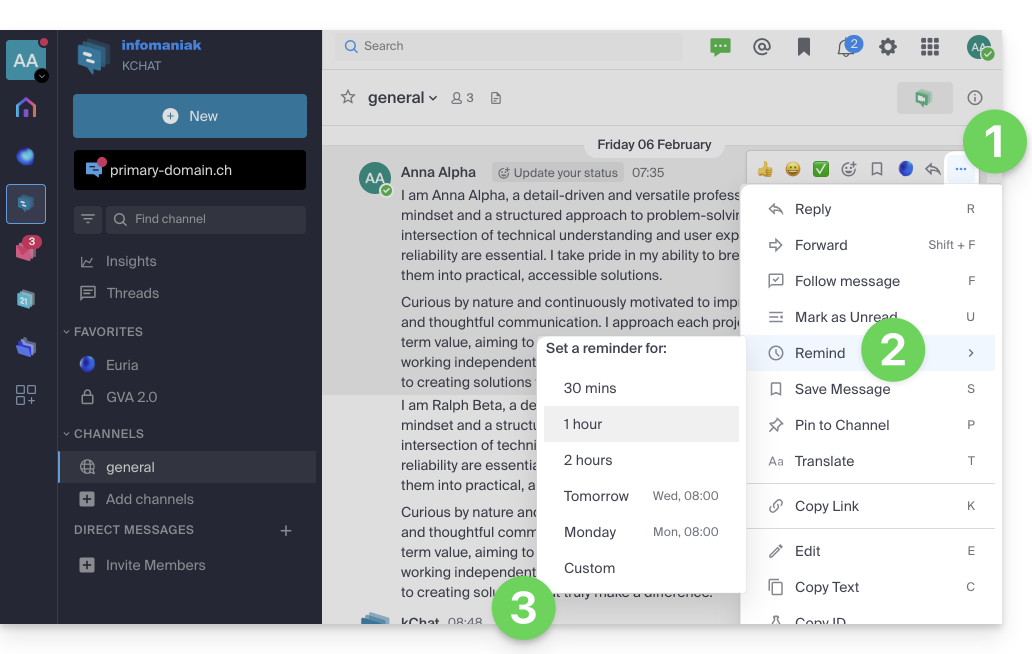
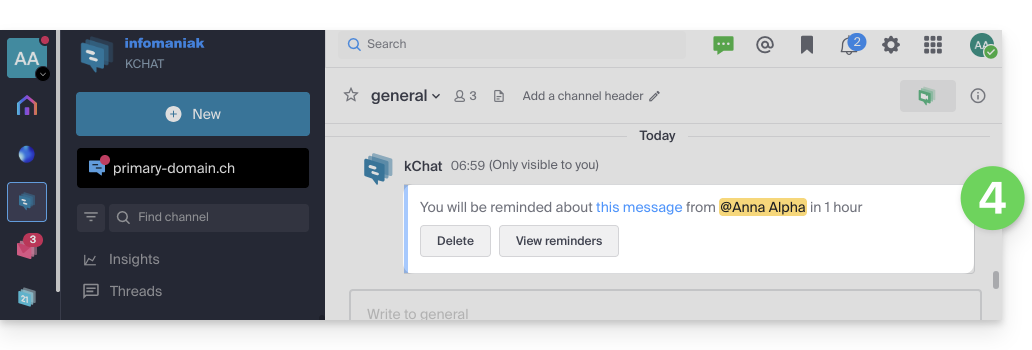
- Uma notificação no canal (visível apenas para você) indica o próximo lembrete da mensagem:
- Assim, no momento escolhido, você receberá uma notificação do canal Euria no menu lateral esquerdo, que o levará ao lembrete contendo uma citação da mensagem, bem como as informações necessárias para consultar a mensagem, programar um novo lembrete para mais tarde, cancelar outros lembretes, etc.
- Os lembretes agendados para o futuro podem ser visualizados a qualquer momento digitando o comando slash (❓: ajuda) “
/lembretes” no campo de redação de qualquer canal: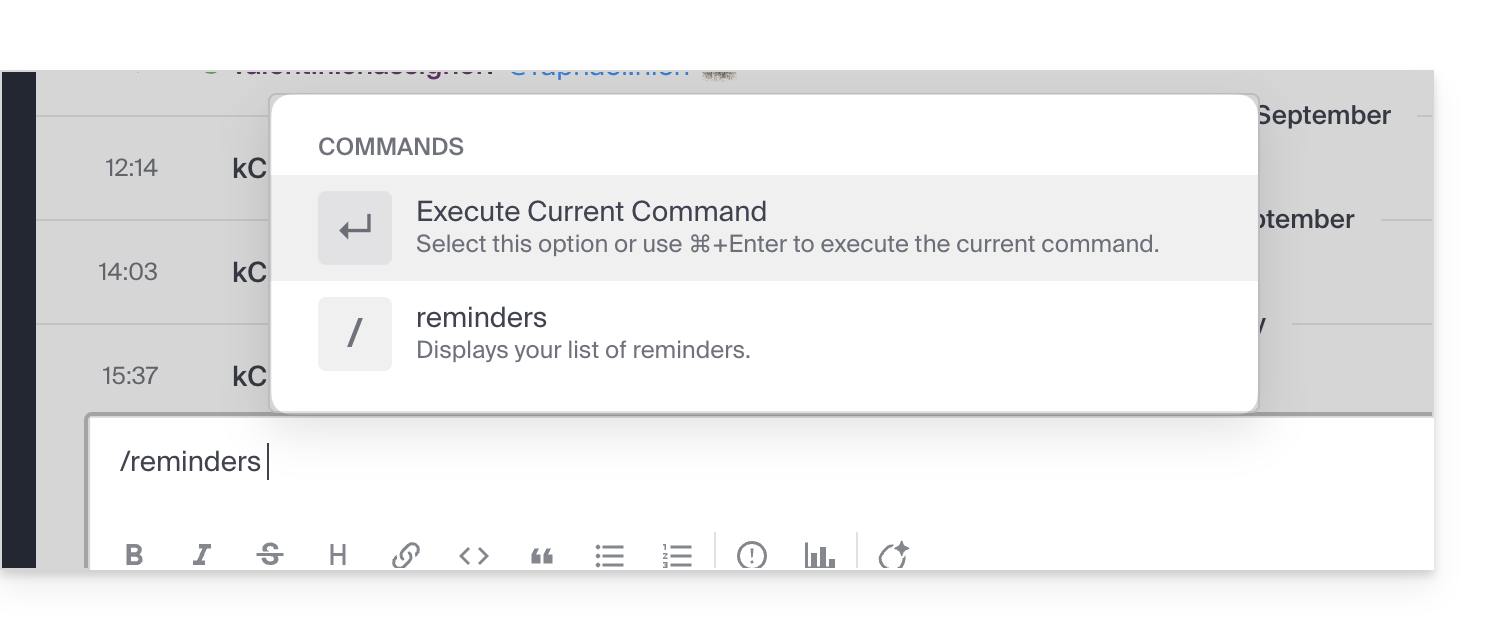
Link para esta FAQ: https://faq.infomaniak.com/1664
Esta seção de perguntas frequentes foi útil?
Este guia detalha o que é possível pesquisar no aplicativo web Mail da Infomaniak (serviço online ksuite.infomaniak.com/mail) ou em outros serviços da kSuite. Para pesquisar no kDrive, consulte este outro guia.
Pesquisar um e-mail
Em ksuite.infomaniak.com/mail, digite na barra de pesquisa, localizada na parte superior da página, o termo que deseja encontrar.
A pesquisa será efetuada no endereço de e-mail indicado na barra lateral esquerda(para pesquisar em vários endereços de e-mail ao mesmo tempo, utilize um software/cliente de e-mail IMAP no qual você conecta seus diferentes endereços):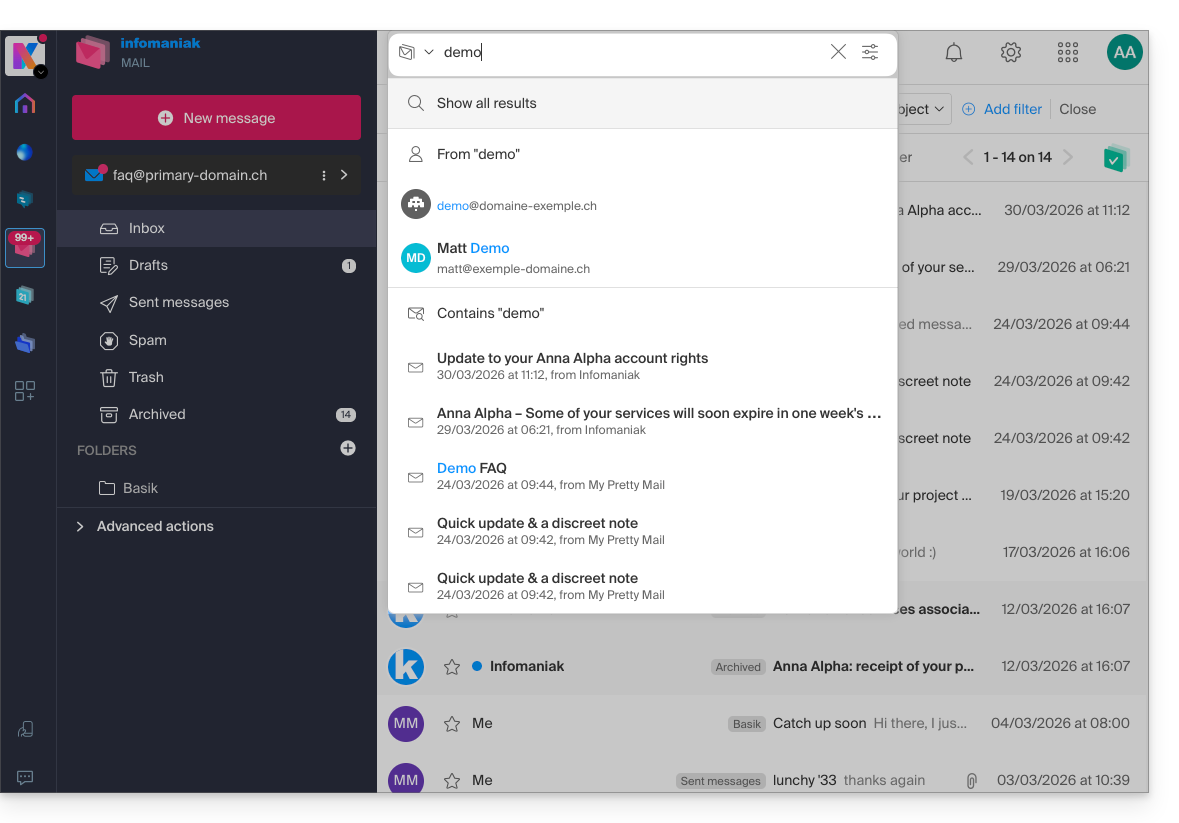
A pesquisa avançada está acessível à direita do campo de pesquisa na parte superior do seu Mail: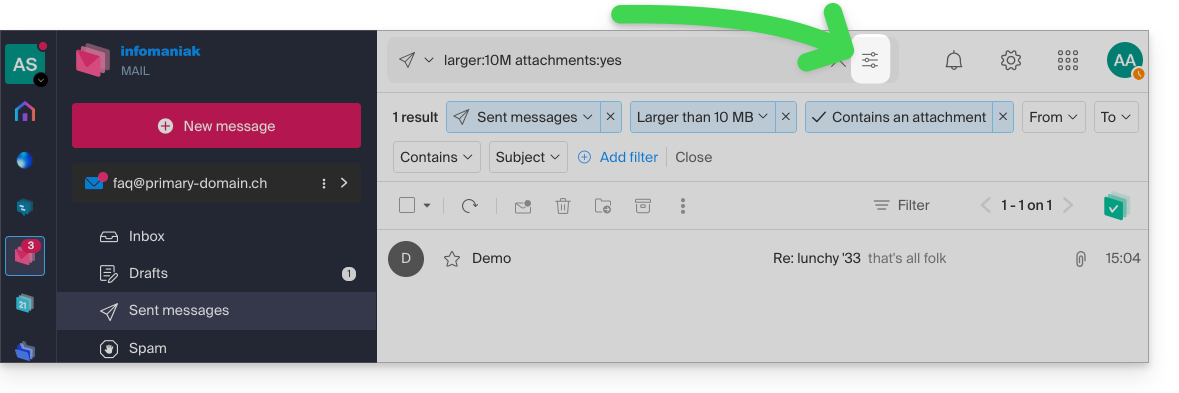
Pode pesquisar conteúdo…
- seja no corpo da mensagem,
- seja no seu assunto,
- seja entre os seus remetentes/destinatários…
Você também pode filtrar a pesquisa por tamanho da mensagem e pela presença ou ausência de anexos.
Em relação ao escopo das pesquisas:
- O conteúdo dos e-mails criptografados não é indexado (exceto o assunto do e-mail).
- O conteúdo dos anexos, assim como o seu nome, não é indexado: portanto, não é possível encontrar um e-mail pesquisando o nome do arquivo associado a ele.
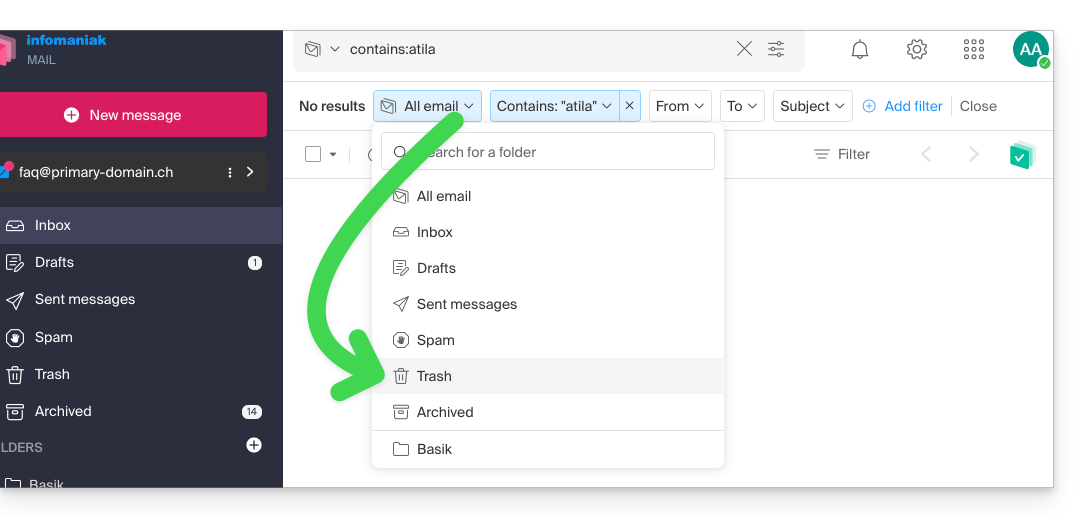
- A opção "Pesquisar todos os e-mails" não inclui a Lixeira nem a pasta de Spam:
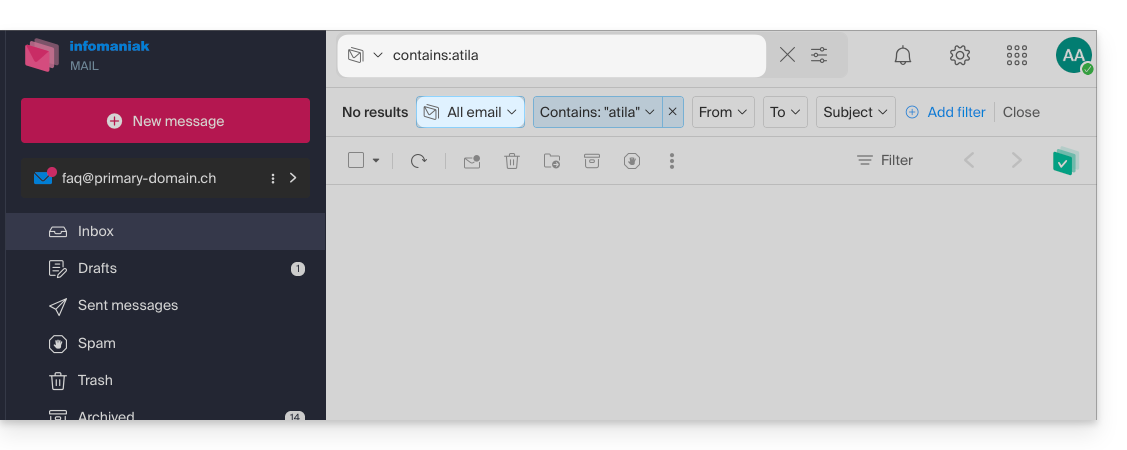
- Se uma pesquisa global não retornar resultados, é possível que o e-mail esteja em uma dessas duas pastas.
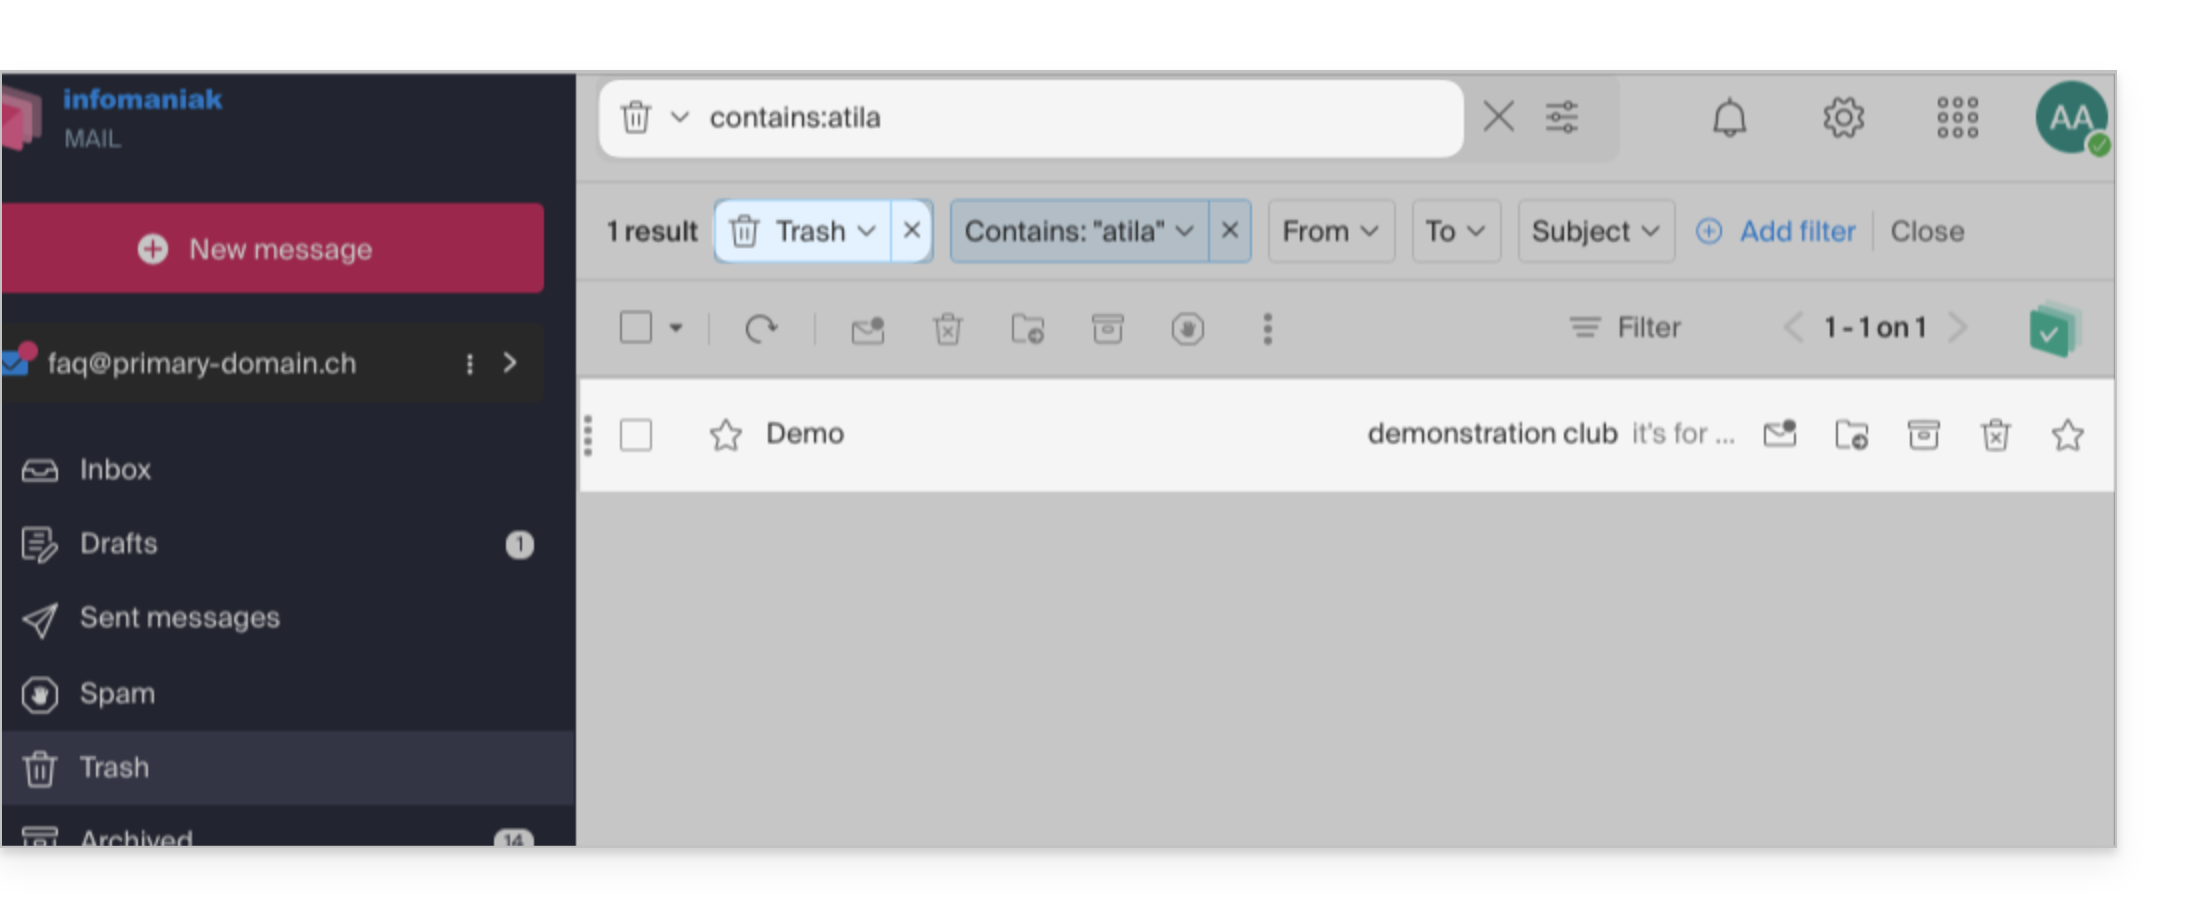
- Nesse caso, você precisará acessar especificamente a Lixeira ou a pasta de Spam para realizar a pesquisa, ou então iniciar a pesquisa selecionando um desses dois itens:
- Os resultados encontrados serão exibidos:
- Da mesma forma, quando você deseja encontrar uma mensagem em um diretório específico, é melhor acessá-lo primeiro pelo menu lateral esquerdo e, em seguida, iniciar a pesquisa.
Para pesquisar o histórico de um e-mail ou verificar sua atividade, você também pode pesquisar nos registros de um endereço de e-mail.
A pesquisa de e-mails com um software/cliente de e-mail
Para saber como o seu aplicativo de e-mail específico realiza as pesquisas, consulte a documentação. Por exemplo, os aplicativos de desktop Thunderbird e Outlook podem sincronizar as mensagens localmente e realizar as pesquisas localmente, enquanto outros aplicativos podem preferir a pesquisa no servidor IMAP e, nesse caso, o software/cliente de e-mail envia um comando de pesquisa ao servidor, que então pesquisa em todas as mensagens armazenadas no servidor e retorna os resultados ao software/cliente de e-mail.
Pesquisar um contato nos catálogos de endereços
A pesquisa de um item é realizada automaticamente em todos os seus catálogos de endereços, grupos, contatos, através do campo de pesquisa na parte superior da interface ksuite.infomaniak.com/contacts: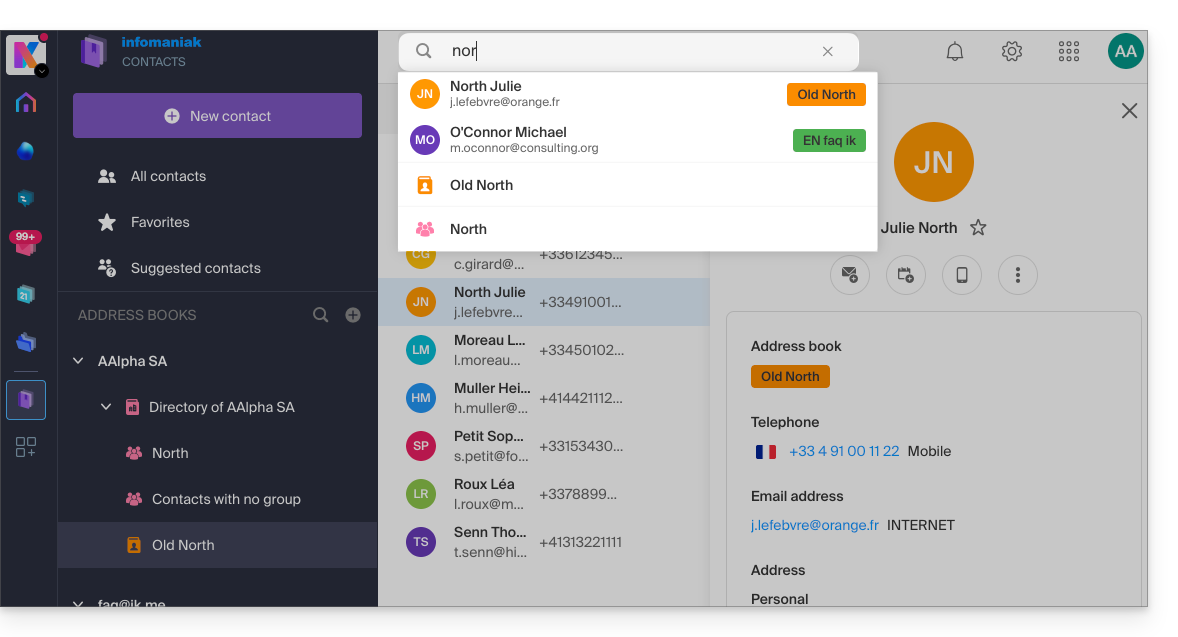
Pesquisar um evento nos calendários
A pesquisa de um item em ksuite.infomaniak.com/calendar é realizada automaticamente em todos os seus calendários, eventos, salas, incluindo a descrição destes e as pessoas que estavam associadas a eles (se clicar em um contato, obterá os eventos em comum com esse contato):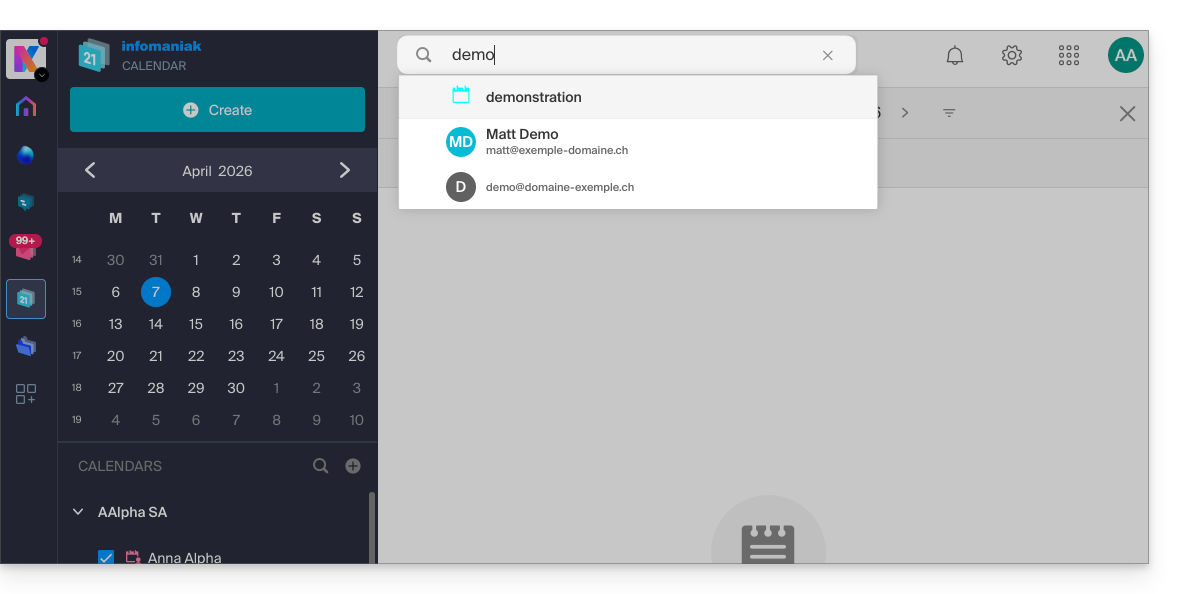
Pesquisar no kChat
A pesquisa de um elemento em ksuite.infomaniak.com/kchat é realizada através do campo de pesquisa principal para encontrar mensagens, respostas ou o conteúdo de arquivos: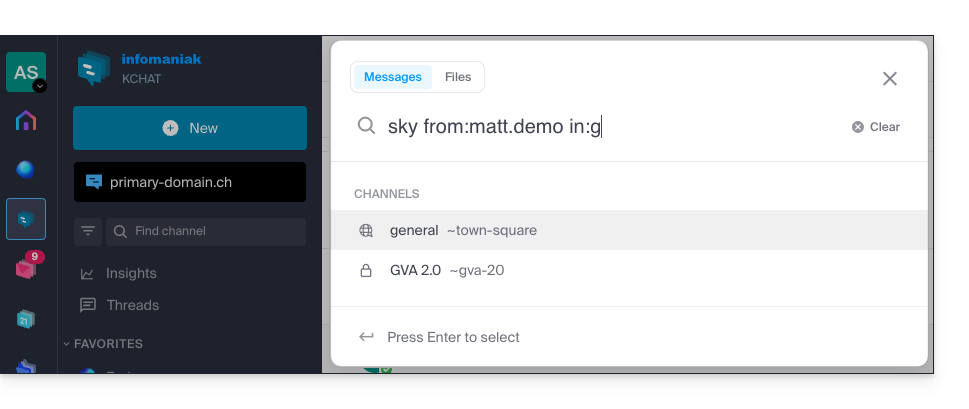
Para refinar os seus resultados, vários modificadores de pesquisa estão à sua disposição:
from:: para encontrar as mensagens enviadas por um utilizador específico (ex:from:jean.dupont).in:: para restringir a pesquisa a um canal público, um canal privado ou uma mensagem direta específica (ex:in:nome-do-canal).before:,after:,on:: para especificar uma data (no formato AAAA-MM-DD) ou um período preciso (ex:on:2026-09-01).
Excluir um canal ou termos de uma pesquisa (exclusões)
É possível excluir certos resultados da pesquisa usando o hífen - antes de um termo ou modificador. Esta é uma funcionalidade extremamente útil para filtrar resultados irrelevantes:
- Excluir um canal: adicione
-in:nome-do-canalà sua pesquisa para excluir completamente os resultados provenientes desse canal. - Excluir uma palavra: digite
teste -liberaçãopara que os resultados incluam o termo "teste", excluindo ao mesmo tempo as mensagens que contenham "liberação". - Excluir um utilizador: digite
-from:utilizadorpara ocultar as mensagens enviadas por essa pessoa específica.
Pode combinar perfeitamente estas exclusões. Por exemplo, a pesquisa test -release -in:release-discussion -from:anna encontrará a palavra "test", excluindo a palavra "release", ignorando completamente o canal "release-discussion" e excluindo as mensagens da utilizadora “anna”.
Link para esta FAQ: https://faq.infomaniak.com/1733
Esta seção de perguntas frequentes foi útil?
Este guia detalha o princípio das conversas kChat, organizadas em Canais de discussão privados e públicos, e de discussões diretas entre utilizadores.
Iniciar uma conversa
Para enviar uma mensagem a um utilizador da sua organização, clique no nome dele na lista de membros, no lado esquerdo da sua interface kChat: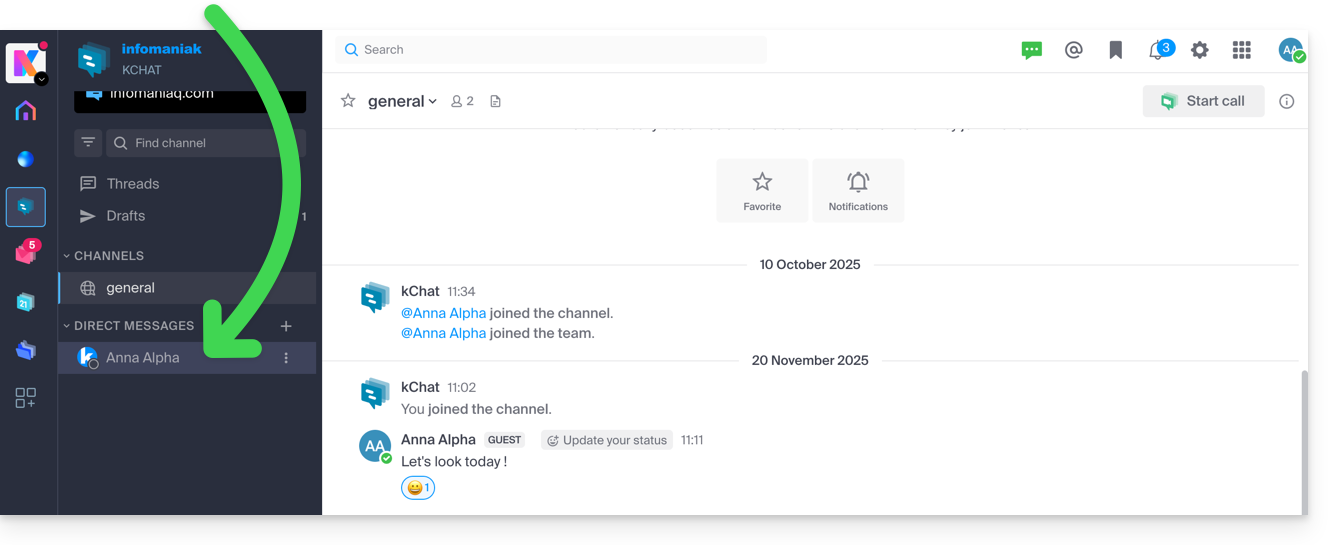
Também pode clicar no + à direita de Mensagens pessoais para selecionar até 7 membros e, assim, criar uma conversa em grupo: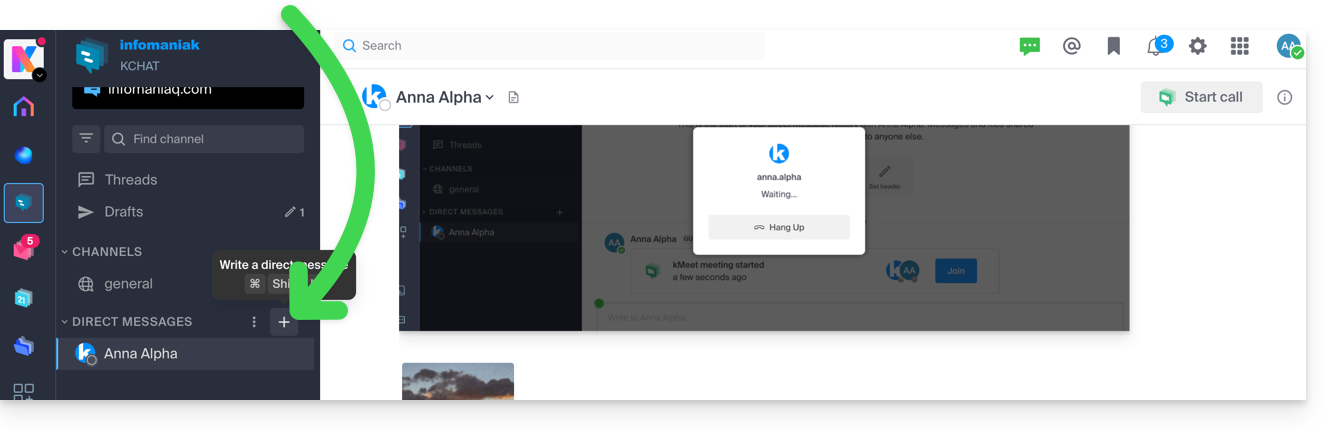
Redija e envie sua mensagem pressionando o botão de envio: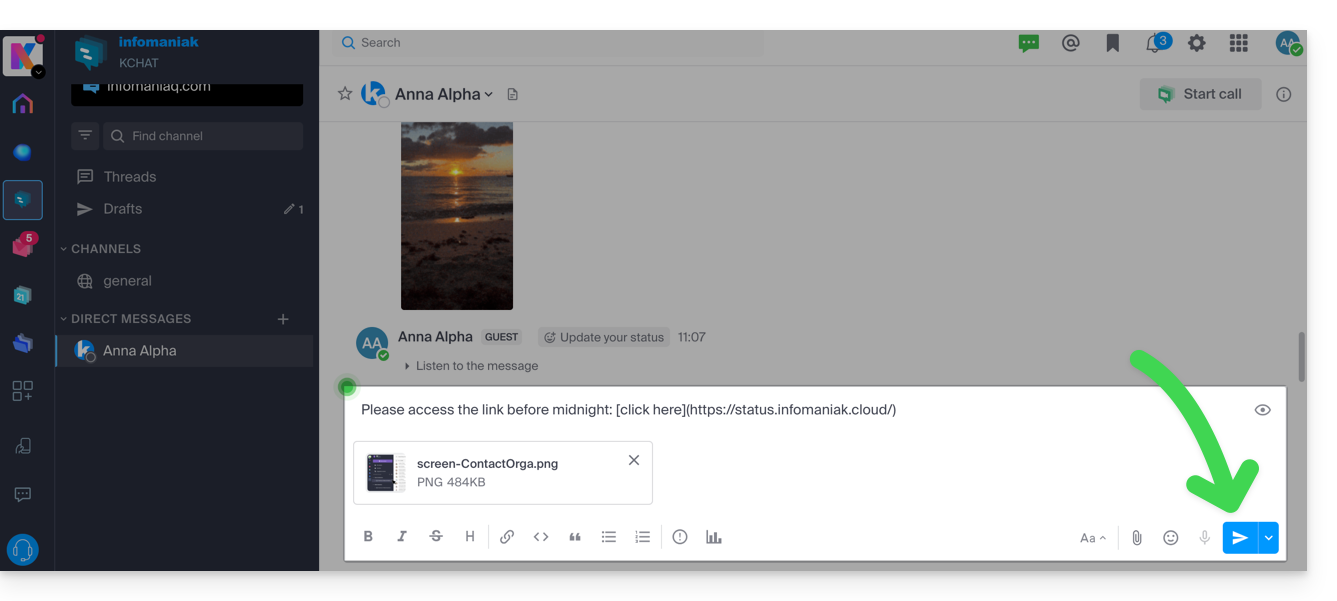
Se necessário, você pode anexar arquivos de até 100 MB. Você também pode usar as “reações”.
Envio agendado: programe uma mensagem
✘ INDISPONÍVEL com
my kSuite / my kSuite+ (ik.me, etik.com, ikmail.com)
O kSuite Free não permite a personalização do horário ao programar o envio.
Para programar o envio para uma data/hora posterior, basta clicar na seta para a direita do botão de envio e escolher o momento em que a mensagem deverá ser enviada: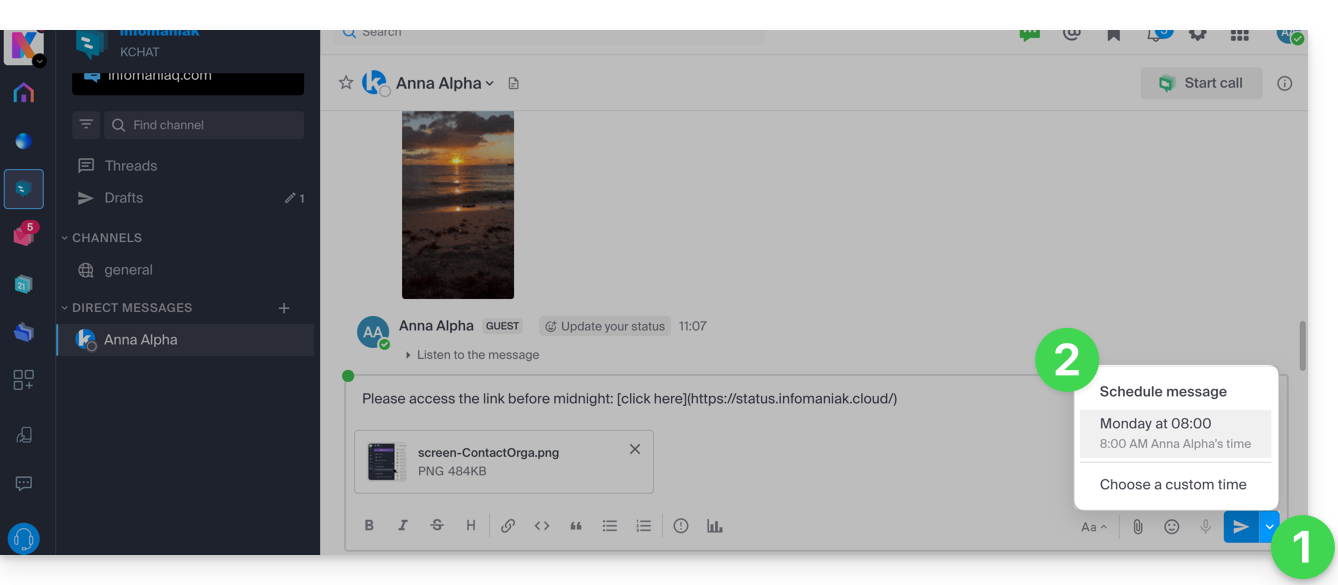
No aplicativo móvel kChat (aplicativo para smartphone ou tablet iOS/Android), pressione o botão de envio por alguns segundos e um menu para agendar a mensagem será exibido.
Mencionar outro usuário
Para contatar um dos membros da Organização (ou um Grupo) por meio de uma mensagem, digite o símbolo "@" para exibir as pessoas ou os canais que podem ser mencionados:

Atenção: dependendo do tipo de canal, mencionar um usuário exibirá uma mensagem que permite adicioná-lo à conversa (ou notificá-lo); caso contrário, ele não verá a menção.
Solicitar confirmação de leitura
Para que os utilizadores possam confirmar o recebimento da sua mensagem e indicar que a leram, ative a confirmação de leitura antes de enviar a mensagem no canal, clicando no ícone (!) e ativando o botão de alternância (toggle switch):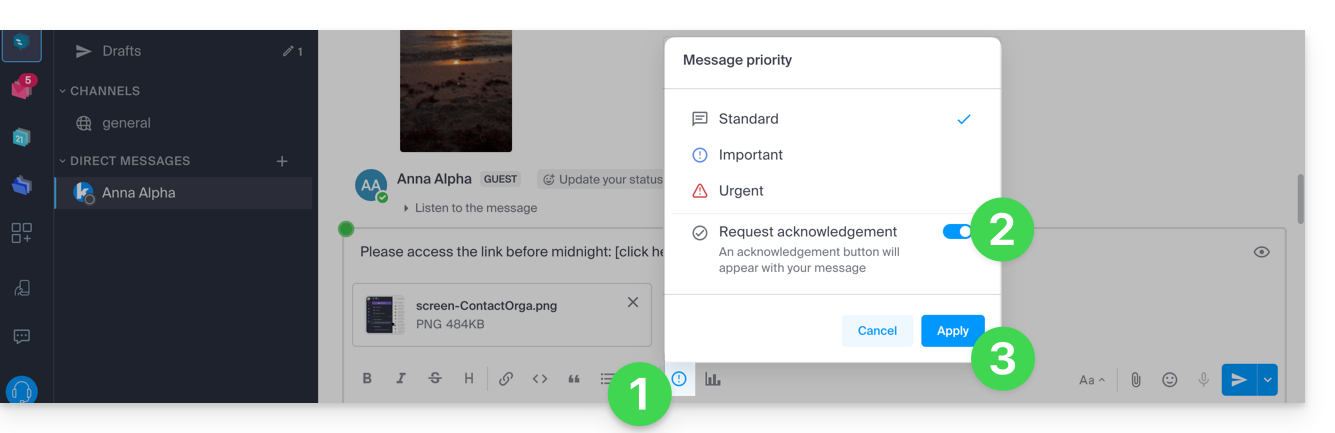
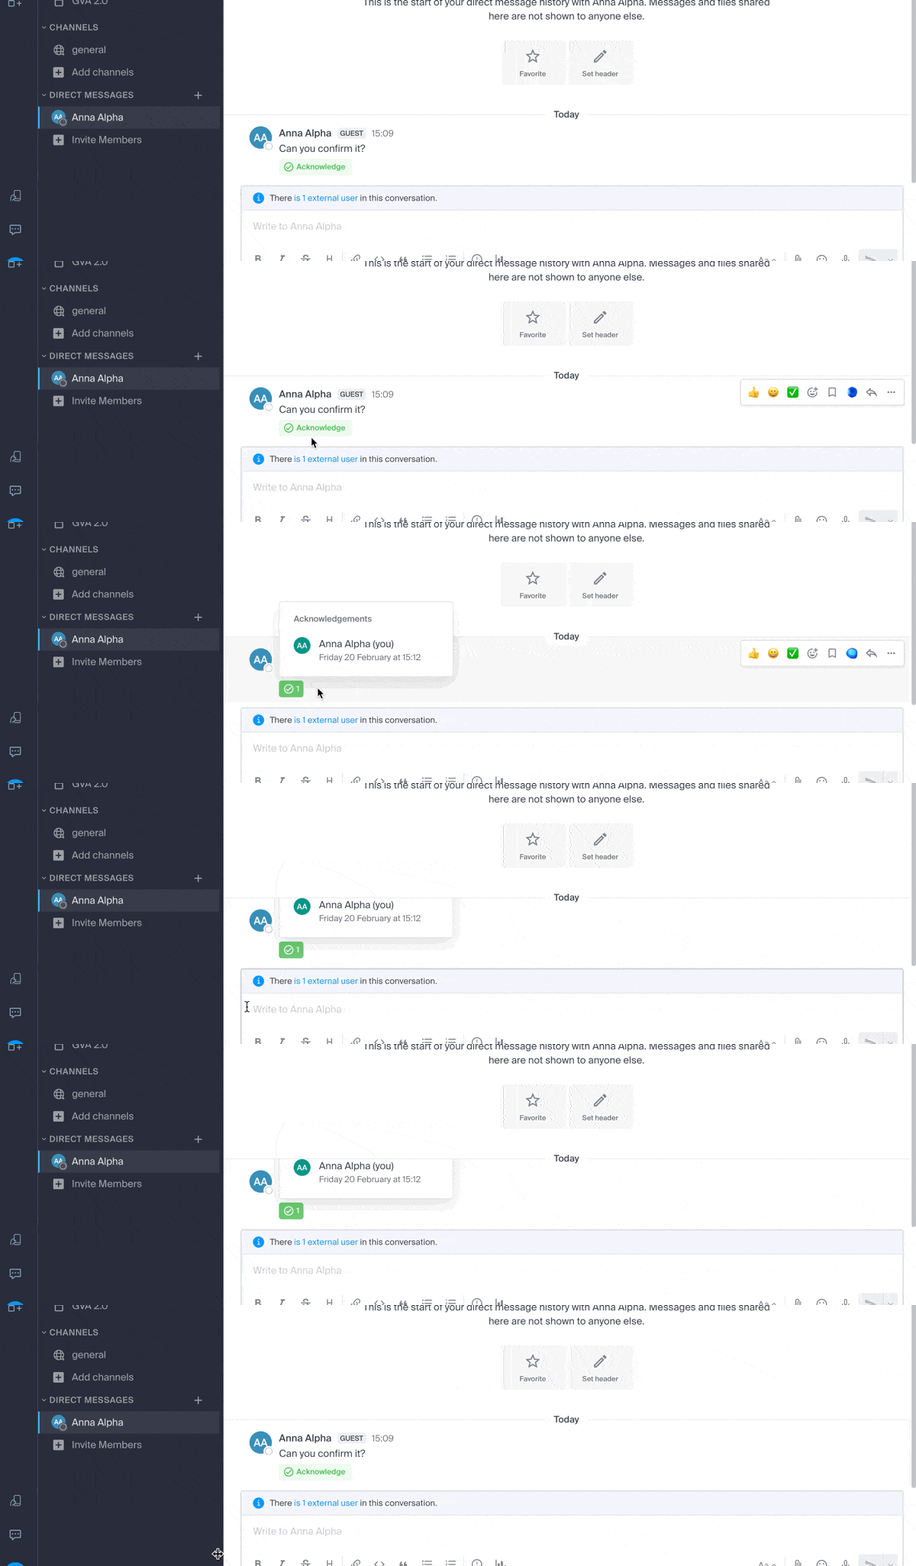
Após o envio da mensagem, o resultado será o seguinte:
Editar/excluir uma mensagem ou fixá-la
Para editar uma mensagem (que exibirá então uma indicação de mensagem editada), clique no menu de ações à direita da mensagem que deseja editar. No mesmo local, você também pode excluir sua mensagem, que desaparecerá da discussão para todos os usuários:
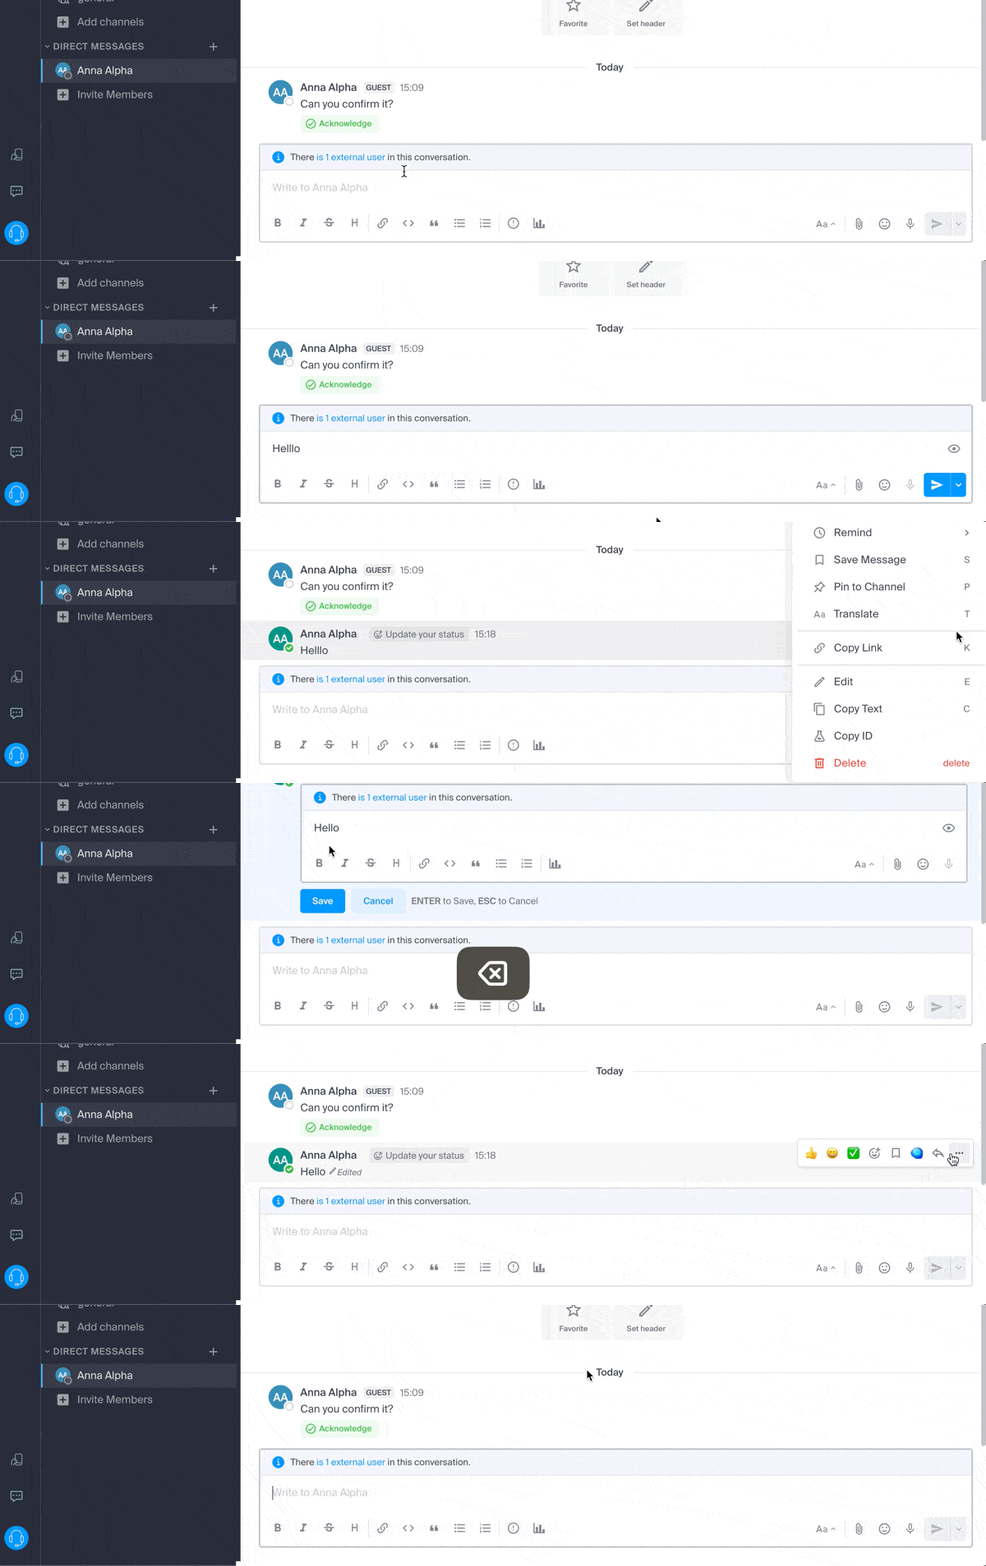
Uma indicação sobre a exclusão aparecerá para todos os outros usuários do canal, no local original da mensagem.
No mesmo local, você pode fixar uma mensagem:
- As mensagens fixadas são visíveis para todos os membros do canal, seja ele público ou privado.
- As mensagens fixadas em um canal privado só são acessíveis aos membros desse canal.
- Você pode consultar a lista de todas as mensagens fixadas através da opção «Mensagens fixadas» do canal.
- Para remover uma mensagem fixada, passe o cursor sobre ela novamente e selecione «Remover fixação».
Organizar as conversas no kChat
O tipo de ordenação para os elementos que você gerencia no lado esquerdo da tela é muito importante.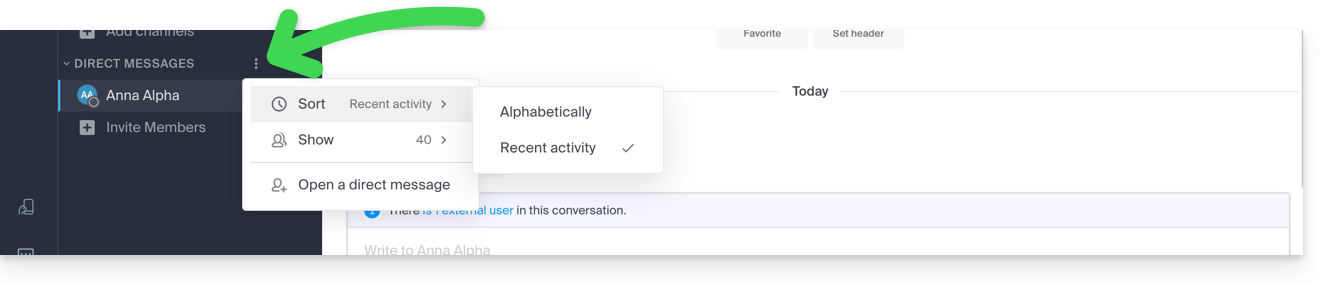
Imagine abrir o kChat após vários dias de ausência: as conversas não lidas serão exibidas umas abaixo das outras. Após ler essas conversas, você poderá querer encontrar uma informação lida em uma delas. Assim, uma ordenação por atividade recente, por exemplo (veja abaixo outras possibilidades), permite encontrar as últimas conversas que são relevantes para você.
Essa escolha do tipo de ordenação está disponível para todos os elementos: canais de discussão, categorias, mensagens diretas, etc. 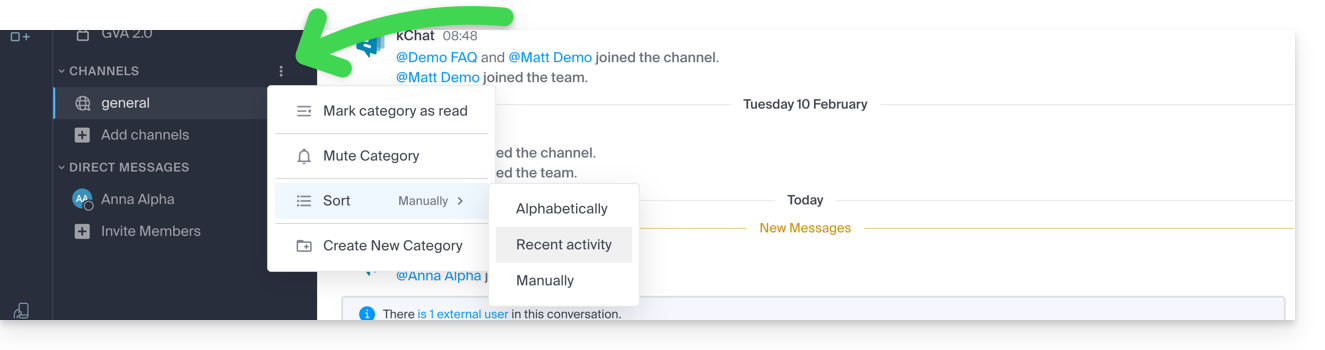
Pesquisar uma conversa
A pesquisa de elementos (palavra, participante, arquivo) está localizada na parte superior da janela. Uma vez encontrados resultados, eles aparecem no lado direito da janela: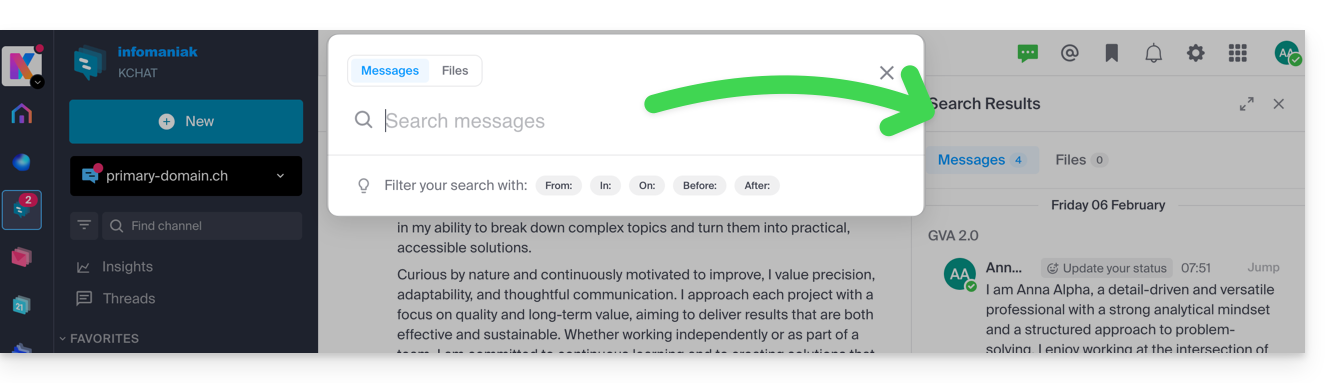
Fio de discussão
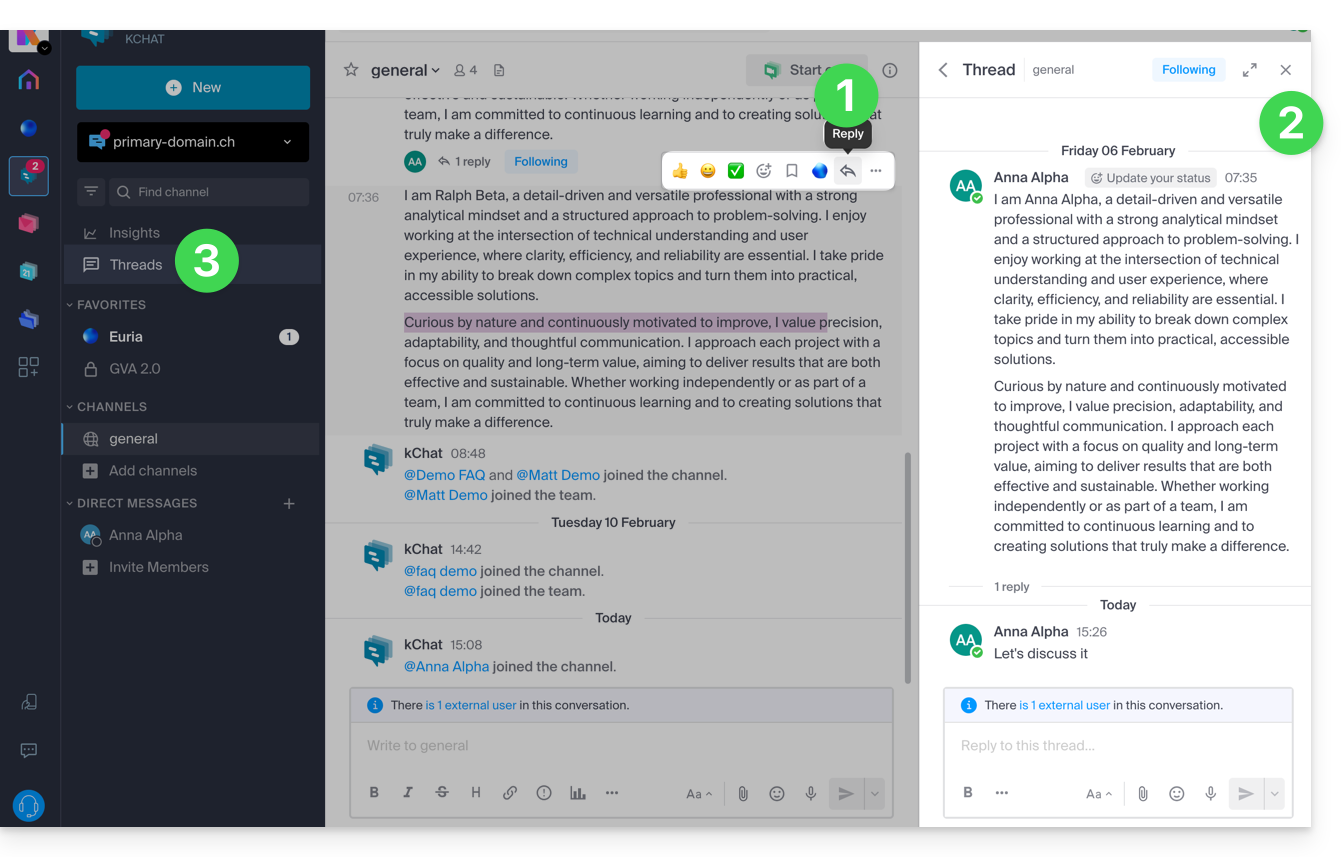
- Seja qual for o canal ou o chat privado com outro utilizador, pode iniciar um fio de discussão a partir de outro, simplesmente selecionando Responder na mensagem desejada.
- Um tópico de discussão será aberto em um painel lateral à direita, permitindo que cada utilizador do canal contribua com as suas opiniões neste tópico específico sem interromper os novos tópicos do canal em curso (este tópico pode então ser seguido ou ignorado para que não receba mais notificações quando houver novas mensagens — o acompanhamento é gerido na parte superior do painel lateral).
- Estes tópicos de discussão são, em seguida, centralizados para serem lidos e relidos na secção Tópicos de discussão da barra lateral esquerda.
Link para esta FAQ: https://faq.infomaniak.com/1758
Esta seção de perguntas frequentes foi útil?
Este guia detalha a gestão dos membros do seu serviço de chat kChat.
Consulte este outro guia se desejar gerir os canais aos quais os novos membros deverão pertencer automaticamente.
Pré-requisitos
- Ser administrador do kChat:
- Não importa o cargo na Organização; ser administrador da Organização na qual existe a kSuite (e, portanto, o kChat) não é obrigatório e, de qualquer forma, não é suficiente:
- Não importa o cargo na Organização; ser administrador da Organização na qual existe a kSuite (e, portanto, o kChat) não é obrigatório e, de qualquer forma, não é suficiente:
- Convidar um utilizador para participar no kChat.
Ver os membros de um canal
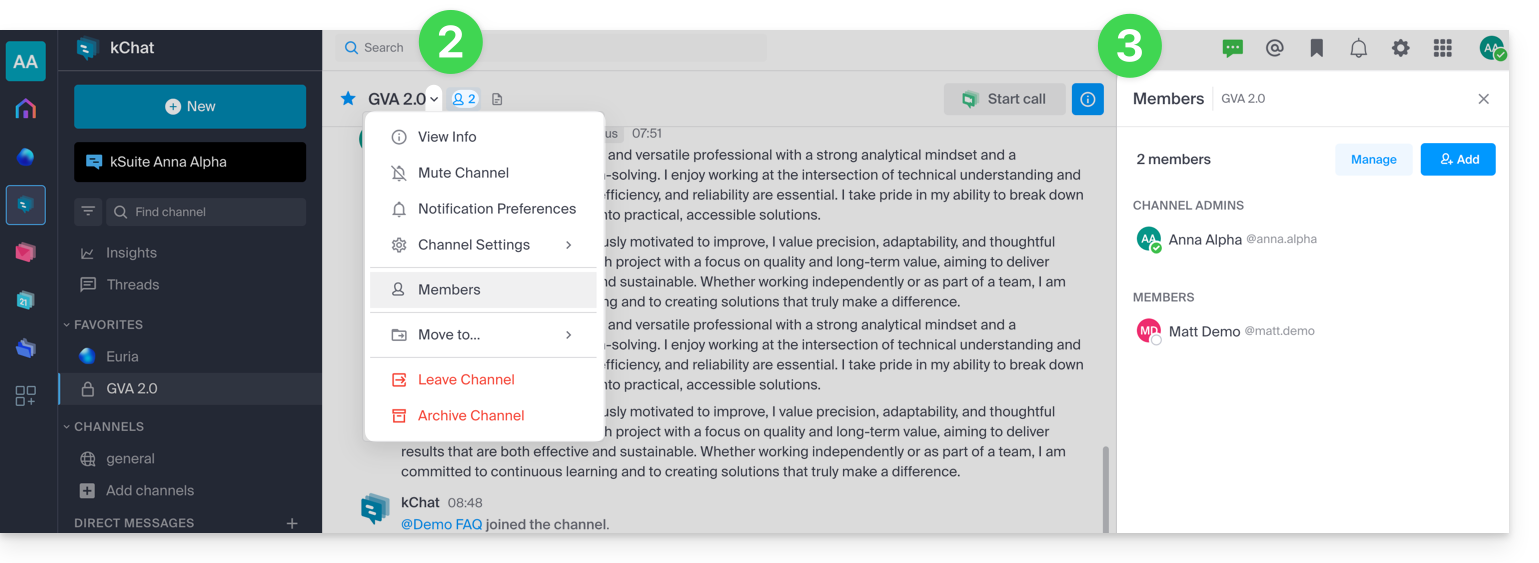
Para ver os utilizadores que têm acesso ao canal selecionado:
- Clique aqui para aceder à aplicação web kChat (serviço online ksuite.infomaniak.com/kchat) ou abra a aplicação de ambiente de trabalho kChat (aplicação para macOS / Windows / Linux).
- Clique no ícone de pessoa à direita do título do canal ou acesse pelo menu Membros.
- Os participantes são exibidos à direita do kChat:
Convidar ou remover um membro de um canal privado
Quando tiver aberto o painel de membros de um canal:
- Os participantes atuais são exibidos à direita do kChat.
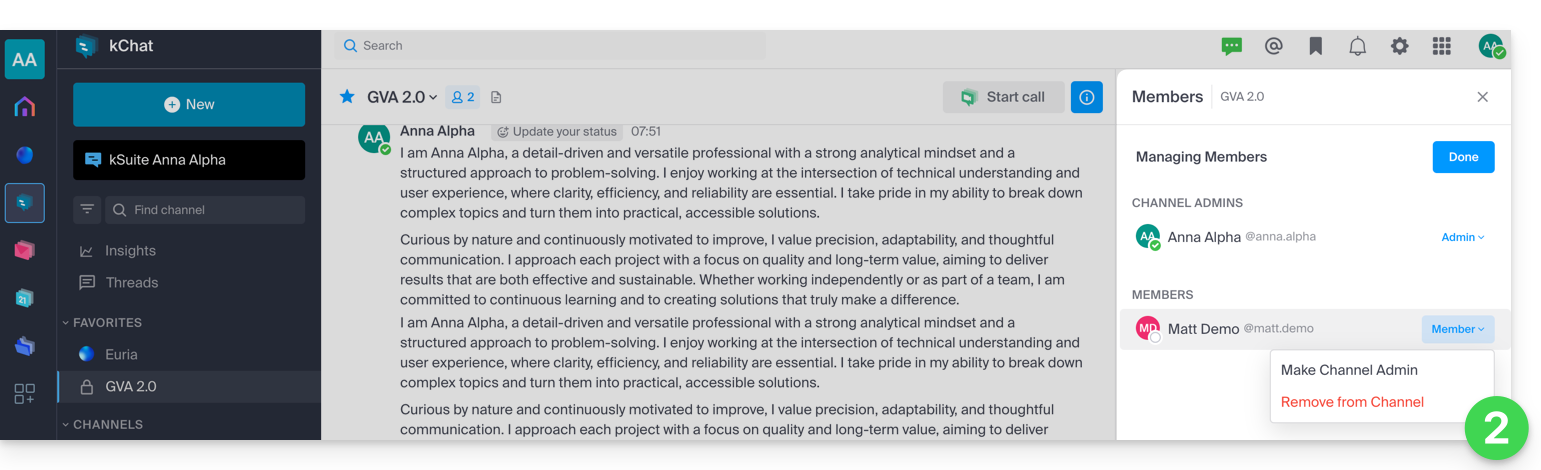
- O botão Gerenciar permite remover um membro deste canal ou designá-lo como Administrador do canal, para que, por sua vez, ele possa gerenciar os membros:
- O botão azul Adicionar permite convidar um utilizador kChat ou um Grupo completo que ainda não tem acesso a este canal:
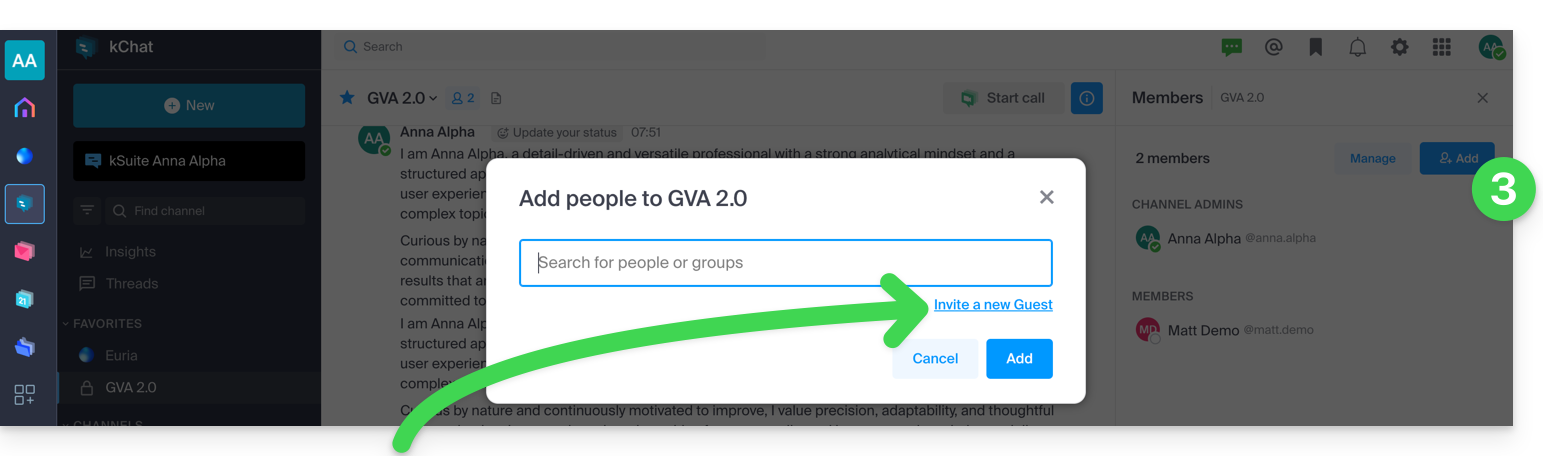
- Consulte este outro guia sobre a adição de convidados, membros que não usarão uma licença kSuite para conversar consigo no kChat.
Link para esta FAQ: https://faq.infomaniak.com/1886
Esta seção de perguntas frequentes foi útil?
Este guia permite gerenciar aplicativos externos com o kChat usando webhooks.
Introdução
- Um webhook é um método que permite a uma aplicação ser notificada imediatamente quando um evento específico ocorre em outra aplicação, em vez de perguntar constantemente a essa aplicação se algo novo aconteceu ("polling").
- Webhook de saída: o kChat comunica informações a outras aplicações quando um evento ocorre no kChat.
- Webhook de entrada: o kChat recebe informações de outras aplicações para acionar ações no kChat.
- Não é possível importar o histórico das conversas de outra aplicação (Slack, Teams, Jabber, etc.) ou de outra Organização.
- Número máximo de Webhooks de entrada/saída:
- kSuite Free = 1 / 1
- kSuite Standard = 20 / 20
- kSuite Business = ilimitado
- kSuite Enterprise = ilimitado
Aceder à interface web do kChat
Pré-requisitos
- Não ser um utilizador externo (este não verá o menu Integrações).
Para configurar um webhook, encontre aplicações e integrações auto-hospedadas ou de terceiros:
- Clique aqui para aceder à aplicação web kChat (serviço online ksuite.infomaniak.com/kchat) ou abra a aplicação de ambiente de trabalho kChat (aplicação para macOS / Windows / Linux).
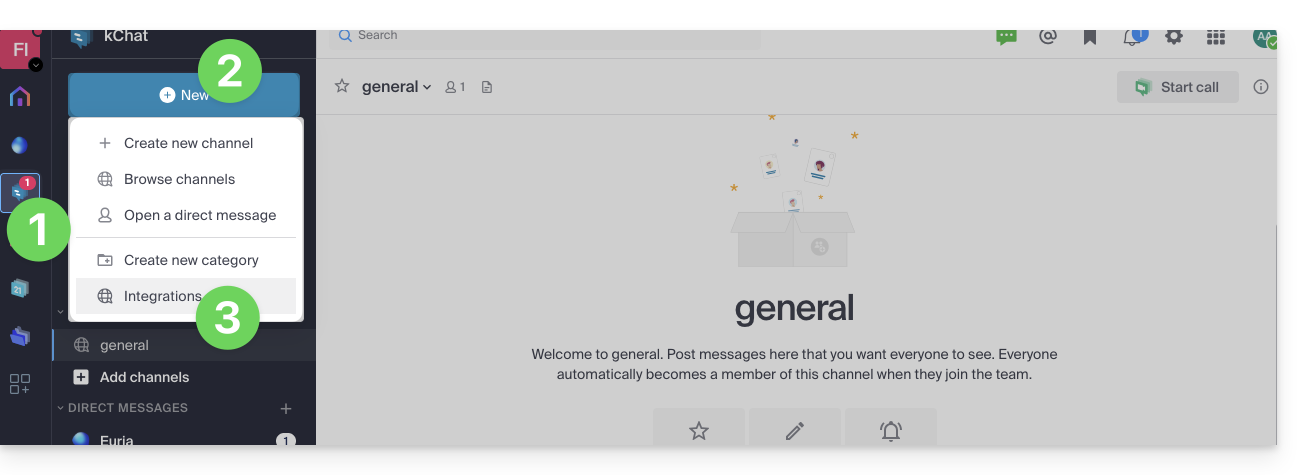
- Clique no ícone Novo ao lado do nome da sua organização kChat.
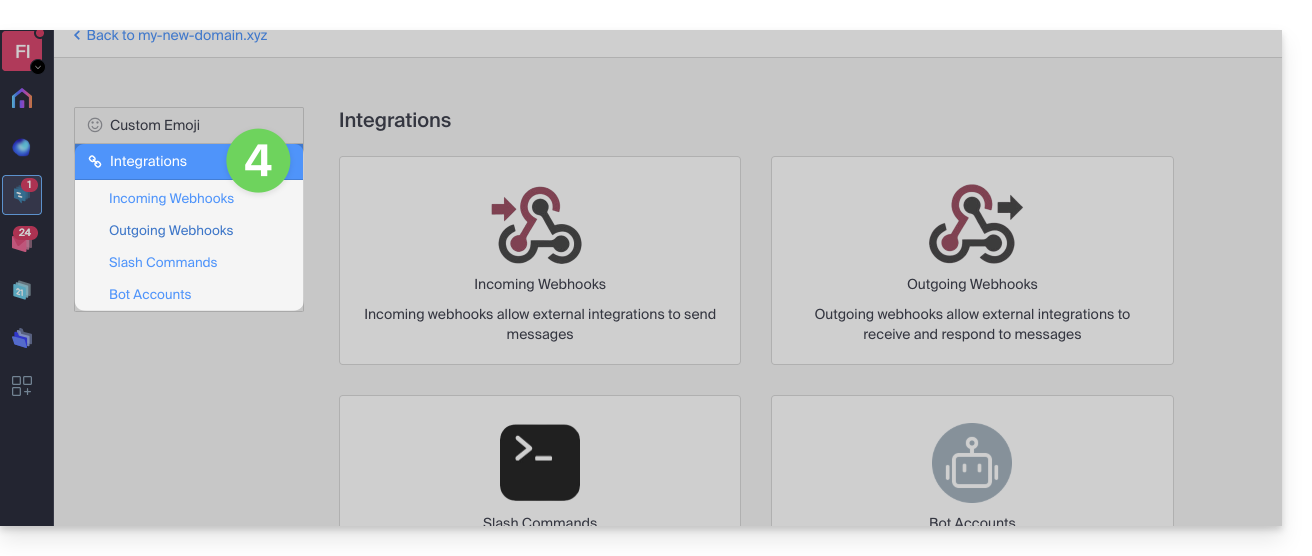
- Clique em Integrações:
- Aceda às categorias:
Guias específicos
Exemplos de integração no kChat:
- Calendário Infomaniak: exibir um lembrete de evento no kChat
- aplicativo n8n: ativar o envio de uma mensagem no kChat
Guias para outros usos
Para criar um webhook de entrada (para exibir um evento externo no kChat):
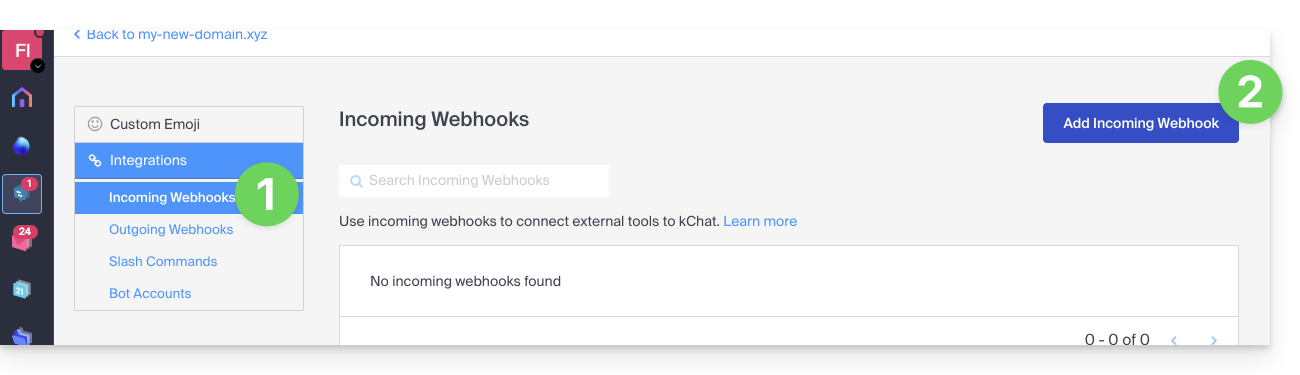
- Clique na categoria Webhooks de entrada.
- Clique no botão azul Adicionar webhooks de entrada:
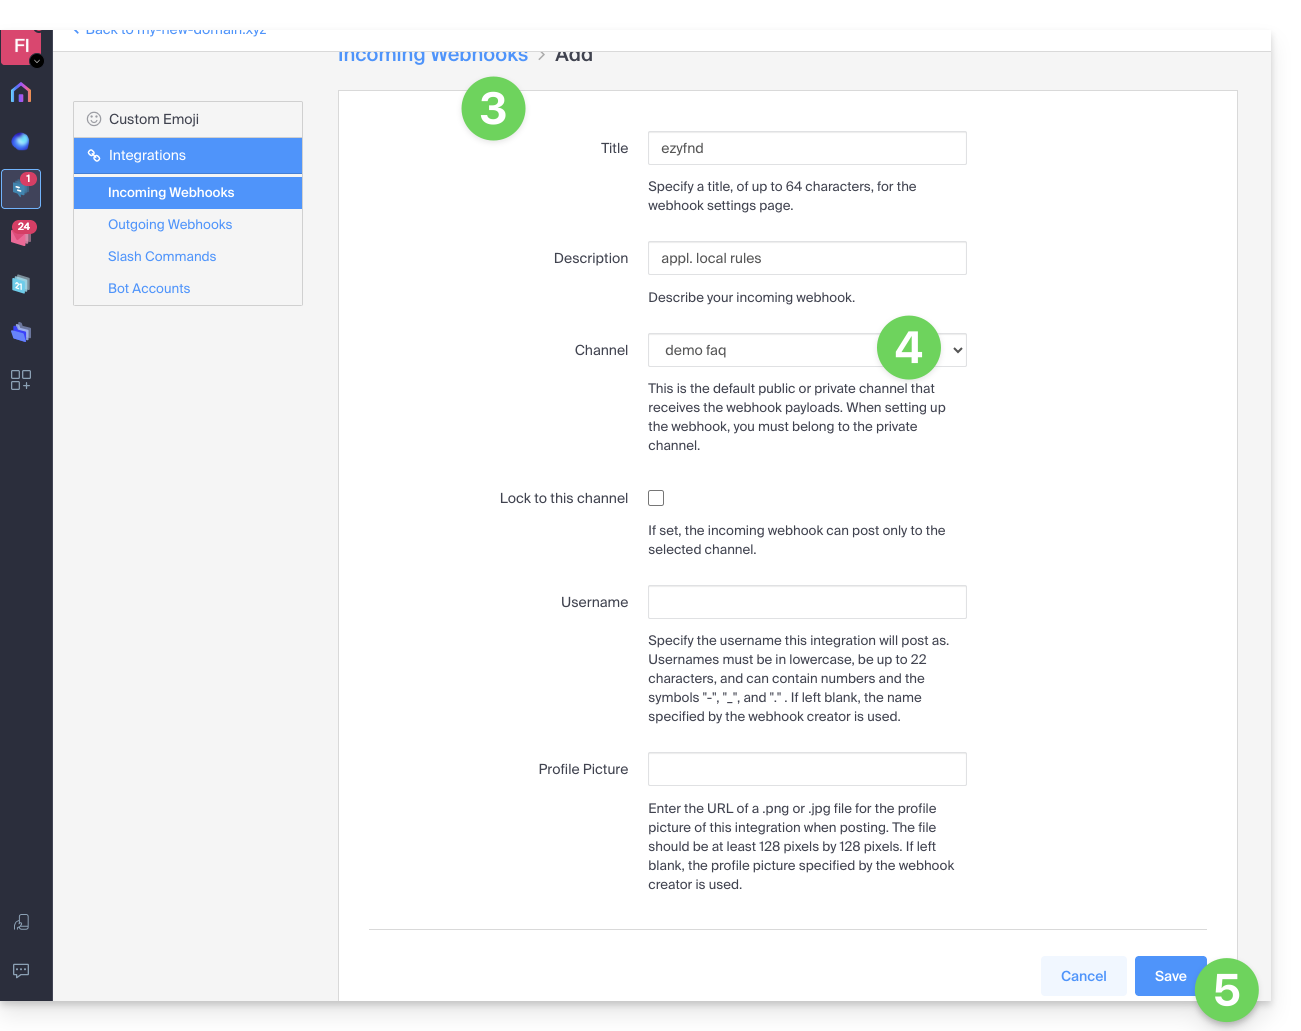
- Adicione um nome e uma descrição para o webhook.
- Selecione o canal que receberá as mensagens.
- Clique no botão para Salvar:
- A URL a ser utilizada para seus desenvolvimentos é exibida (não a divulgue publicamente); exemplo: “
https://your-server-kchat.xyz/hooks/xxx-key-generated-xxx”: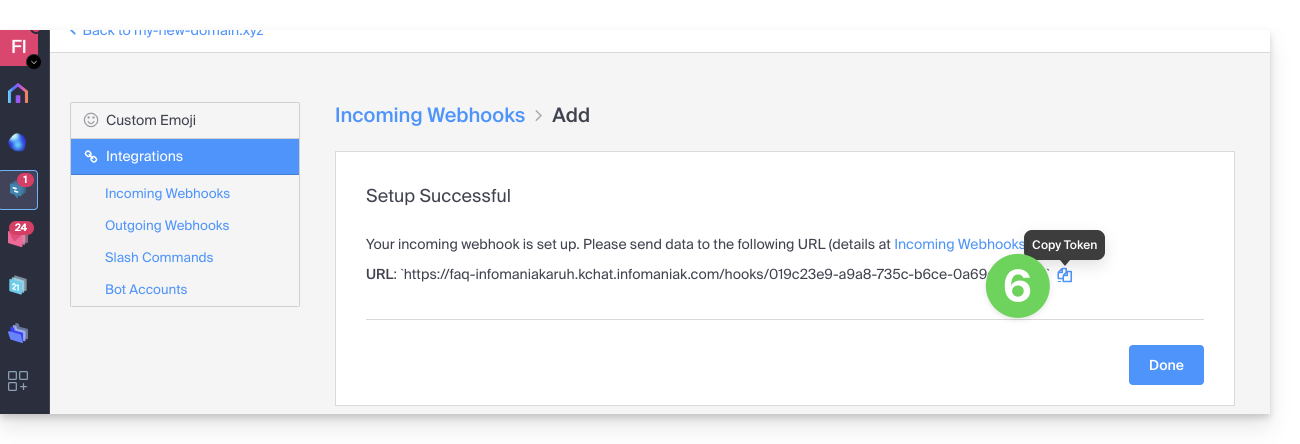
Utilização do webhook
Exemplo rápido
- Um comando
curlespecífico (detalhado abaixo) é inserido em um terminal. - O comando contém a URL obtida no ponto 6 acima.
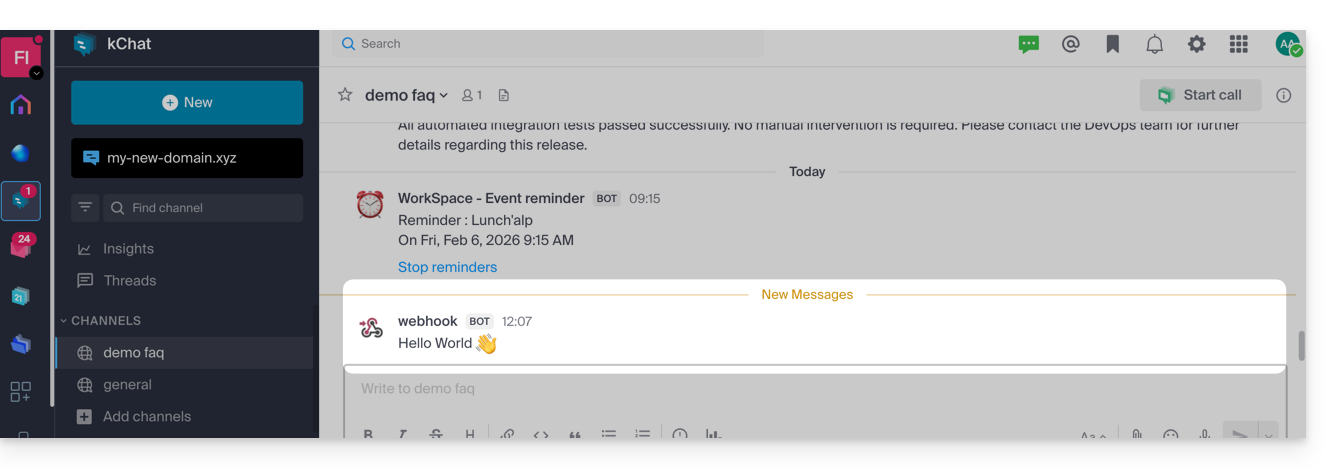
- O comando terá como resultado a publicação de uma mensagem no canal especificado no ponto 4 acima:
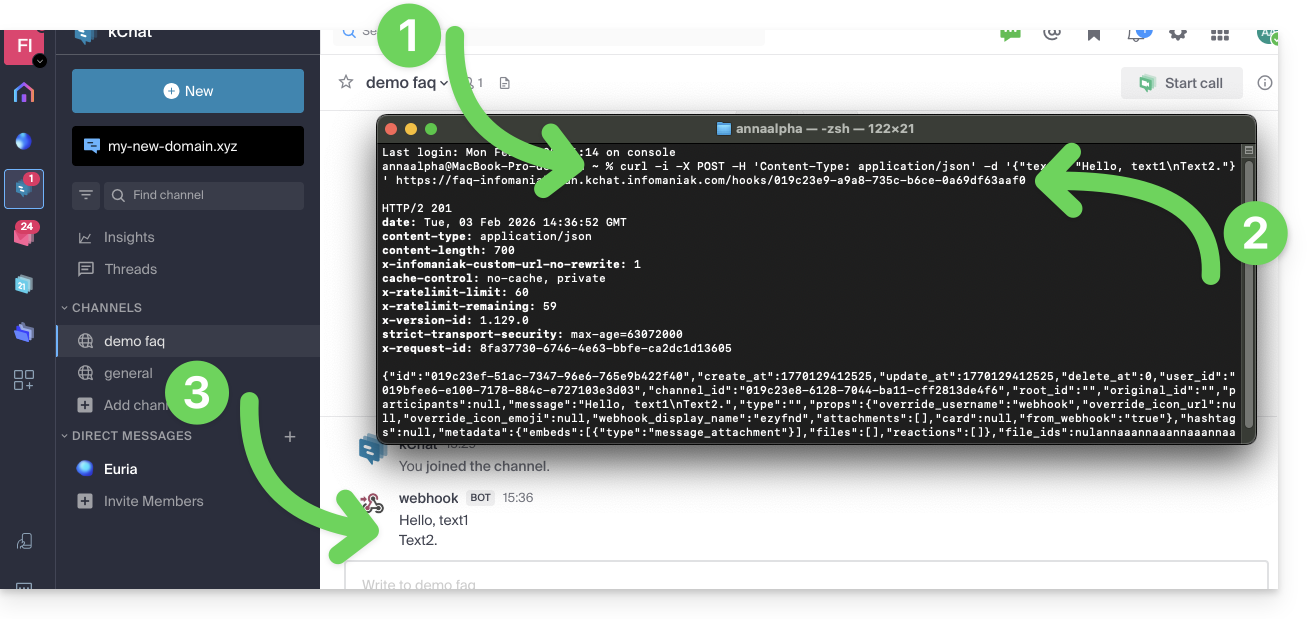
Detalhes
Na aplicação que deve publicar no kChat:
Ajuste o código abaixo de acordo com a URL obtida no kChat:
POST /hooks/xxx-key-generated-xxx HTTP/1.1
Host: your-server-kchat.xyz
Content-Type: application/json
Content-Length: 63
{
    "text": "Hello, text1\nText2."
}
Se necessário, use a mesma solicitação, mas com
curl(para testar a partir de um aplicativo do tipoTerminal(interface de linha de comando,CLI / Command Line Interface) no seu dispositivo), como no exemplo da imagem acima:curl -i -X POST -H 'Content-Type: application/json' -d '{"text": "Hello, text1\nText2."}' {{URL_12}}
A indicação BOT é adicionada ao lado do nome de usuário no kChat por motivos de segurança.
Se nenhum cabeçalho Content-Type for definido, o corpo da solicitação deve ser precedido por payload=, da seguinte forma:
payload={"text": "Hello, text1\nText2."}Uma solicitação bem-sucedida receberá a seguinte resposta:
HTTP/1.1 200 OK
Content-Type: application/json
X-Version-Id: 4.7.1.dev.12799dvd77e172e8a2eba0f4041ec1471.false
Date: Sun, 01 Jun 2023 17:00:00 GMT
Content-Length: 58

{
    "id":"x",
    "create_at":1713198308869,
    "update_at":1713198308869,
    "delete_at":0,
    "user_id":"x",
    "channel_id":"x",
    "root_id":"",
    "original_id":"",
    "participants":null,
    "message":"test",
    "type":"",
    "props":{
        "override_username":"webhook",
        "override_icon_url":null,
        "override_icon_emoji":null,
        "webhook_display_name":"test",
        "attachments":[

        ],
        "card":null,
        "from_webhook":"true"
    },
    "hashtags":null,
    "metadata":{
        "embeds":[
            {
                "type":"message_attachment"
            }
        ],
        "files":[

        ],
        "reactions":[

        ]
    },
    "file_ids":null,
    "has_reactions":false,
    "edit_at":0,
    "is_pinned":false,
    "remote_id":null,
    "reply_count":0,
    "pending_post_id":null,
    "is_following":false
}
Se você deseja ter o mesmo formato de resposta que o Slack:
HTTP/1.1 200 OK
Content-Type: text/plain
X-Request-Id: hoan69ws7rp5xj7wu9rmystry
X-Version-Id: 4.7.1.dev.12799dvd77e172e8a2eba0f4041ec1471.false
Date: Sun, 01 Jun 2023 17:00:00 GMT
Content-Length: 2
ok
você deve adicionar ?slack_return_format=true à URL do webhook.
Parâmetros
Além do campo text, aqui está a lista completa dos parâmetros suportados:
| Parâmetro | Descrição | Requisitos |
|---|---|---|
text | Mensagem em formato Markdown a ser exibida na publicação. Para acionar notificações, use “@<nome de usuário>”, “@canal” e “@aqui” como faria em outras mensagens do kChat. | Se attachments não for definido, sim |
channel | Substitui o canal no qual a mensagem é publicada. Utilize o nome do canal, e não o nome de exibição; por exemplo, utilize “town-square”, e não “Place de la ville”. Utilize “@” seguido de um nome de utilizador para enviar uma mensagem direta. Por defeito, utiliza o canal definido durante a criação do webhook. O webhook pode publicar em qualquer canal público ou privado onde o criador do webhook esteja presente. As publicações em mensagens diretas aparecerão na mensagem direta entre o utilizador-alvo e o criador do webhook. | Não |
username | Substitui o nome de usuário sob o qual a mensagem é publicada. Por padrão, utiliza o nome de usuário definido durante a criação do webhook; caso nenhum nome de usuário tenha sido definido durante a criação, utiliza webhook. | Não |
icon_url | Substitui a imagem de perfil com a qual a mensagem é publicada. Por padrão, utiliza a URL definida durante a criação do webhook; caso nenhum ícone tenha sido definido durante a criação, o ícone de webhook padrão () é exibido. O parâmetro de configuração Permitir que as integrações substituam os ícones de foto de perfil deve ser ativado para que a substituição do ícone tenha efeito. | Não |
icon_emoji | Substitui a imagem de perfil e o parâmetro icon_url.Por padrão, nada é definido durante a criação do webhook. O valor esperado é o nome de um emoji, tal como é digitado numa mensagem, com ou sem dois pontos ( :).O parâmetro de configuração Permitir que as integrações substituam os ícones da foto de perfil deve estar ativado para que a substituição entre em vigor. | Não |
anexos | Anexos da mensagem usados para opções de formatação mais avançadas. | Sim, se text não estiver definido. |
type | Define o tipo de publicação, principalmente para uso por plugins.Se não estiver vazio, deve começar com " custom_". | Não |
Exemplo de código com parâmetros
Veja como gerar uma mensagem mais completa com parâmetros, alguns dos quais podem substituir parâmetros já definidos durante a criação do webhook (nome de usuário, canal preferido, avatar, etc.), conforme indicado na tabela acima:
curl -i -X POST -H 'Content-Type: application/json' \
-d '{
"username": "System Monitor",
  "icon_url": "{{URL_13}}",
  "text": "### System Status Report\nEnvironment: PRODUCTION\nStatus: SUCCESSFUL\n\n---\n\n| Component | Version | Build ID | Status |\n|:----------|:-------:|:---------|:-------|\n| API-Core  | 2.4.1   | #88421   | OK     |\n| Web-UI    | 1.9.0   | #88425   | OK     |\n| Database  | 14.5    | N/A      | OK     |\n\n---\n\n**Commit Reference:**\n`git-ref: a7f8e9c21b` \n\n**Summary:**\nAll automated integration tests passed successfully. No manual intervention is required. Please contact the DevOps team for further details regarding this release."
}' \
{{URL_14}}
Resultado de um exemplo semelhante em imagem: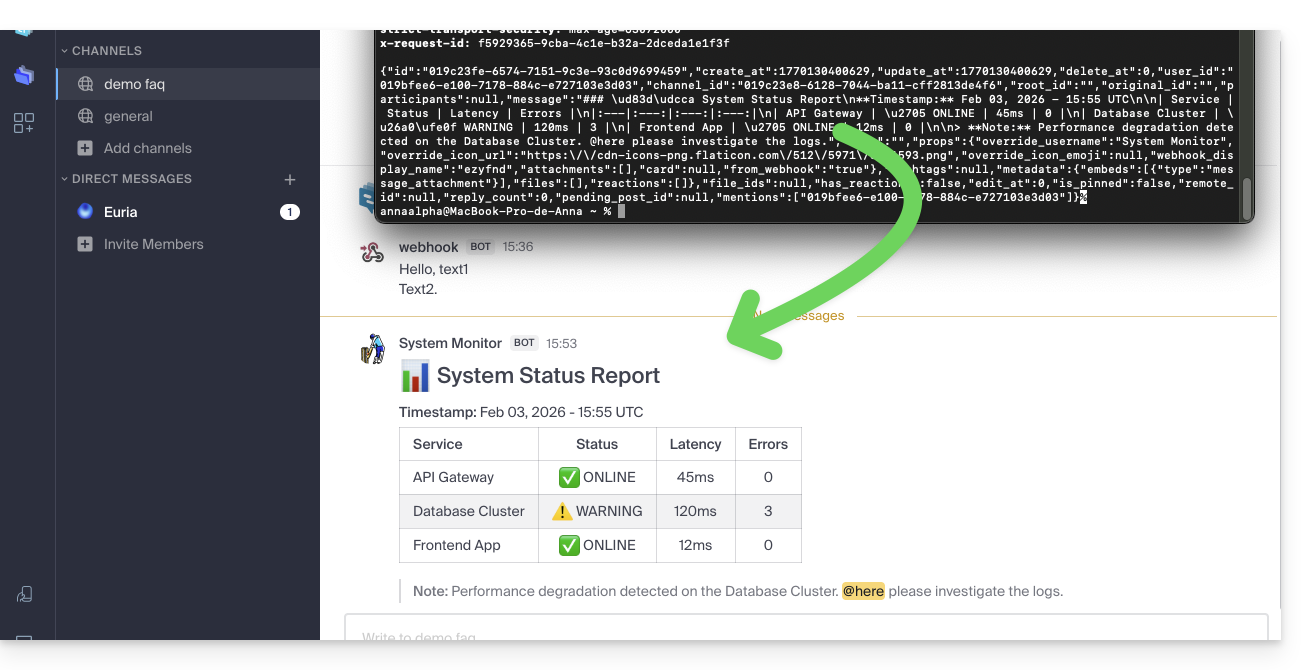
Link para esta FAQ: https://faq.infomaniak.com/2001
Esta seção de perguntas frequentes foi útil?
Obrigado por escolher a Infomaniak e o kChat como solução de comunicação entre você, seus contatos ou sua empresa! Estes guias o ajudarão a organizar seus canais, usuários, conversas e muito mais!
Introdução
- Multiplataforma, o kChat é o serviço de mensagens instantâneas do kSuite que permite trocar mensagens, partilhar e coordenar as suas equipas em segurança a partir de…
- … um navegador como Brave, Chrome, Edge, Firefox, Opera, Safari…
- … um dispositivo iOS / Android
- … um computador macOS / Windows / Linux
- Descarregue a aplicação kChat nos seus dispositivos!
- Não é possível alterar a localização da pasta
kchat-desktopno seu disco rígido. - O conteúdo das conversas, fotos e vídeos é armazenado online nos servidores seguros da Infomaniak.
- O espaço de armazenamento disponível é o da kSuite.
- Não é possível alterar a localização da pasta
O que deseja fazer?
- Configurar o kChat
- Gerenciar usuários
- Gerenciar um canal
- Gerenciar uma conversa
- Responder às mensagens
- Gerenciar as notificações do kChat
- Formatar mensagens e inserir imagens
- Enviar uma mensagem de voz e sua transcrição automática
- Traduzir o conteúdo de uma mensagem no aplicativo kChat Infomaniak
Tem alguma dúvida ou sugestão?
- Em caso de problema, consulte a base de conhecimento antes de entrar em contato com o suporte.
- Clique aqui para partilhar uma opinião ou sugestão sobre um produto Infomaniak.
Link para esta FAQ: https://faq.infomaniak.com/2076
Esta seção de perguntas frequentes foi útil?
Este guia trata das mensagens que começam com / no kChat, as quais são interpretadas como comandos com barra.
Executar um comando com barra no kChat
Para acessar os comandos com barra (/) no kChat:
- Clique no campo de redação dentro de um canal.
- Insira um caractere
/(barra) e o comando correspondente. - Confirme para enviar o comando.
Se digitar apenas o símbolo /, uma janela modal será exibida com os comandos que podem ser executados, como, por exemplo, entrar no modo offline.
A seguir, uma tabela com os principais comandos:
| comando | descrição |
|---|---|
| /away | define seu status como "ausente" |
| /offline | define seu status como "ausente" |
| /online | defina o seu estado como "online" |
| /dnd | define seu status como "não perturbe" |
| /code | utilizado para formatar o texto como código |
| /collapse | oculta o conteúdo do elemento na mensagem |
| /expand | expande o conteúdo do elemento na mensagem |
| /echo | repete o texto que segue o comando |
| /header | exibe um cabeçalho em uma mensagem |
| /purpose | define ou exibe a descrição do canal |
| /renomear | renomeia o canal atual |
| /leave | sai do canal atual |
| /mute | silencia o canal atual |
| /lembretes | gerencia os lembretes |
| /pesquisa | pesquisa de mensagens e outros conteúdos |
| /configurações | abre as configurações |
| /atalhos | exibe os atalhos do teclado |
Criar um comando de barra personalizado
Pré-requisitos
- Não ser um utilizador externo (não verá o menu Integrações).
Para criar um comando de barra personalizado:
- Clique aqui para acessar o aplicativo Web kChat (serviço online ksuite.infomaniak.com/kchat) ou abra o aplicativo desktop kChat (aplicativo para computador em macOS / Windows / Linux).
- Clique no ícone Novo ao lado do nome da sua organização kChat.
- Clique em Integrações:
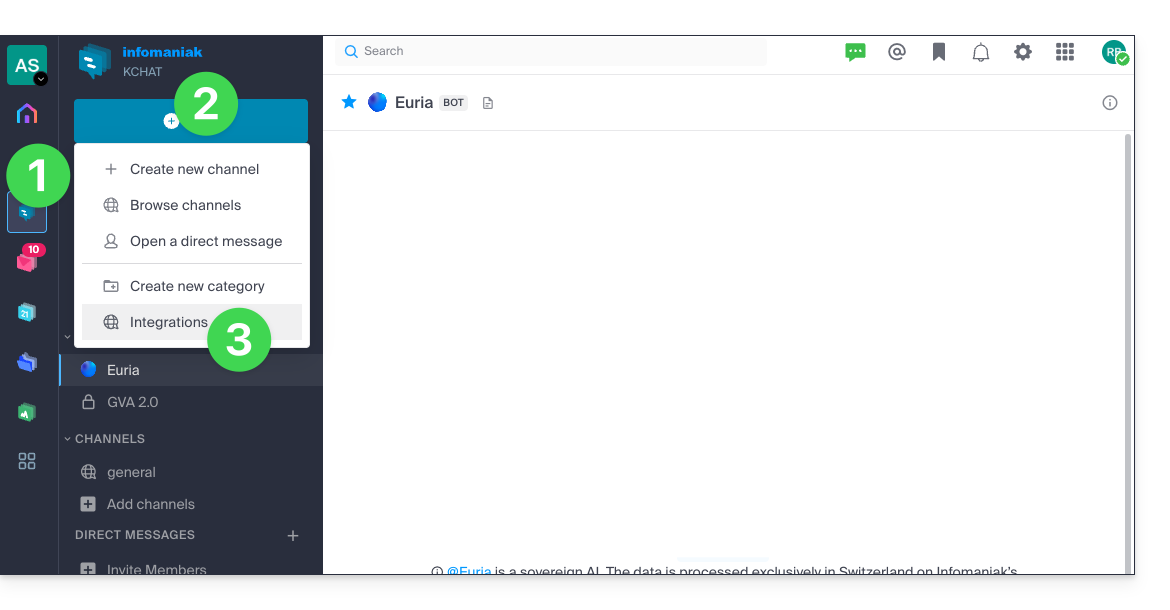
- Clique em Comandos slash:
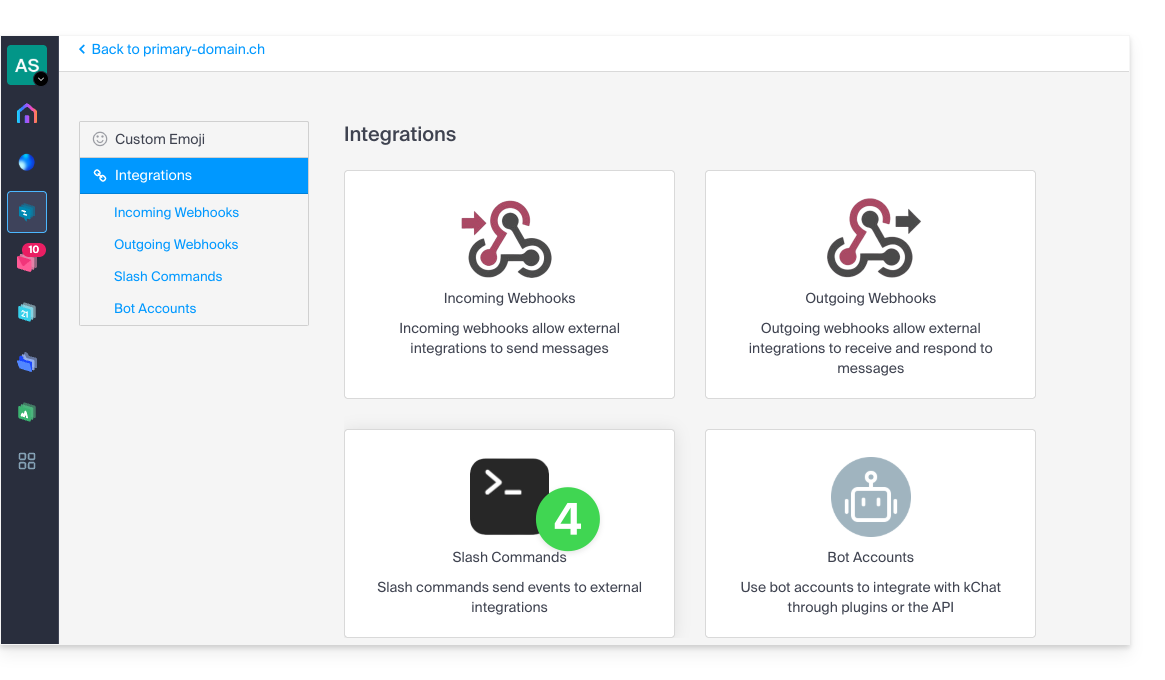
- Clique no botão azul para Adicionar um comando:
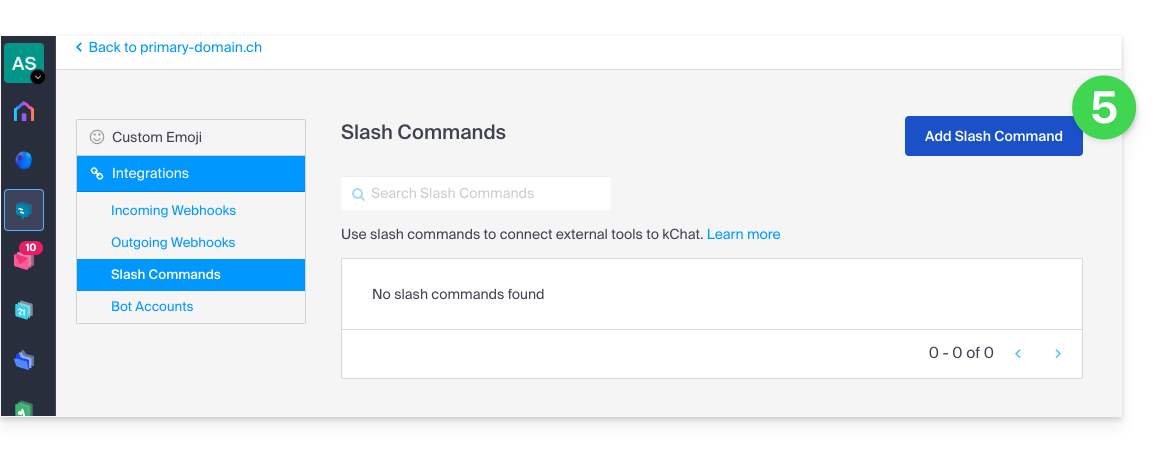
- Configure o comando de barra (nome, gatilho (sem a
/), tipo de conteúdo esperado, ação a ser executada*, etc., incluindo se o comando deve ser exibido na janela de ajuda).- * Isso pode incluir a chamada a uma API externa, a execução de um script, a exibição de uma resposta específica, etc. Para isso, você geralmente precisará de um script ou de uma aplicação externa que responderá aos comandos. Você também pode definir parâmetros adicionais para o comando, como opções suspensas, caixas de seleção, etc., dependendo de suas necessidades.
- Salve o comando:
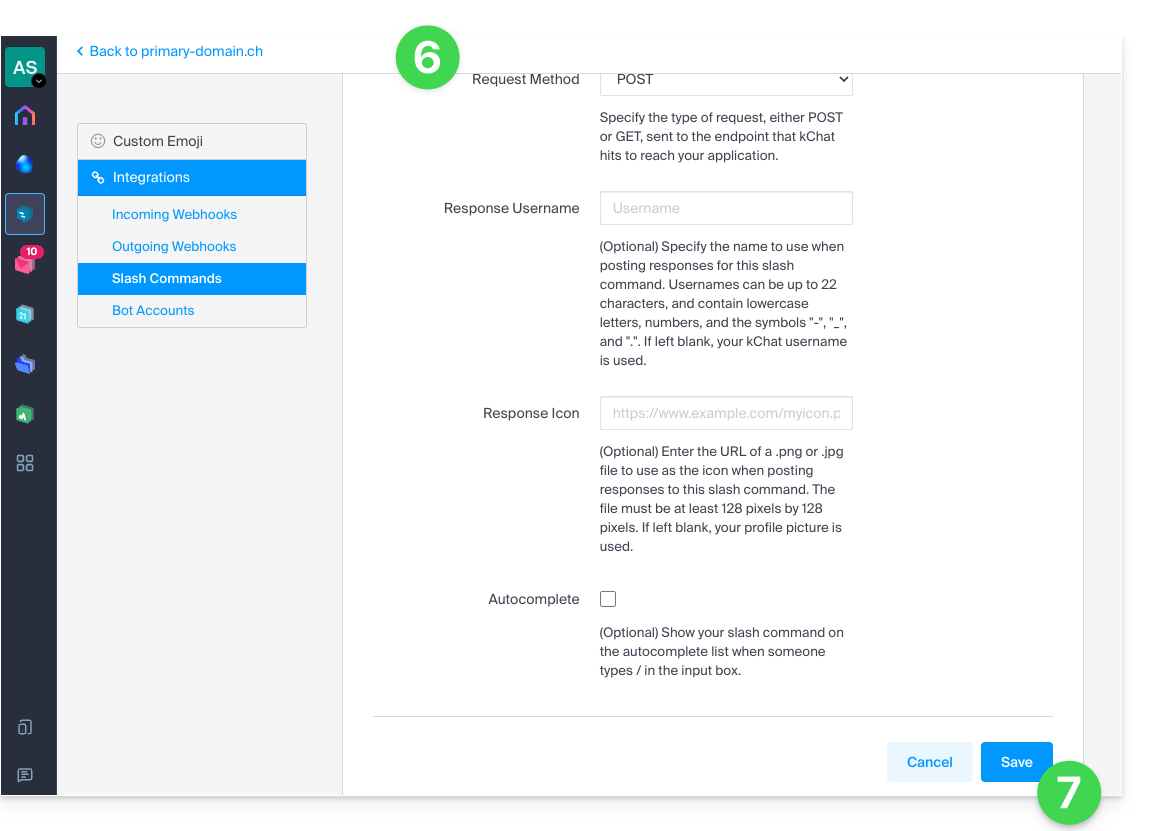
- Certifique-se de testar o comando para garantir que ele funcione conforme o esperado.
Lembre-se de que a criação de comandos personalizados pode exigir conhecimentos de programação adicionais, especialmente se for necessário integrar funcionalidades personalizadas ou interações com sistemas externos. Certifique-se também de seguir as boas práticas de segurança ao criar esses comandos para evitar possíveis vulnerabilidades de segurança.
Link para esta FAQ: https://faq.infomaniak.com/2134
Esta seção de perguntas frequentes foi útil?
Este guia explica como obter lembretes de eventos do aplicativo web Calendar da Infomaniak (serviço online ksuite.infomaniak.com/calendar) em um sistema de mensagens como o kChat, para ser notificado no canal de mensagens de sua escolha quando um evento estiver próximo.
Introdução
- A oferta kSuite Free é limitada a 1 único webhook.
Associar o webhook kChat ao Calendar
Pré-requisitos
- Crie, no aplicativo kChat, um webhook de entrada, para obter uma URL do tipo
https://your-server-kchat.xyz/hooks/xxx-key-generated-xxx: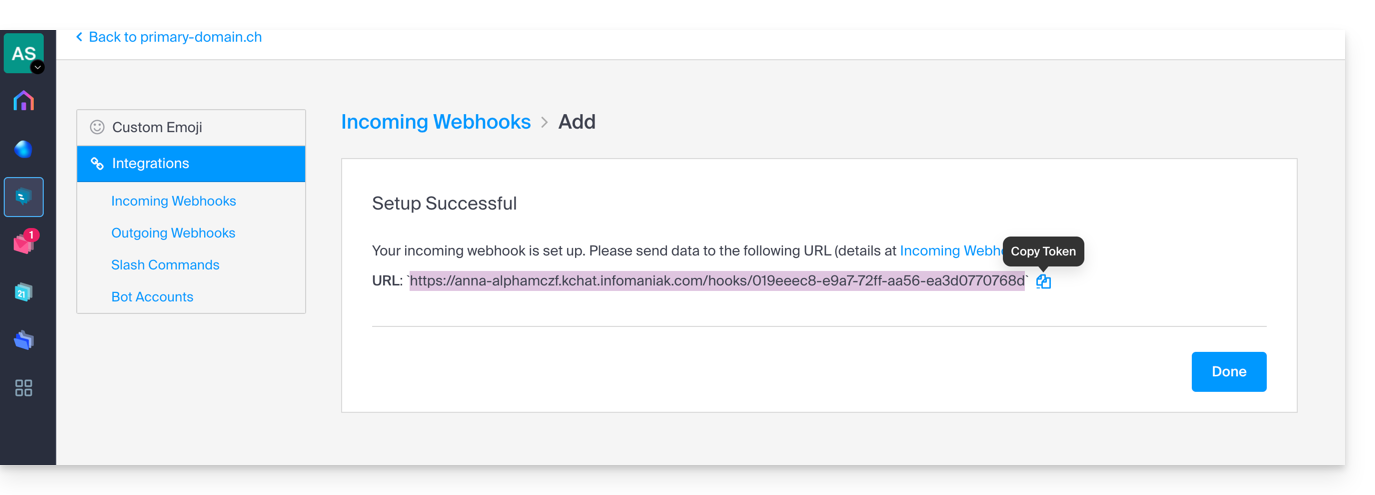
Em seguida, para adicionar o webhook do seu sistema de mensagens ao aplicativo Calendar:
- Clique aqui para acessar o aplicativo web Calendar da Infomaniak (serviço online ksuite.infomaniak.com/calendar).
- Clique em Configurações no canto superior direito.
- Clique em Integrações no menu lateral esquerdo.
- Clique no botão Adicionar um webhook:
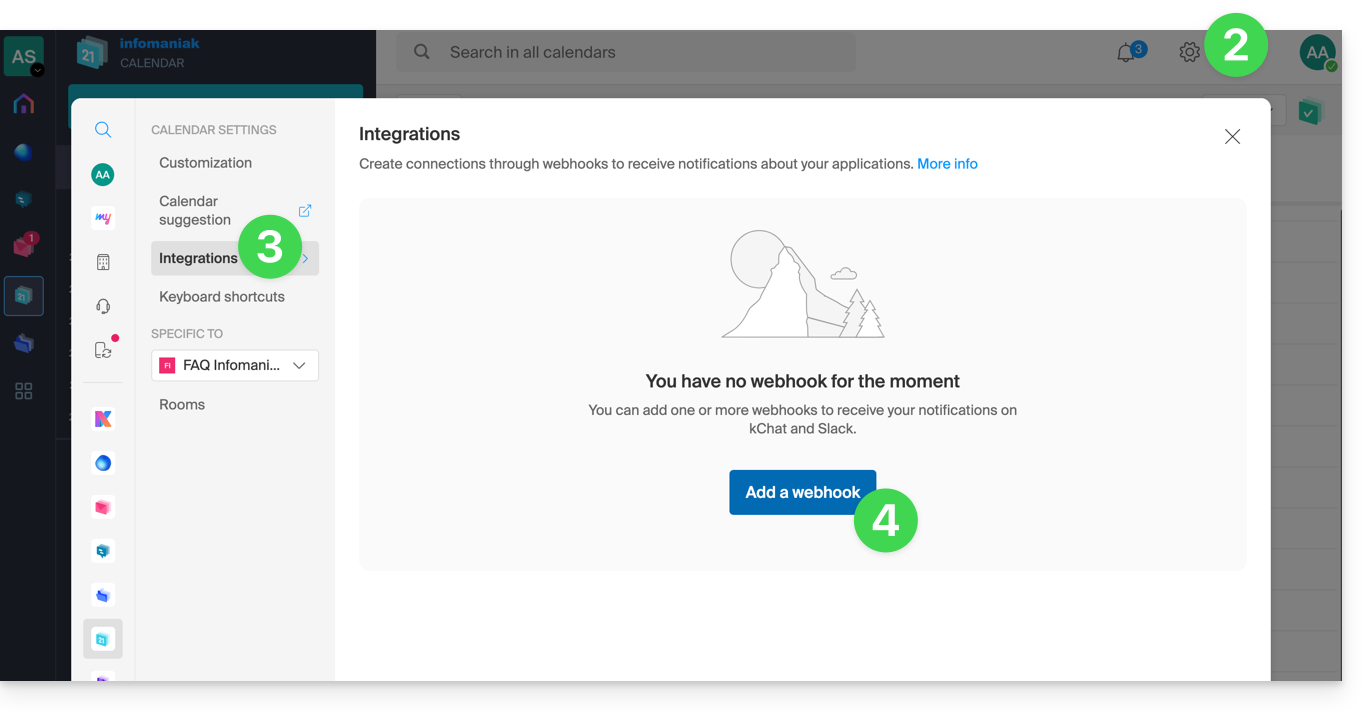
- Defina:
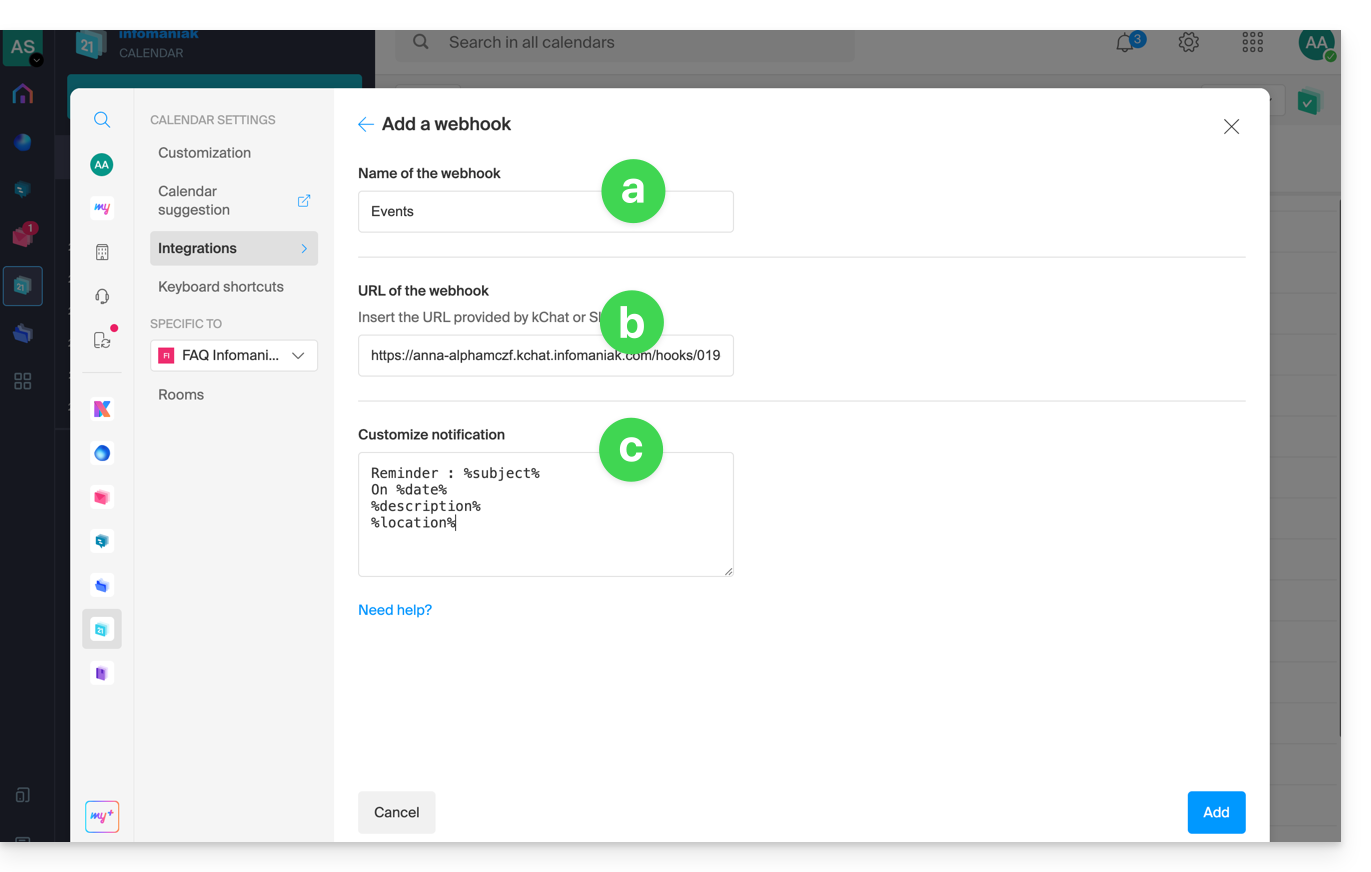
- Um nome para identificar facilmente o webhook ao adicionar lembretes.
- A URL do webhook (obtida do seu sistema de mensagens).
- Os elementos (recolhidos automaticamente do seu evento e/ou adicionados manualmente aqui) e a sua disposição na mensagem que será enviada:
- Insira %subject% para incluir o assunto do evento.
- Insira %date% para incluir a data do evento.
- Insira %description% para incluir a descrição do evento.
- Insira %location% para incluir a possível localização do evento.
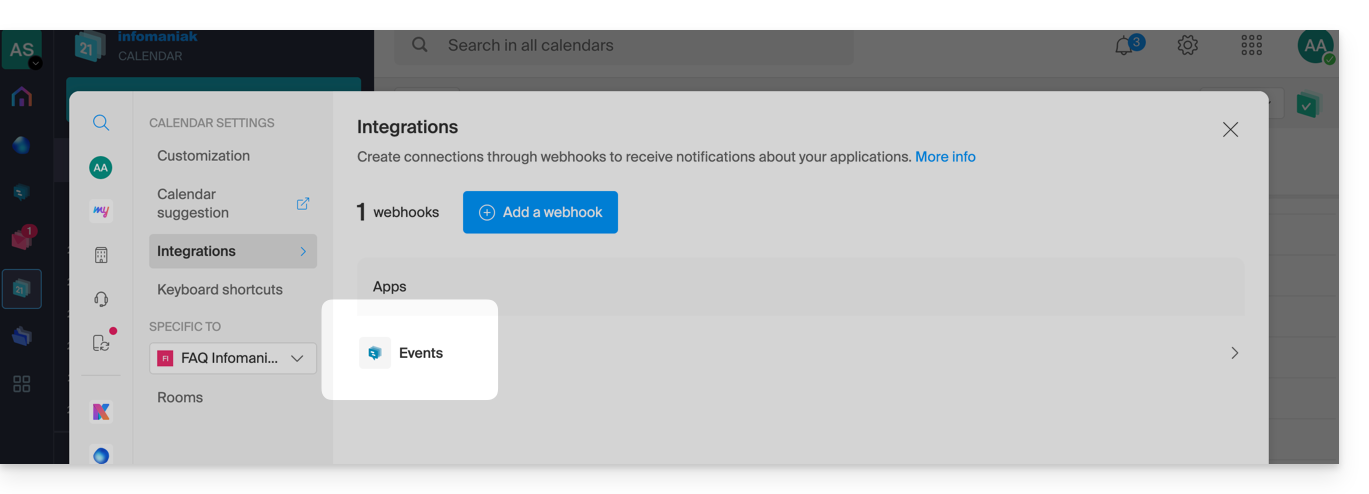
- Clique no botão para Adicionar o elemento configurado e veja-o agora criado:
Crie um evento com lembrete por chat
Agora que o Calendar está vinculado à sua conta de sistema de mensagens, você pode optar por receber notificações em uma conversa quando adicionar um lembrete a um evento:
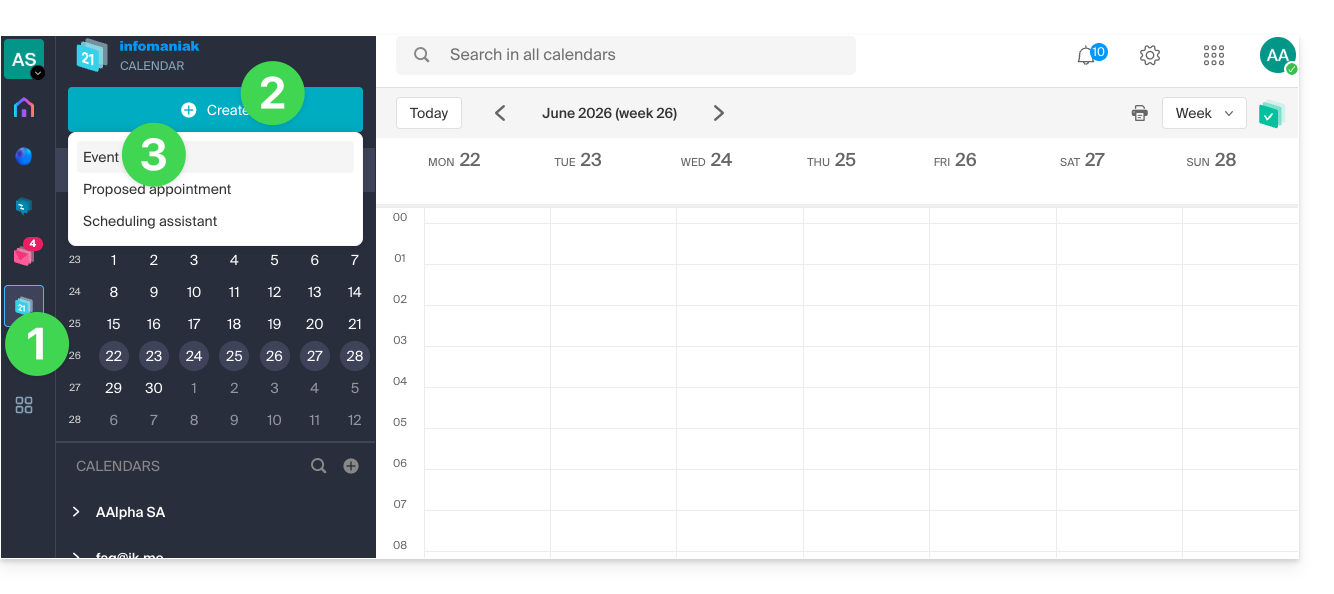
- Clique aqui para acessar o aplicativo web Calendar da Infomaniak (serviço online ksuite.infomaniak.com/calendar).
- Clique no botão Criar no canto superior esquerdo.
- Clique em Evento:
- Você também pode clicar em um evento existente no calendário para editá-lo.
- Insira os detalhes do evento.
- Clique em Adicionar lembrete para configurá-lo:
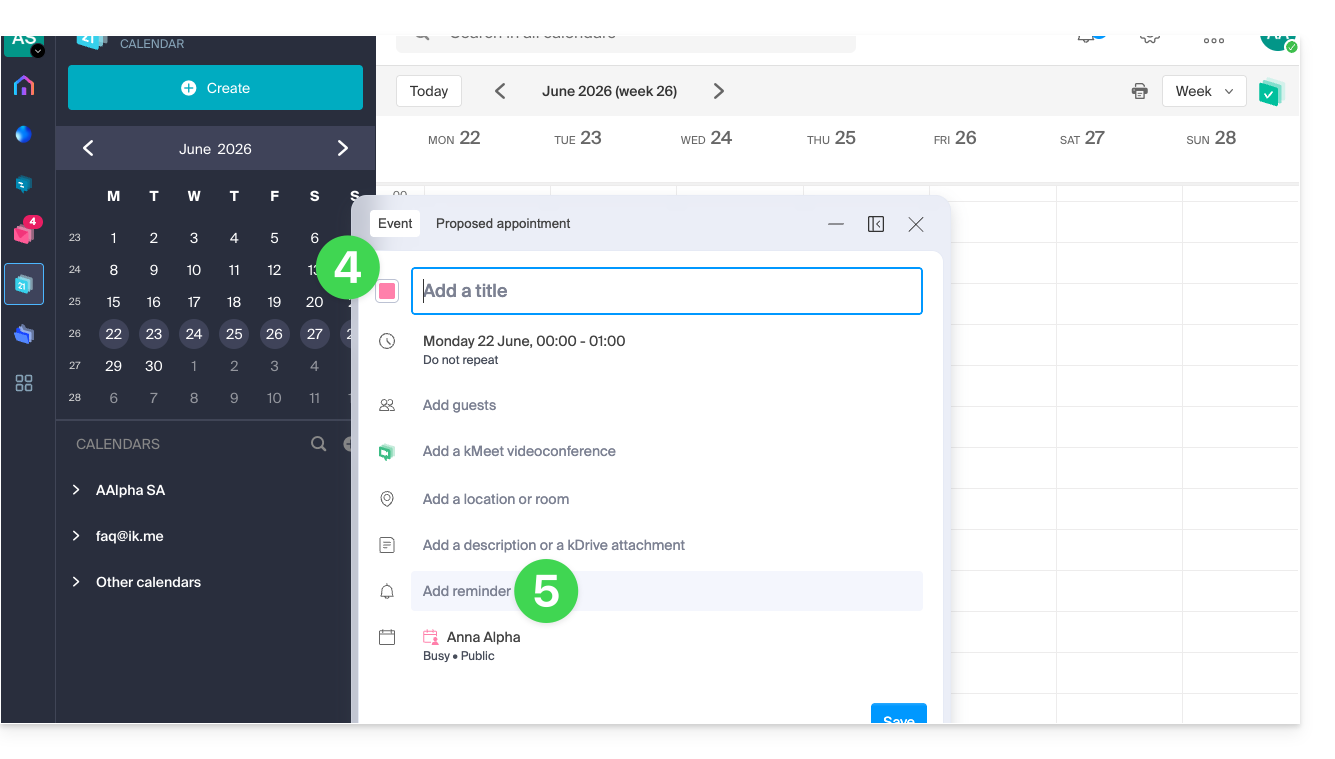
- No menu suspenso dos tipos de lembrete, selecione o webhook configurado (de acordo com o nome dado no ponto 5a acima).
- Salve o evento na parte inferior da página:
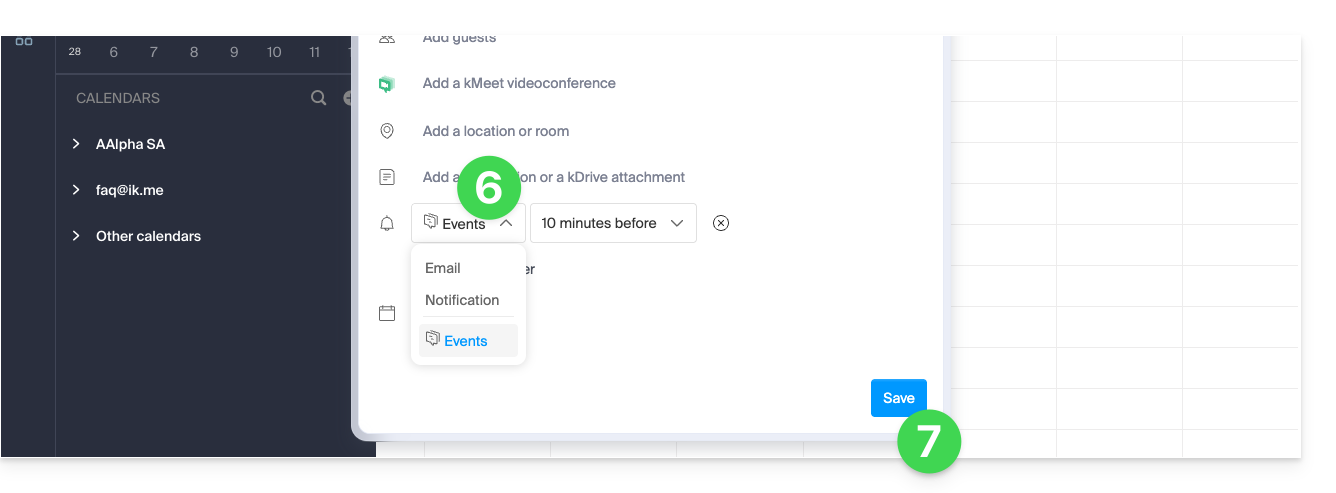
- Quando chega o momento do lembrete, uma mensagem (no formato configurado no ponto 5c acima) é enviada ao destinatário do evento, no canal configurado no webhook (ver pré-requisitos):
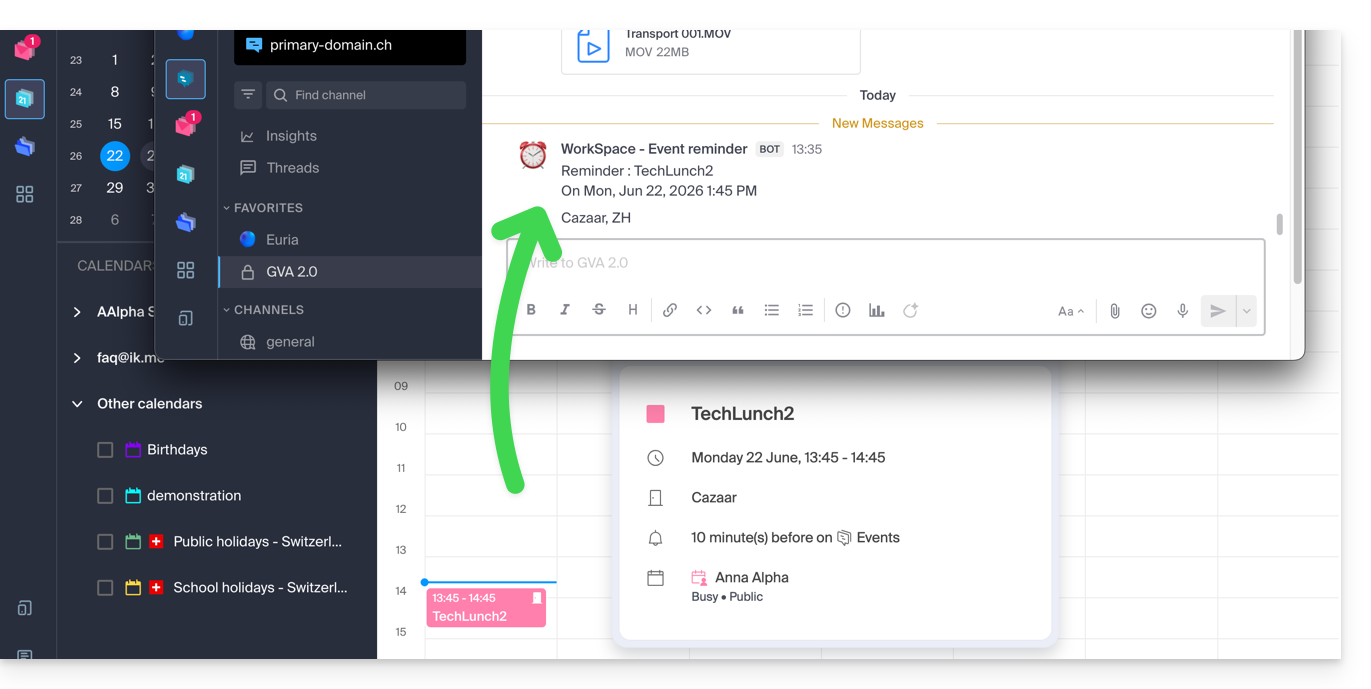
E em outros sistemas de mensagens?
Slack
- Clique aqui para acessar os WebHooks do Slack.
- Escolha o canal de discussão onde os seus lembretes serão exibidos (por exemplo, @slackbot ou #general):
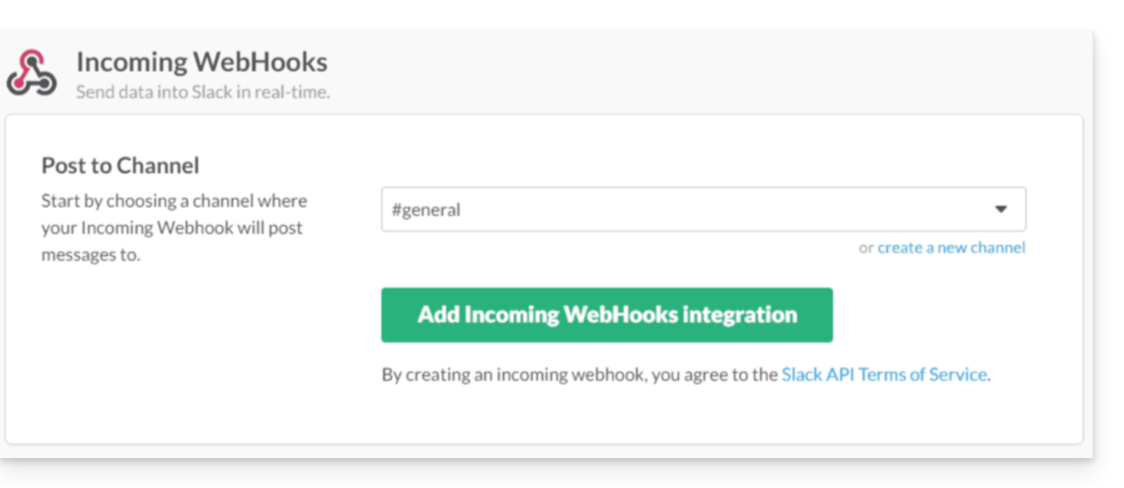
- Salve para obter a URL do webhook.
Crie outros webhooks para definir lembretes em outros canais de discussão.
Você pode usar livremente as opções de formatação do Slack em suas notificações. Exemplo em português:
N'oubliez pas de %subject% pour le %date%.
À prendre avec le jour J : %description%.
Lieu de l'event : %location%
Link para esta FAQ: https://faq.infomaniak.com/2244
Esta seção de perguntas frequentes foi útil?
Este guia explica como configurar uma ação no n8n para que uma mensagem seja enviada no kChat quando as condições forem cumpridas.
Pré-requisitos
- Instalar n8n em uma hospedagem Infomaniak.
- Criar um webhook no aplicativo kChat Infomaniak.
Criar a ação no n8n
Na sua sessão n8n:
- Clique para começar do zero:
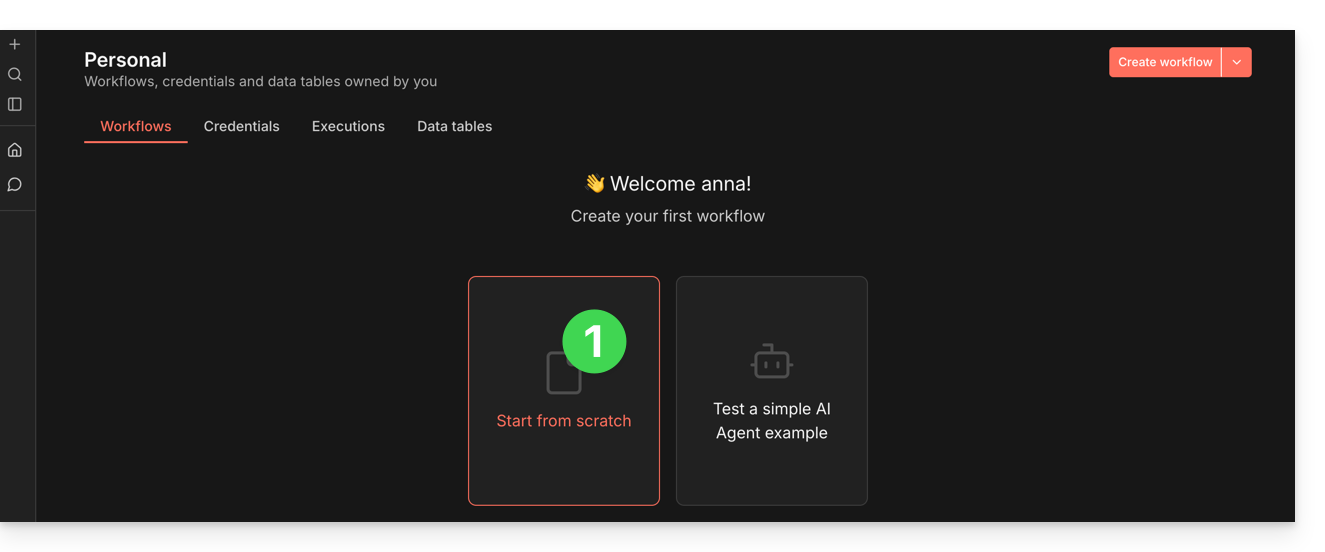
- Clique para adicionar a primeira ação.
- Escolha um gatilho manual:
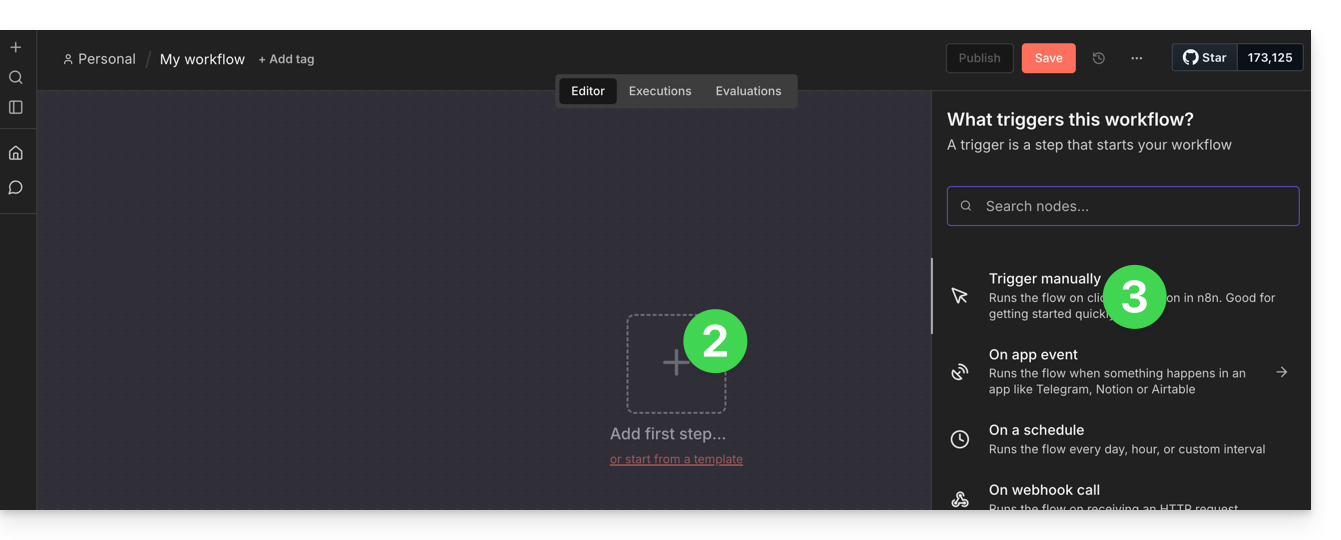
- Clique para adicionar uma ação a ser acionada.
- Pesquise e ative uma ação do tipo “Requisição HTTP”:
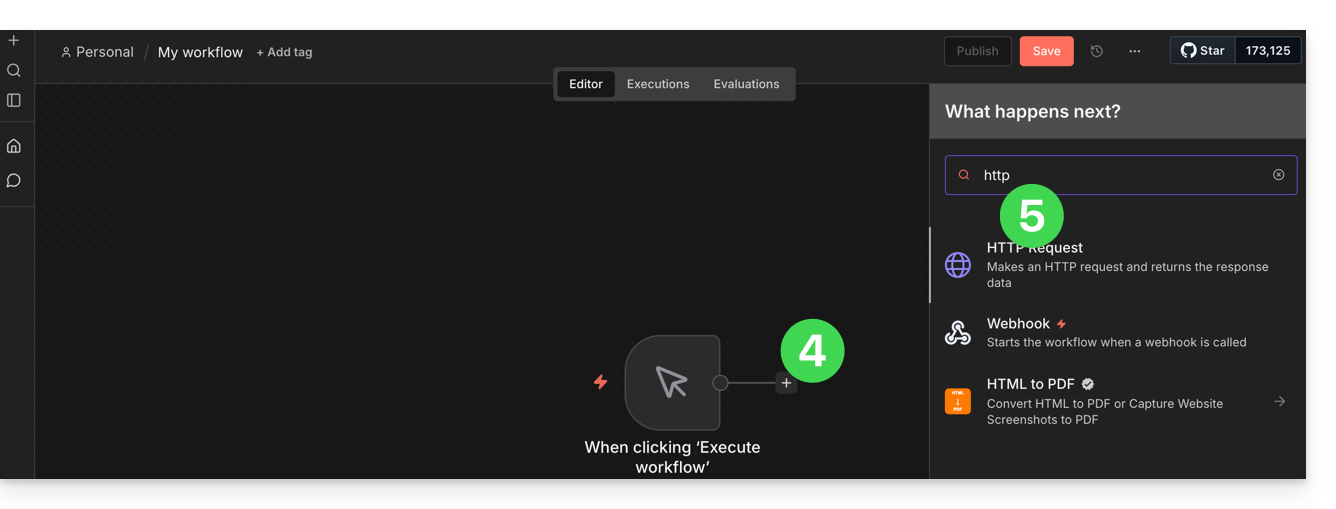
- Escolha o método POST.
- Insira a URL do seu webhook kChat.
- A autenticação não é necessária (já está aplicada na URL).
- Ative o botão de alternância (toggle switch) “Enviar corpo” para poder especificar um conteúdo:
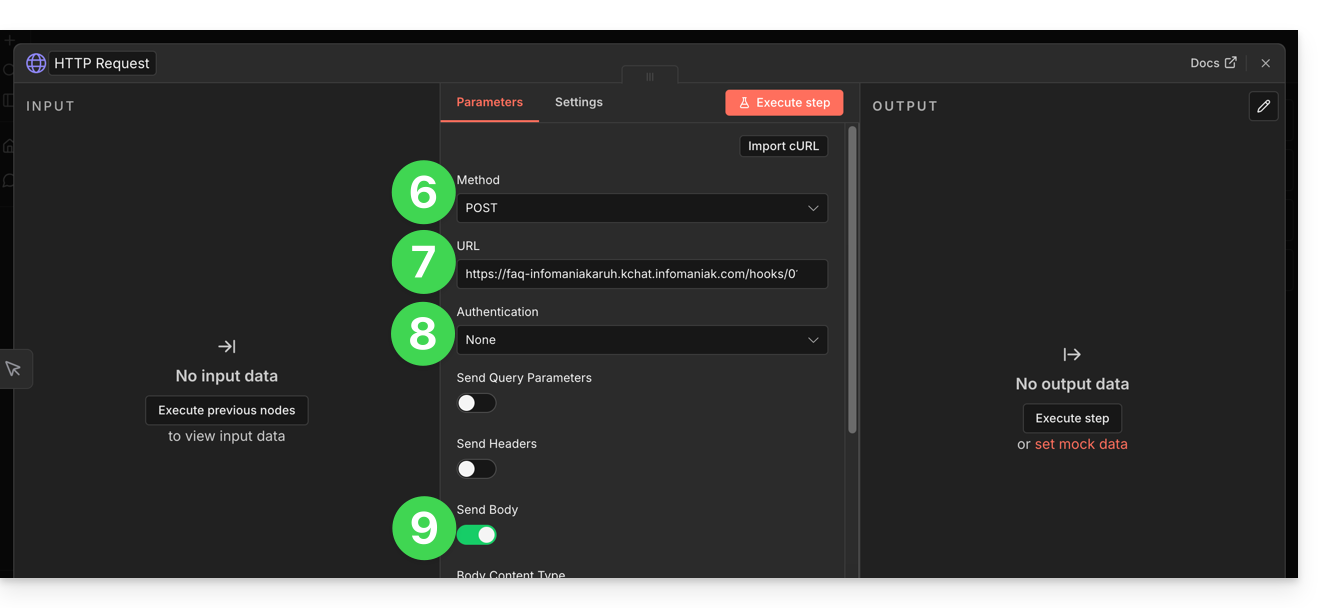
- No campo “Nome”, insira o termo exato “text”, conforme esperado pelo kChat.
- No campo “Valor”, insira as informações que deseja exibir no kChat.
- Clique no botão para testar e aplicar seu comando manual:
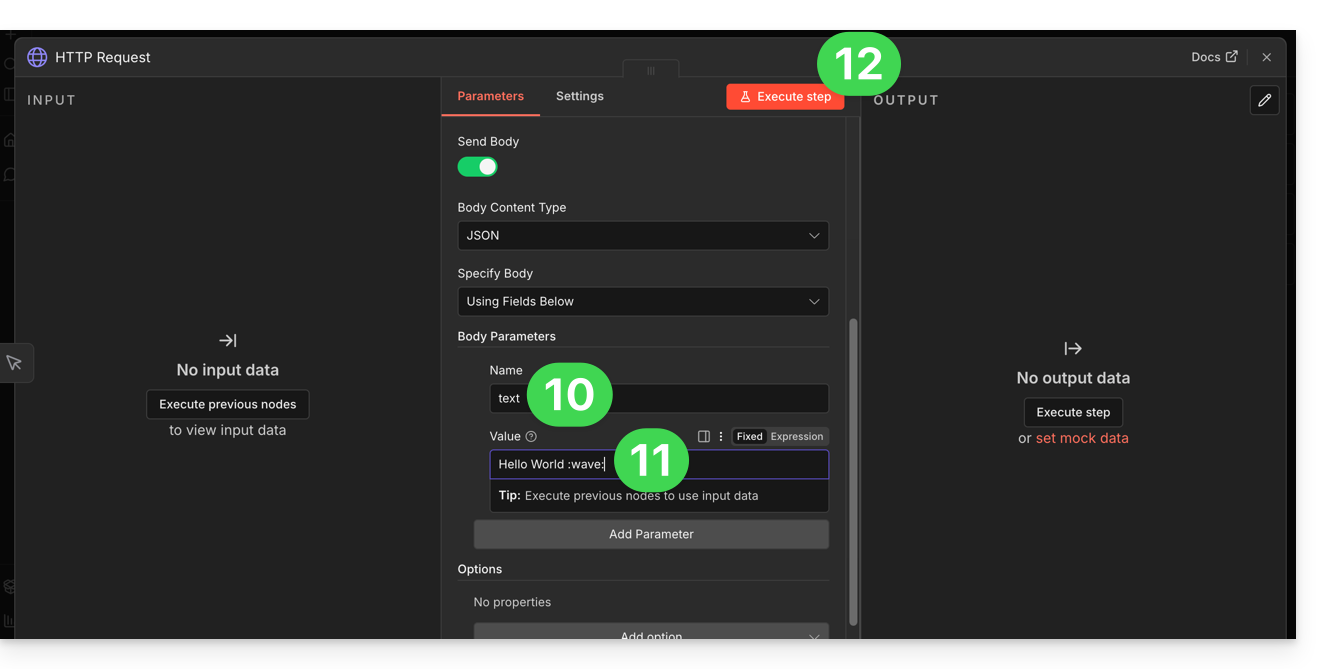
- A mensagem especificada no n8n será então exibida no kChat:
Agora que esta base está funcionando, você pode imaginar substituir o texto fixo por dados provenientes de outras fontes. Por exemplo, adicione um nó "Imap" ou "RSS Feed" antes do nó HTTP Request. Assim, em vez de digitar o texto manualmente, clique no pequeno ícone de engrenagem ao lado de Value > Expression para indicar: "Enviar no kChat o título do último e-mail recebido"…
Link para esta FAQ: https://faq.infomaniak.com/2388
Esta seção de perguntas frequentes foi útil?
Este guia permite que você descubra rapidamente as funções essenciais de Euria, a inteligência artificial à sua disposição dentro de kSuite, que é especialmente eficaz para resumir discussões no aplicativo kChat.
Introdução
- Euria pode ajudá-lo a realizar todo tipo de cálculos, traduções, fornecer informações sobre diferentes tópicos e responder às suas perguntas.
- Leia este outro guia sobre o modelo utilizado e as responsabilidades de cada um.
- Assim que um novo usuário é adicionado, ele recebe uma mensagem de Euria dando-lhe as boas-vindas.
- Leia este outro guia sobre as possibilidades de discussão com a IA no kChat.
Resumir automaticamente uma mensagem do kChat
Para obter o resumo de uma mensagem do kChat:
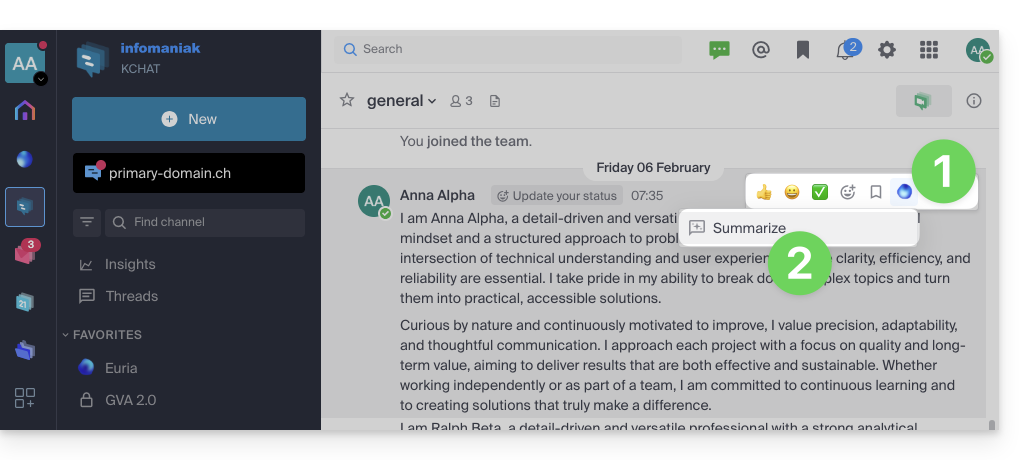
- Passe o mouse sobre a mensagem e selecione o ícone de ações da Euria no canto superior direito.
- Clique em Resumir o tópico de discussão:
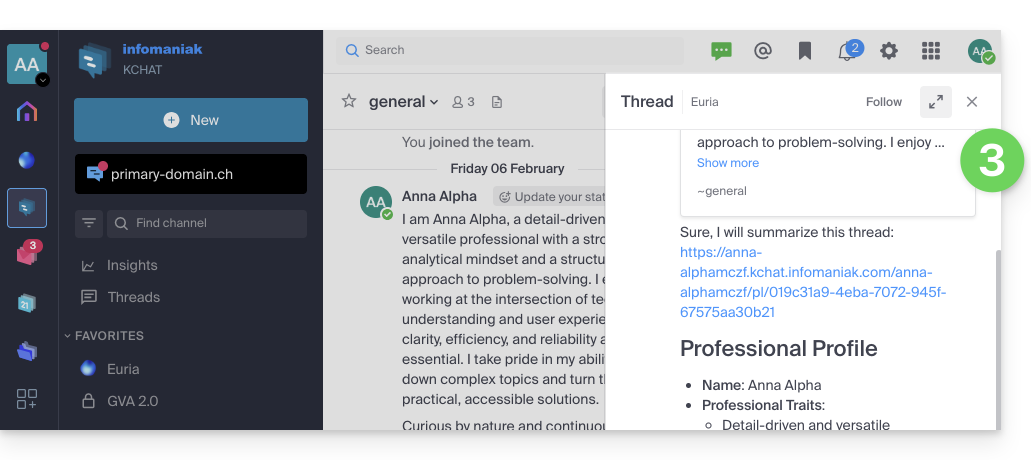
- Obtenha o resumo, gerado pela Euria no painel lateral direito:
Link para esta FAQ: https://faq.infomaniak.com/2480
Esta seção de perguntas frequentes foi útil?
Este guia explica como responder a um e-mail visível no aplicativo web Mail Infomaniak (serviço online ksuite.infomaniak.com/mail) enviando a resposta diretamente no aplicativo web kChat (serviço online ksuite.infomaniak.com/kchat) ou no aplicativo desktop, na forma de uma mensagem privada para o remetente do e-mail.
Introdução
- Esta funcionalidade permite responder a um e-mail diretamente no kChat, com um lembrete da mensagem original para facilitar a compreensão.
- O objetivo é otimizar a colaboração, permitindo responder rapidamente a um e-mail sem sair do ambiente kSuite.
- Reduz o número de idas e vindas entre a caixa de e-mail e o espaço de trabalho colaborativo.
Enviar uma resposta a um e-mail através do kChat
Pré-requisitos
- O botão que dá acesso à funcionalidade só será exibido se o e-mail for recebido de um remetente associado à kSuite e, além disso, na mesma Organização do utilizador que pretende responder.
- Para exibir um atalho para esta funcionalidade, como no primeiro item 3 abaixo, consulte este outro guia.
Quando você receber um e-mail de um colega e quiser responder diretamente no kChat:
- Clique aqui para acessar os e-mails no seu kSuite Infomaniak (❓: ajuda).
- Abra a mensagem à qual deseja responder via kChat.
- Clique no ícone kChat na barra de ferramentas do e-mail:
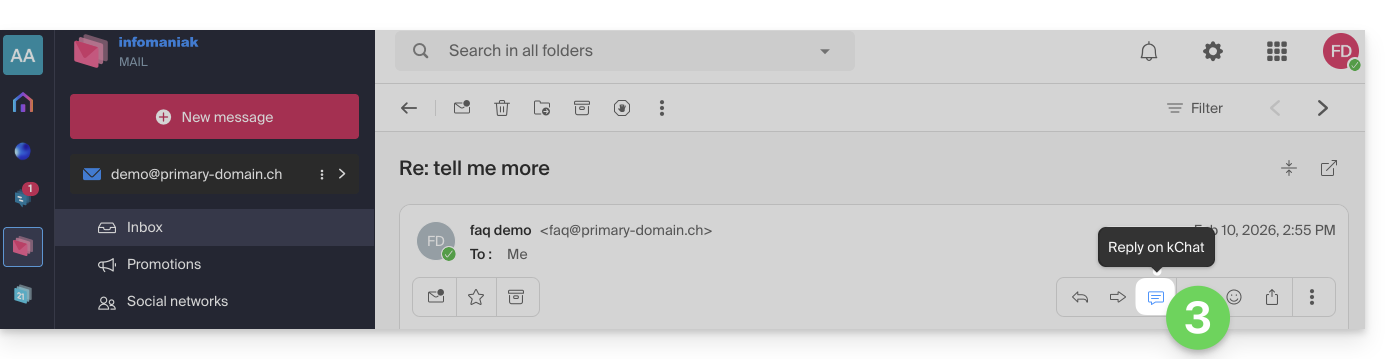
- Também é possível clicar em um botão abaixo da mensagem:
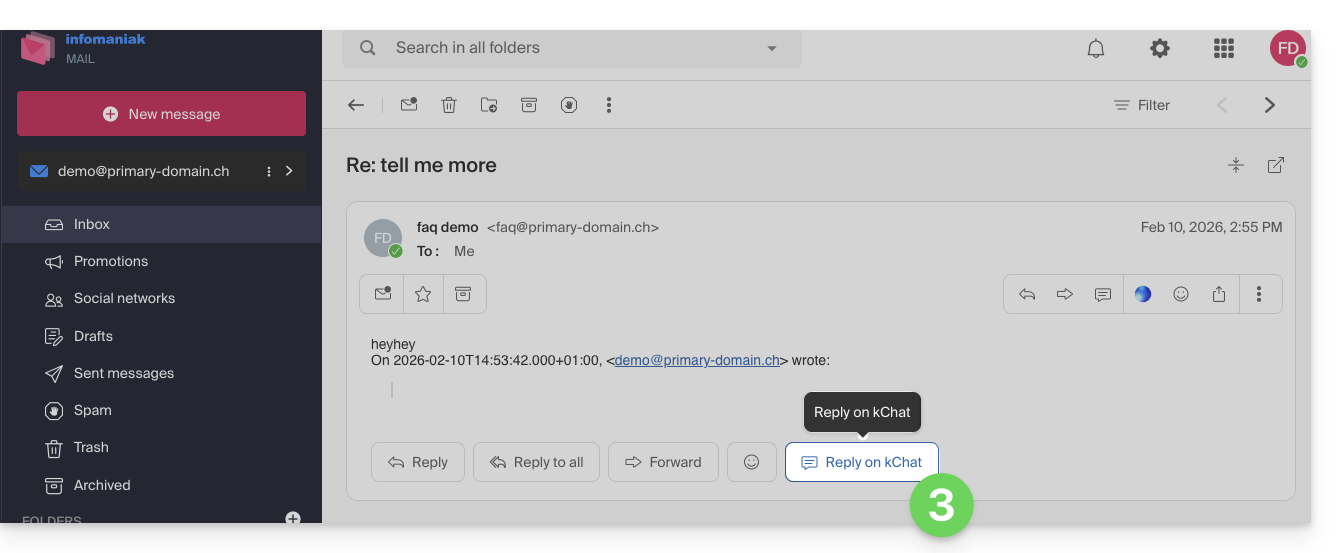
- Também é possível clicar em um botão abaixo da mensagem:
- Escreva sua mensagem kChat, formate-a, se necessário, e clique no botão Enviar no canto inferior direito:
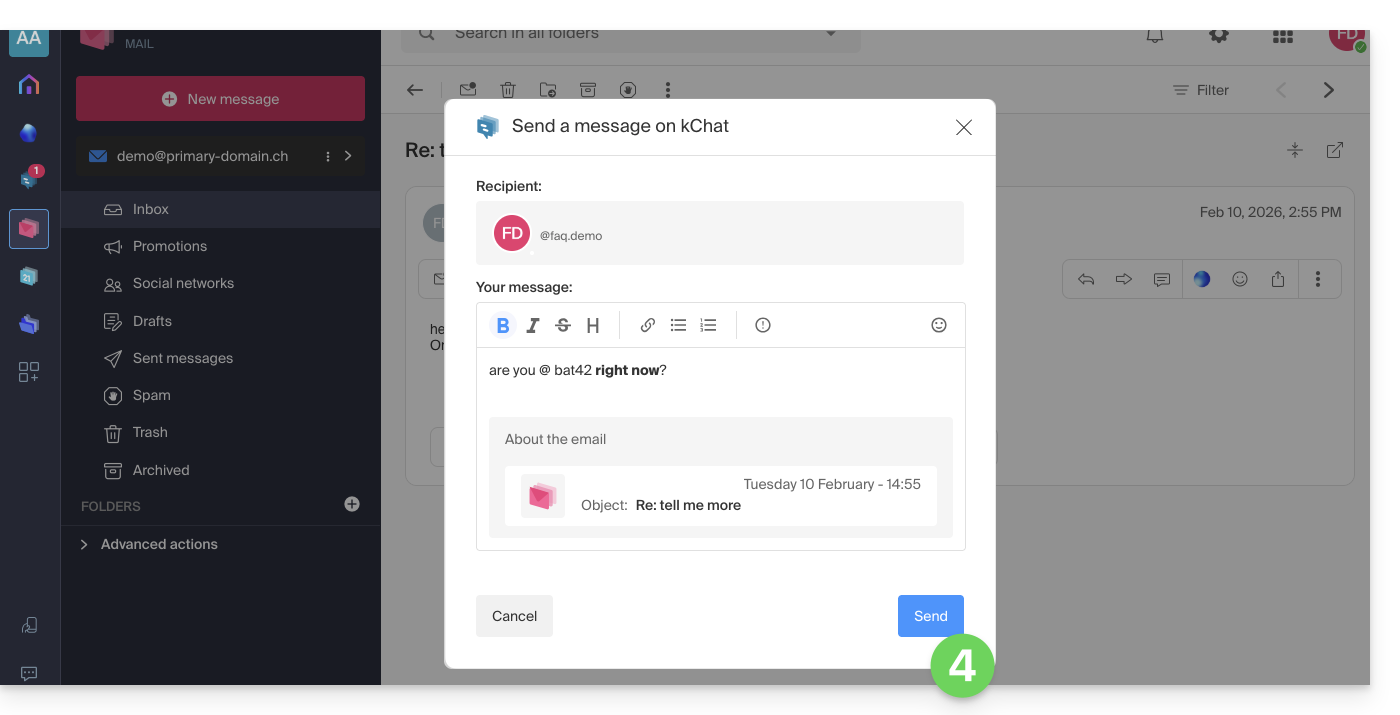
- O seu destinatário recebe a mensagem no kChat, juntamente com uma caixa que exibe o e-mail original (data e hora, assunto):
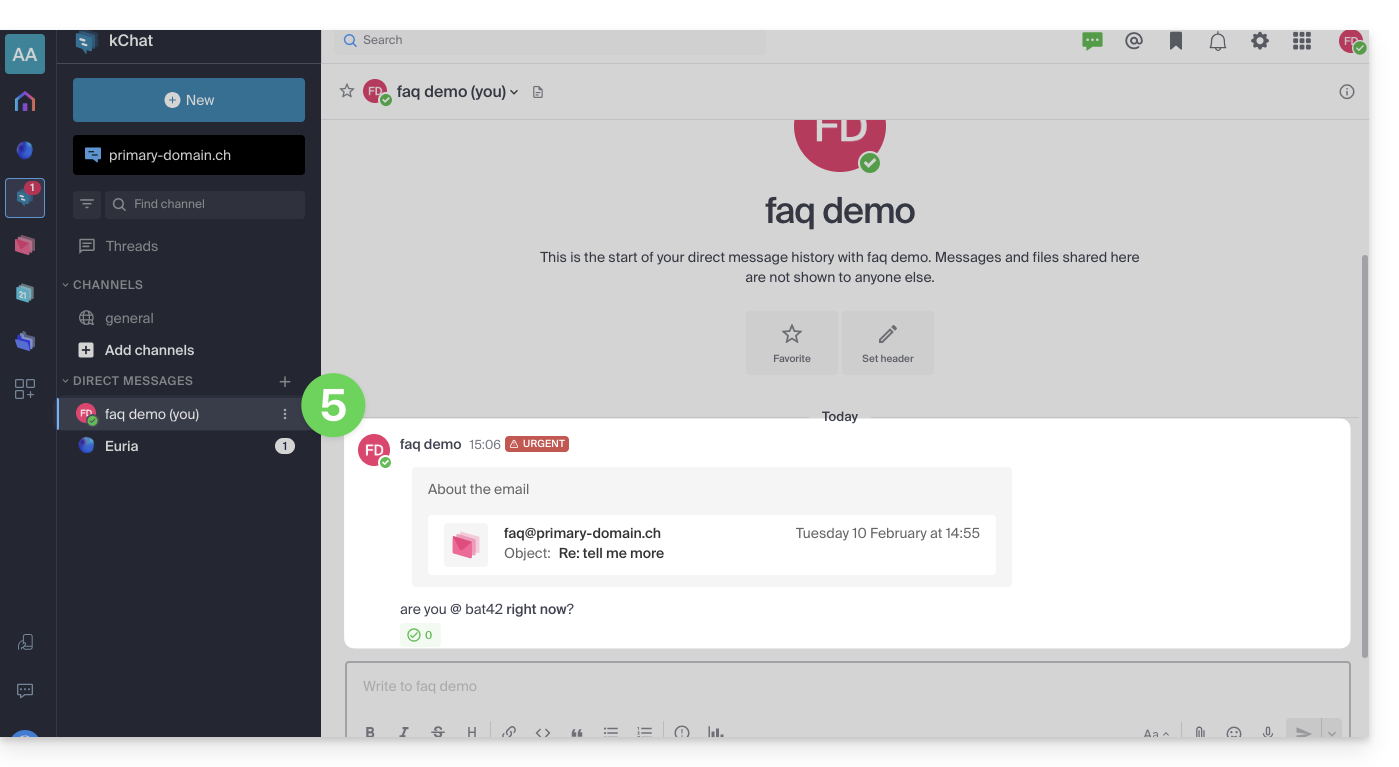
Pode aceder a esta mensagem no kChat (no histórico das mensagens privadas trocadas com o seu destinatário, como mostrado acima), mas também:
- em uma barra de informações na conversa de e-mail,
- na mensagem de confirmação de envio:
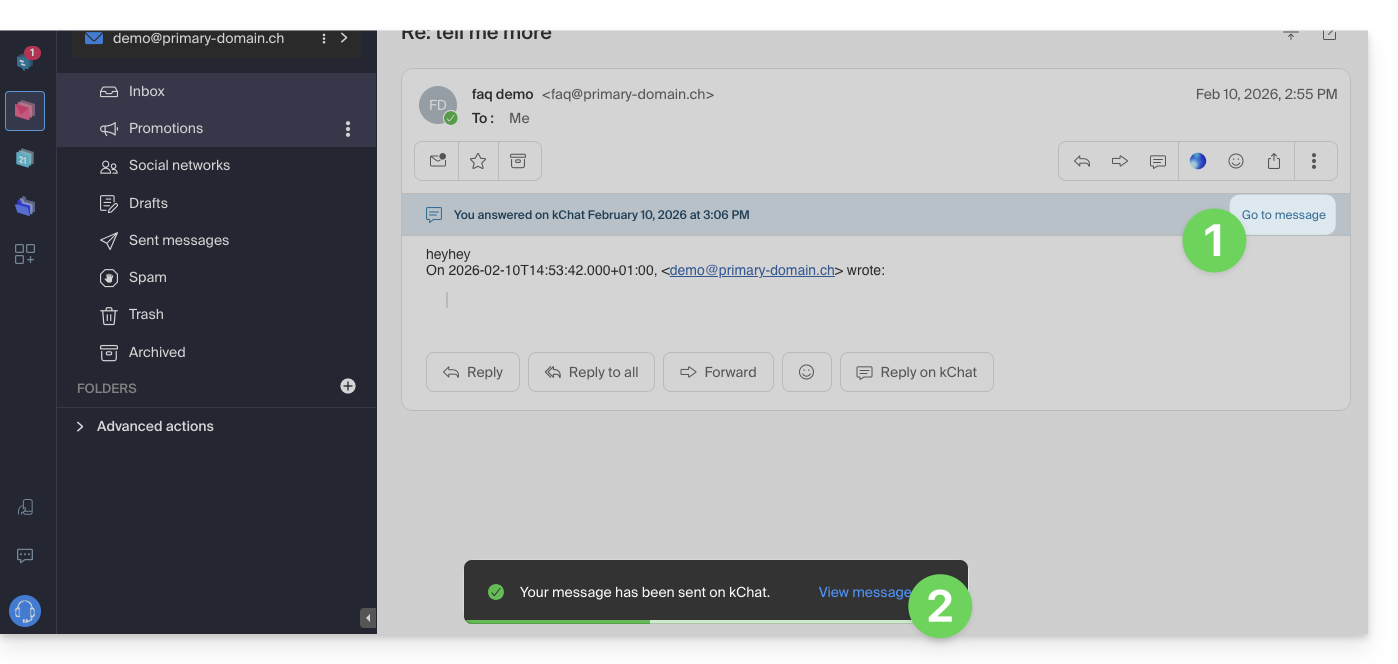
Link para esta FAQ: https://faq.infomaniak.com/2512
Esta seção de perguntas frequentes foi útil?
Este guia detalha o uso e a gestão dos canais no kChat.
Introdução
- Um canal kChat é um espaço de comunicação dedicado a um projeto, um tema ou uma equipe, no qual os membros podem trocar documentos, comunicar em tempo real e organizar videoconferências.
- Os canais privados (e públicos, assim como os convidados) têm um número limitado, dependendo do plano kSuite adquirido (❓: ajuda).
- Histórico armazenado visível (em dias):
- kSuite Free = 90 (e apagado após 365)
- kSuite Standard = ilimitado
- kSuite Business = ilimitado
- kSuite Enterprise = ilimitado
Canal Geral
Cada Organização no kChat possui automaticamente um canal Geral no qual todos os utilizadores são automaticamente convidados: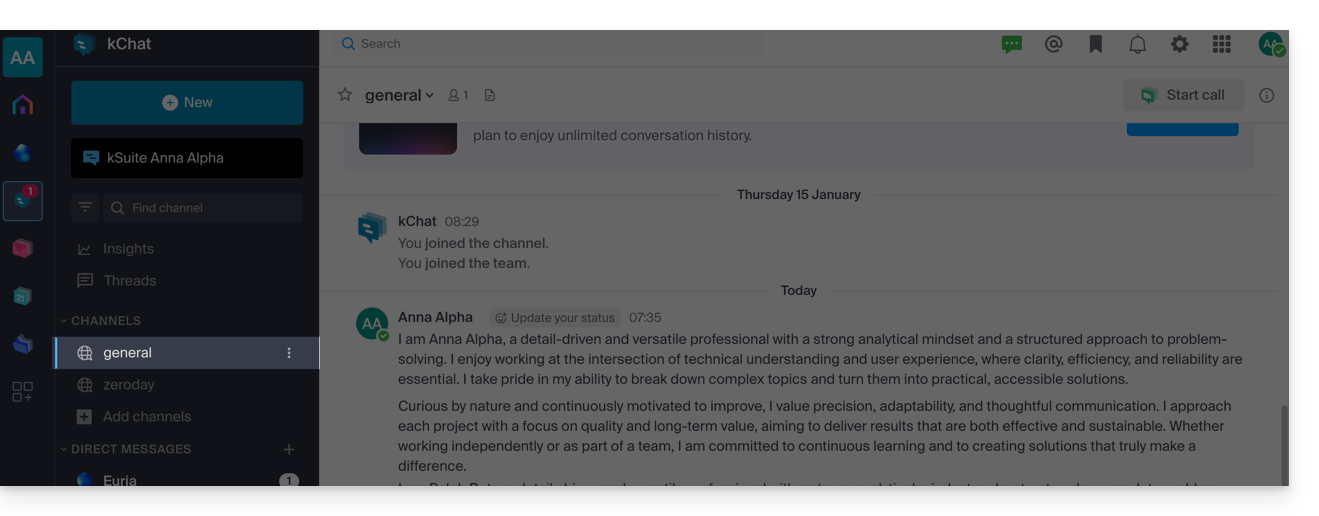
Pode utilizar este canal para partilhar informações que sejam relevantes para toda a sua Organização, como eventos da empresa ou notícias motivadoras.
Você pode, naturalmente, iniciar um novo tópico de conversa (❓: ajuda) dentro do canal Geral; no entanto, é possível restringir a publicação apenas aos administradores (consulte este outro guia no ponto 2.6).
Canal adicional
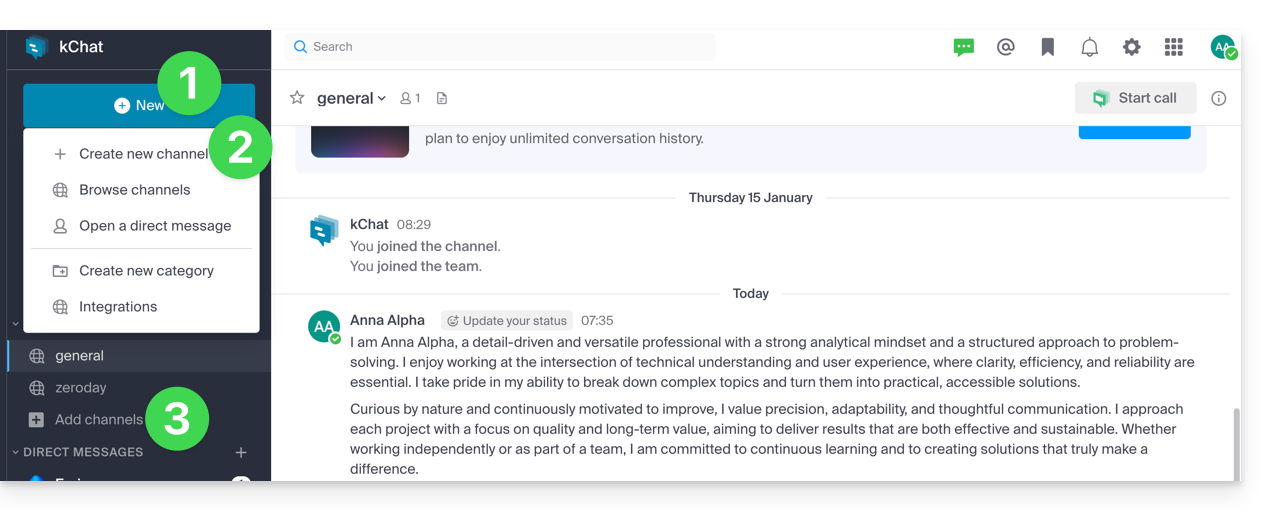
Para adicionar um novo canal de discussão:
- Clique no botão Novo localizado na barra lateral esquerda do aplicativo web kChat (serviço online ksuite.infomaniak.com/kchat).
- Clique em Criar um novo canal.
- Você também pode clicar em Adicionar canais abaixo da lista de canais:
Informações sobre um canal
Ao criar um novo canal, pode escolher: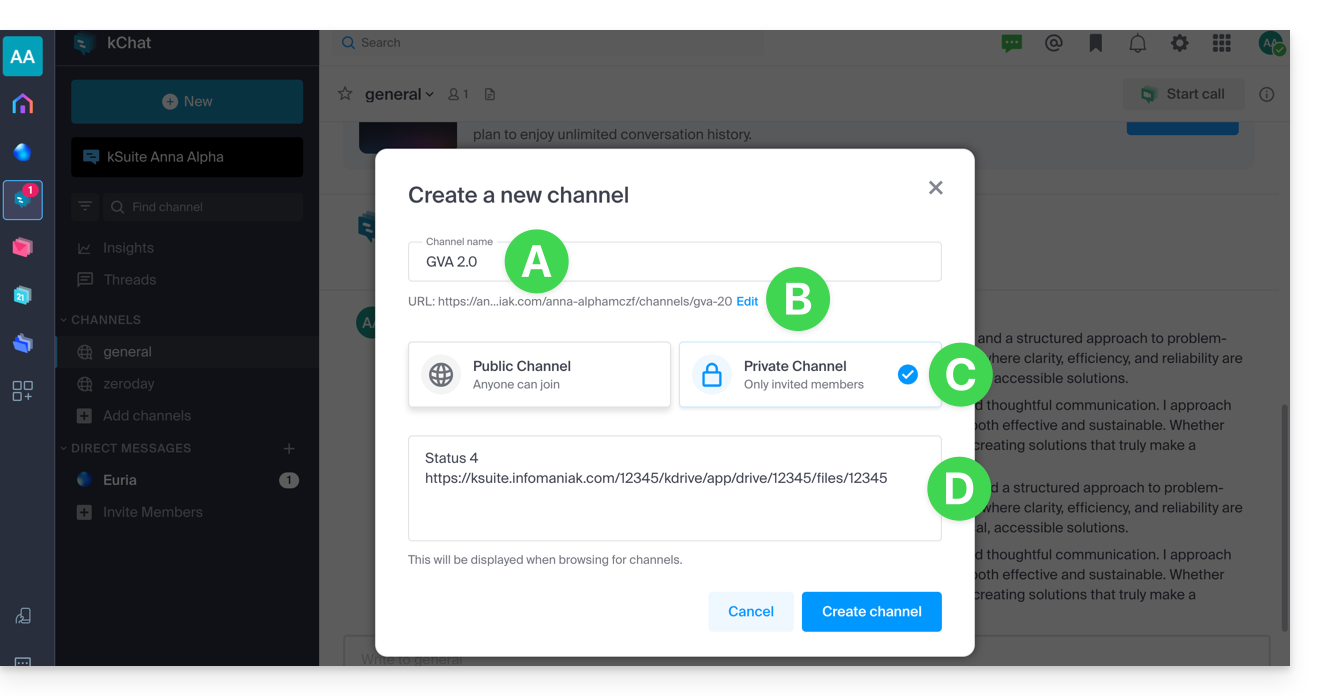
A. o seu nome
Poderá ser alterado posteriormente.
B. seu URL
Por padrão, ele repete o nome do canal, mas você pode modificá-lo usando letras minúsculas, números, pontos, hífens e sublinhados – também é possível alterá-lo posteriormente.
C. o seu estado PRIVADO ou PÚBLICO
Poderá ser modificado posteriormente (veja mais abaixo).
D. A sua descrição
A descrição permite especificar a forma como este canal deve ser utilizado. Este texto aparece na lista de canais no menu «Mais...» e fornece uma indicação aos utilizadores para que saibam se devem aderir ao canal ou não.
Depois de criar o canal, você ainda pode definir:
E. um cabeçalho
e pode clicar em Informações (F)…
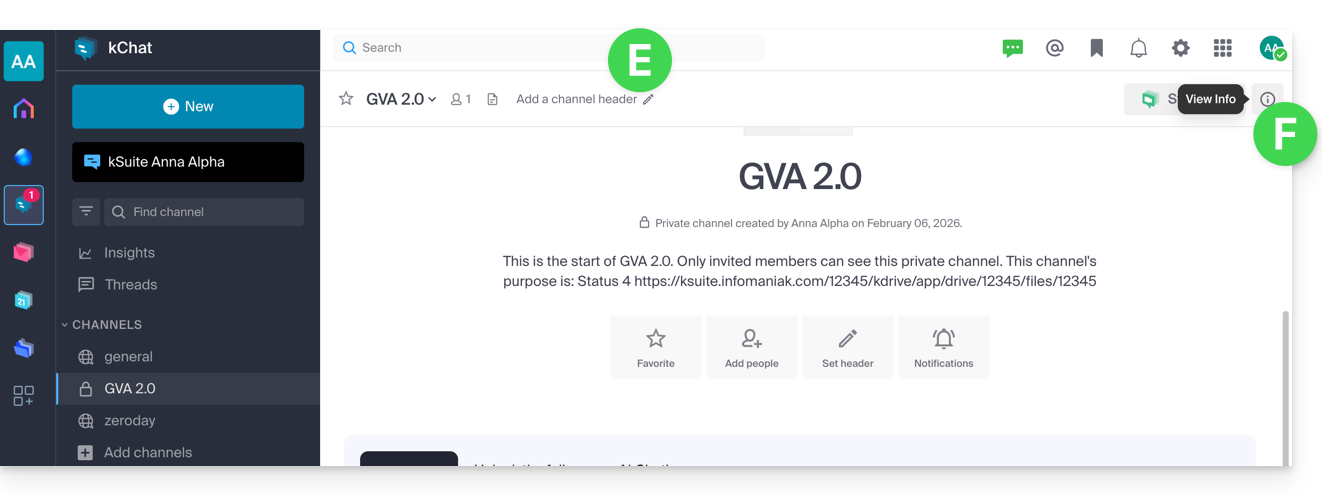
… para encontrar as informações e poder editar algumas delas: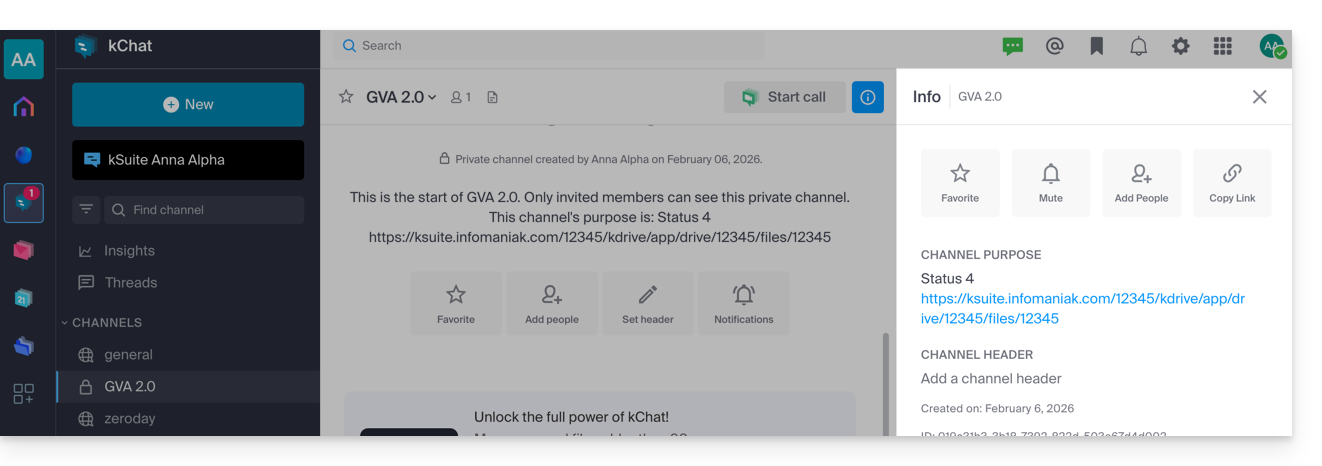
Diferenças entre um canal PRIVADO ou PÚBLICO
Os canais PÚBLICOS aumentam a transparência. Todos os utilizadores podem ver e aderir a um canal público, o que garante que todas as pessoas envolvidas num projeto, tema ou equipa têm acesso à mesma informação.
Os canais PRIVADOS permitem restringir o conteúdo sensível aos utilizadores que escolher. Apenas um membro existente pode convidar outro utilizador para um canal privado. Existem também diferenças na gestão da arquivação/eliminação (consulte abaixo).
Número máximo de canais PRIVADOS/PÚBLICOS:
- kSuite Grátis = 5 / 10
- kSuite Padrão = 50 / 50
- kSuite Business = 100 / 100
- kSuite Enterprise = 1000 / 1000
Converter um canal público em um canal privado, ou vice-versa
Pré-requisitos
- Ser administrador do kChat:
- Não importa o cargo na Organização; ser administrador da Organização na qual existe o kSuite (e, portanto, o kChat) não é obrigatório e, de qualquer forma, não é suficiente:
- Ser administrador do canal também não é suficiente.
- Não importa o cargo na Organização; ser administrador da Organização na qual existe o kSuite (e, portanto, o kChat) não é obrigatório e, de qualquer forma, não é suficiente:
É possível alterar um canal Público para um canal Privado ou vice-versa, tornando um canal privado em público. O histórico das mensagens e os membros que já têm acesso ao canal serão mantidos.
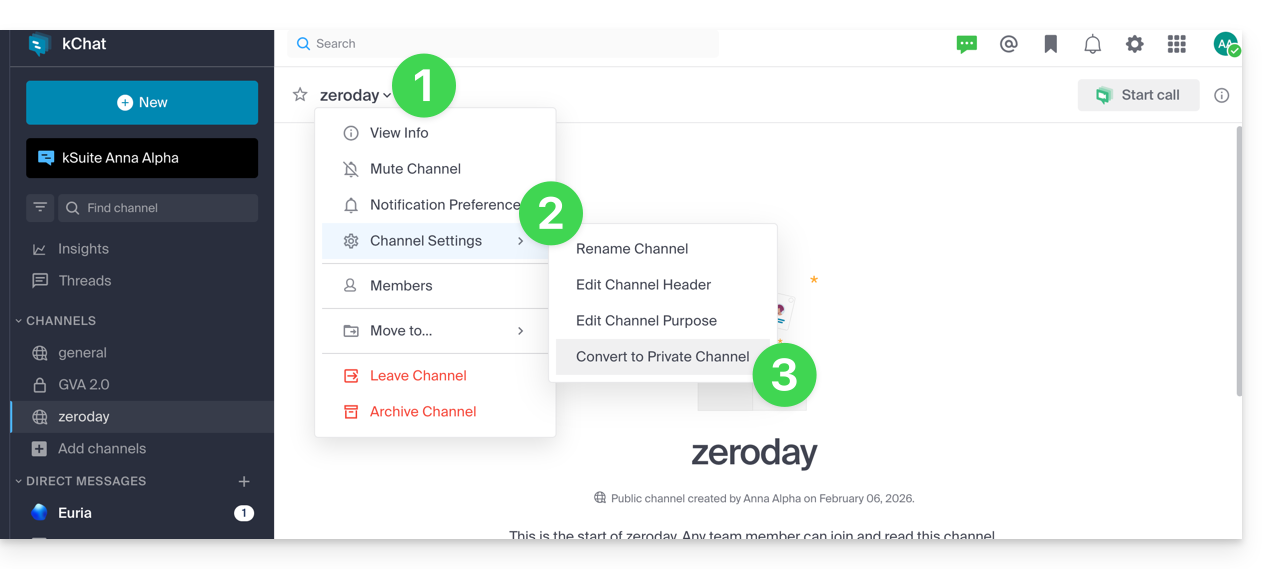
Para bloquear um canal que era público anteriormente (os arquivos compartilhados publicamente permanecem acessíveis a qualquer pessoa que possua o link; a alteração é permanente e não pode ser desfeita):
- Clique na seta para baixo no título do canal, na parte superior da conversa no canal Público.
- Clique em Configurações do canal.
- Escolha Converter:
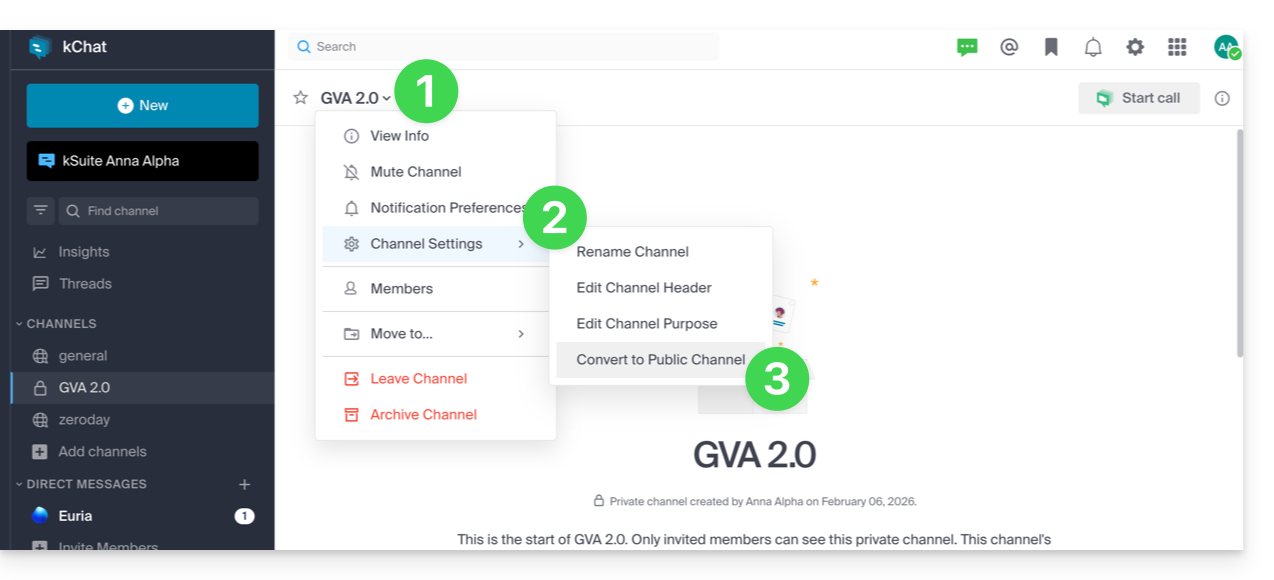
Para tornar acessível um canal que antes era privado (o canal ficará acessível a todos os utilizadores dos outros canais públicos da Organização, exceto os utilizadores externos, que terão de ser convidados manualmente):
- Clique na seta para baixo no título do canal, na parte superior da conversa no canal Privado.
- Clique em Configurações do canal.
- Escolha Converter:
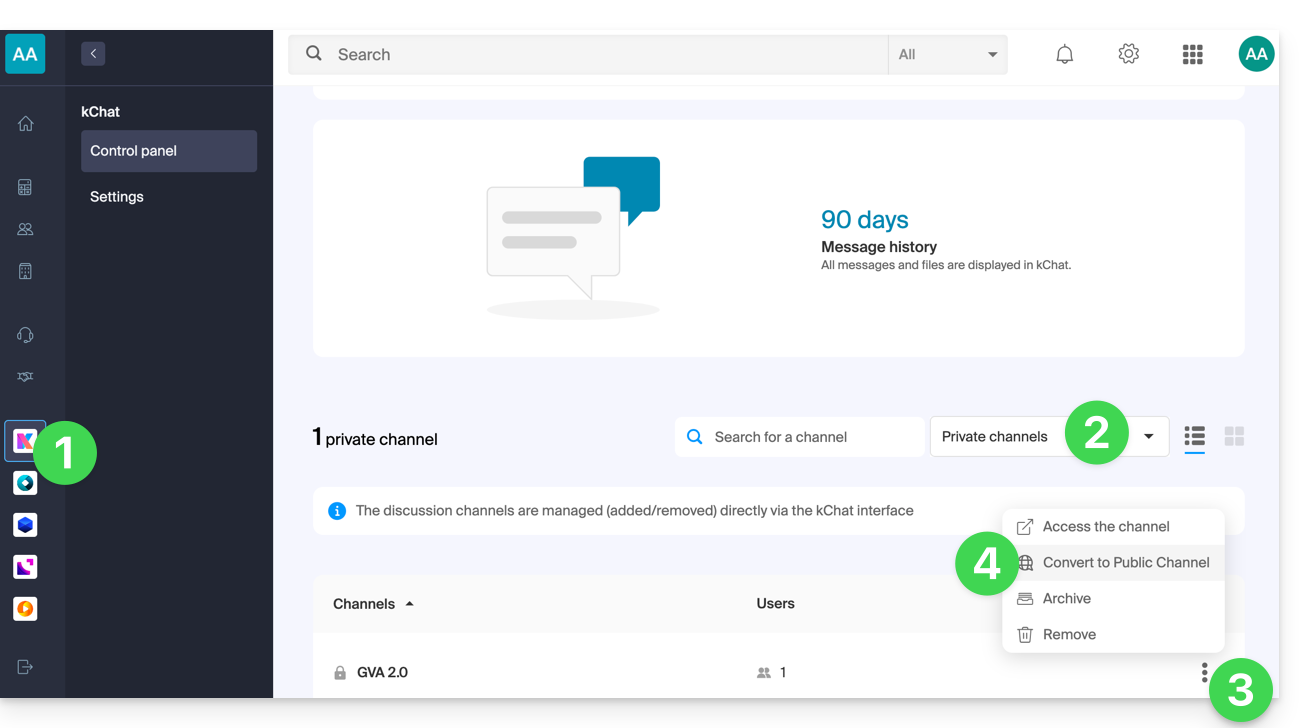
Você também pode realizar a conversão a partir da gestão do kChat no Painel de Controle:
- Clique aqui para acessar a gestão do seu kChat no Painel de Controle Infomaniak (❓: ajuda).
- Clique no menu suspenso para exibir os canais privados.
- Clique no menu de ações ⋮ localizado à direita do item correspondente.
- Clique em Converter em canal público:
Sair de um canal
Além do canal principal, intitulado Geral, você pode sair de um canal a qualquer momento:
- Clique na seta para baixo no título do canal, na parte superior da conversa.
- Clique em Sair do canal:
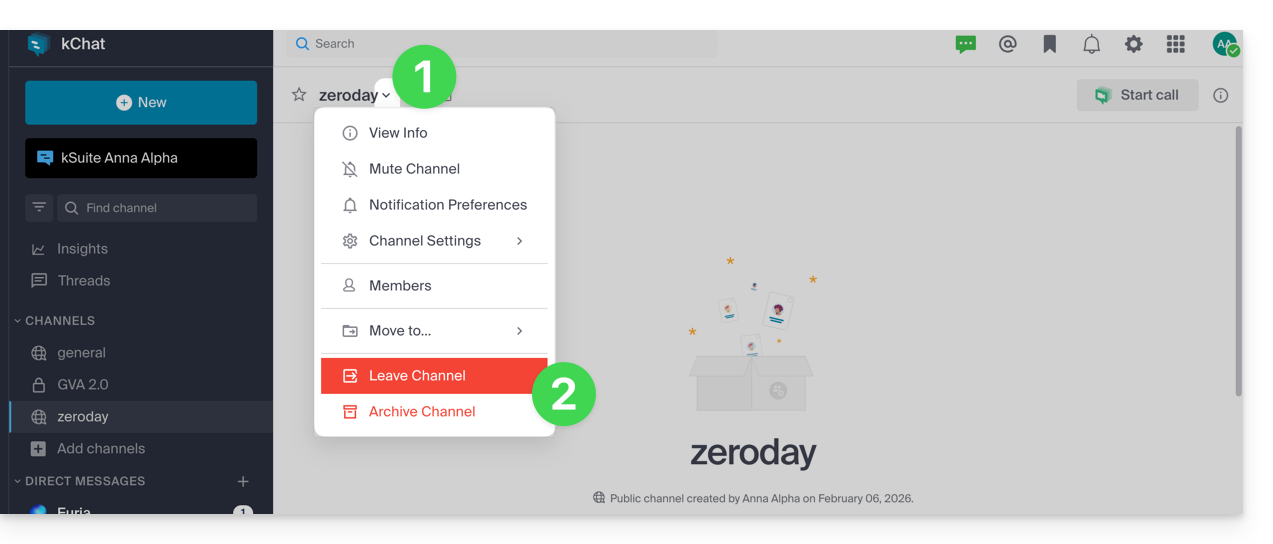
Se sair de um canal privado, não o encontrará mais nas pesquisas, apenas através do seu URL, caso o possua, ou sendo convidado novamente por um membro do canal.
Se sair de um canal público, você o deixará imediatamente, mas poderá voltar a ele quando quiser, simplesmente encontrando-o novamente pelo nome (2) na pesquisa (1), mesmo que ele tenha sido arquivado: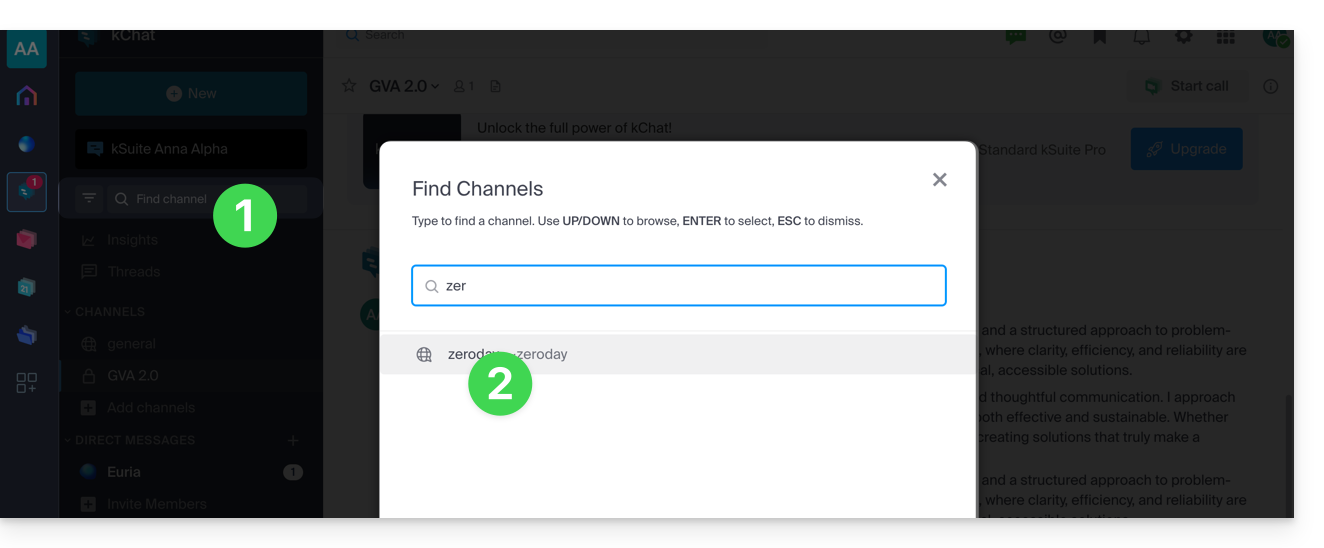
Arquivar / excluir um canal
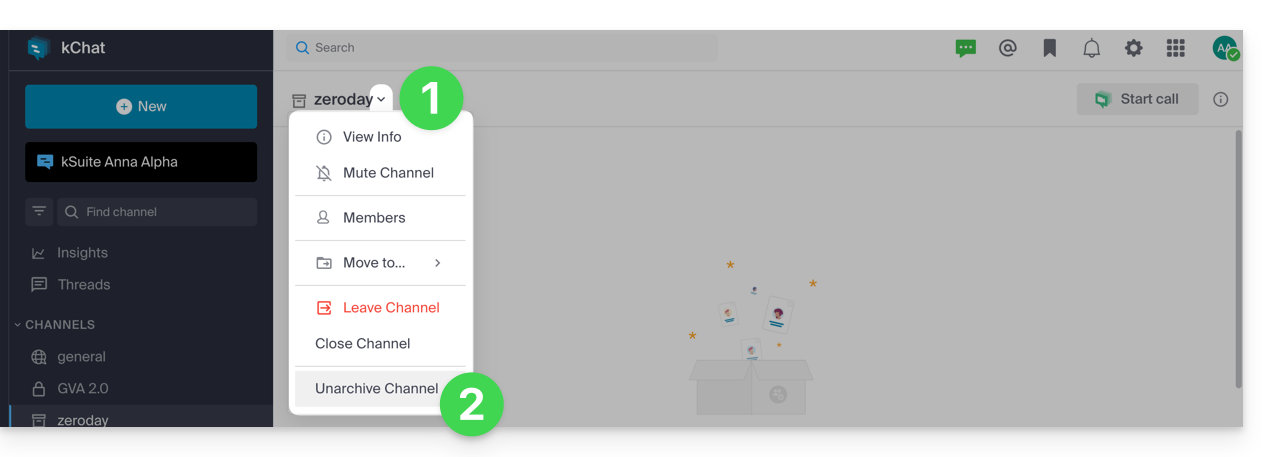
Além do canal principal, intitulado Geral, você pode arquivar um canal a qualquer momento, o que impede o envio de novas mensagens e não o incluirá mais na cota dos seus canais disponíveis. A operação pode ser realizada no Painel de Controle ou diretamente na interface do kChat:
- Clique na seta para baixo no título do canal, na parte superior da conversa.
- Clique em Arquivar canal:
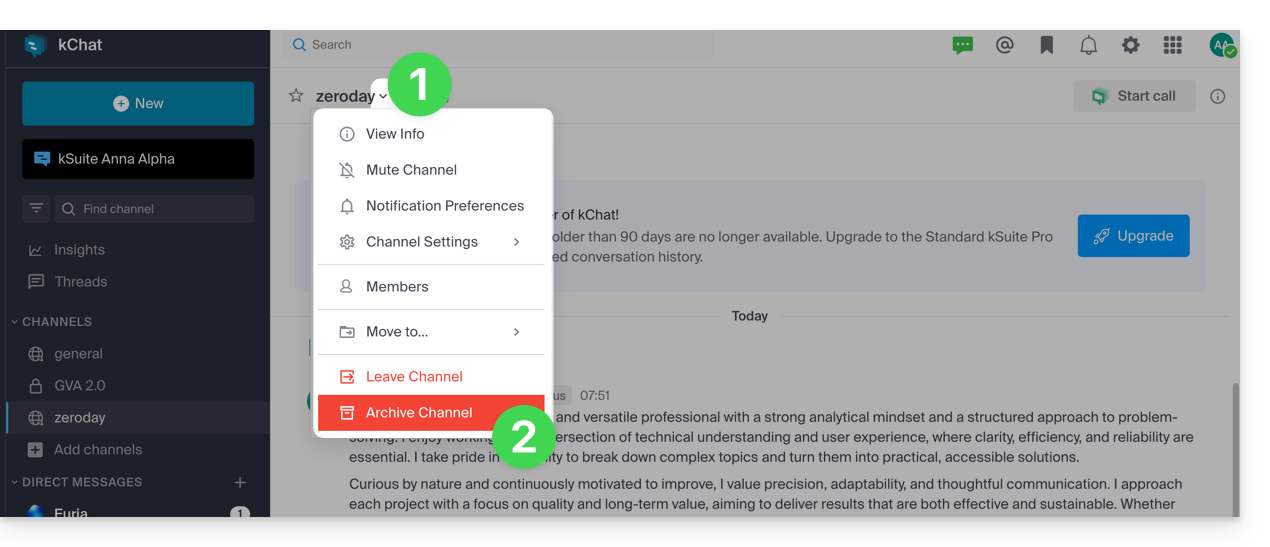
Se criar um canal e, em seguida, o arquivar, poderá voltar a entrar nele quando quiser, simplesmente encontrando-o pelo nome (2) na pesquisa (1):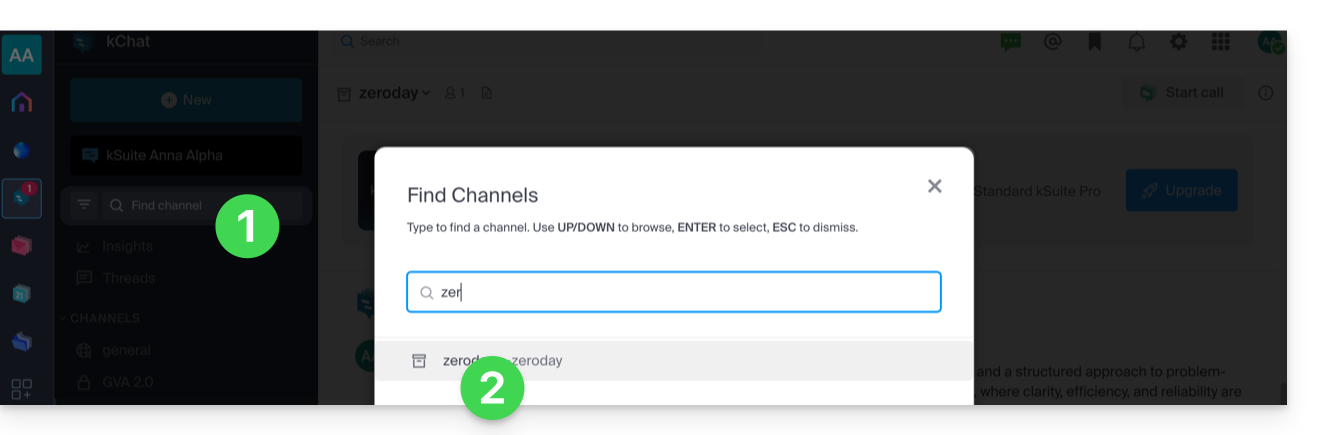
Em seguida, você poderá desativar o arquivo:
- Clique na seta para baixo no título do canal, na parte superior da conversa.
- Clique em Desativar canal:
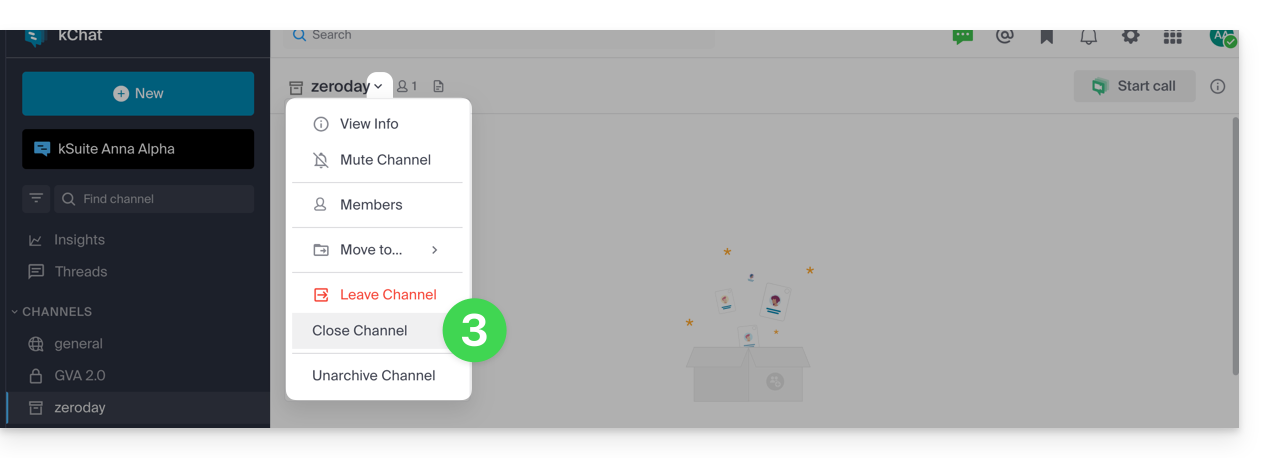
- … ou feche-o para que não apareça mais na sua interface:
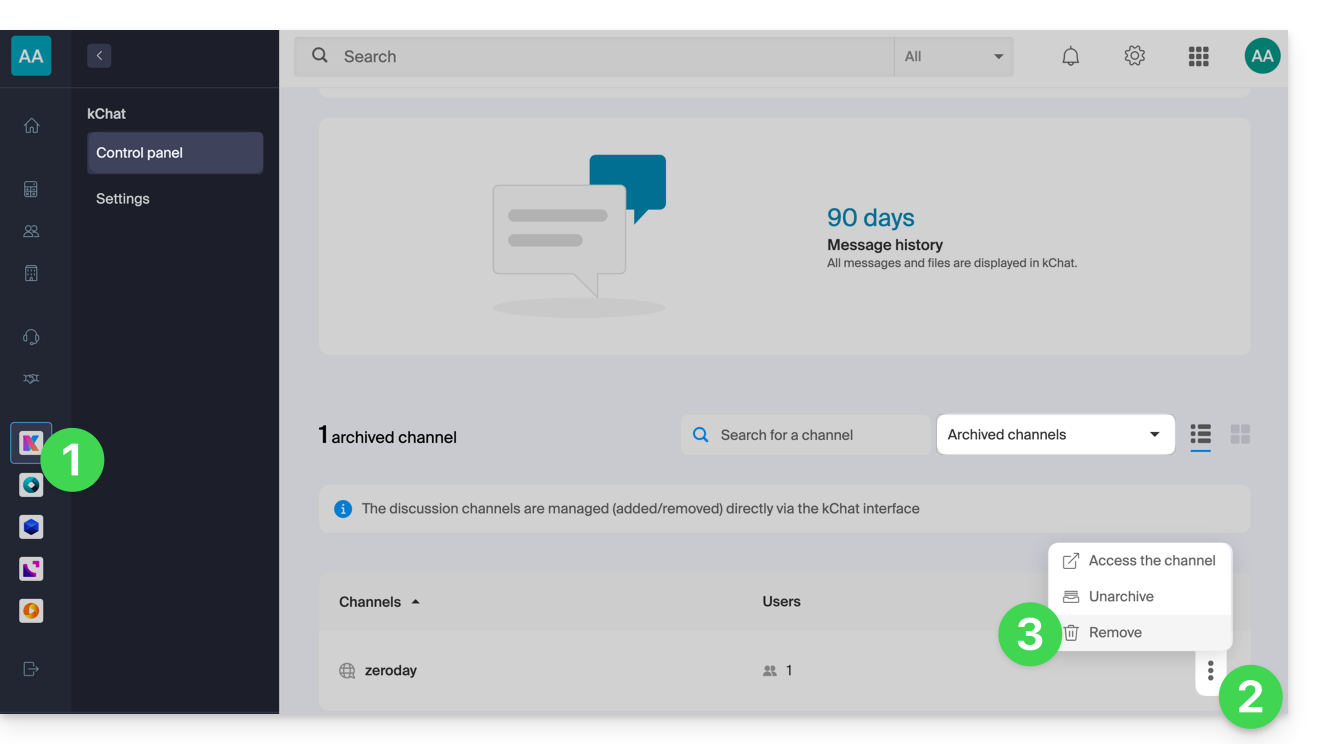
Você também pode excluir um canal e, nesse caso, todos os dados associados serão excluídos permanentemente:
- Clique aqui para acessar o gerenciamento do seu kChat no Painel de Controle Infomaniak (❓: ajuda).
- Clique no menu de ação ⋮, localizado à direita do item em questão.
- Clique em Excluir:
Adicionar aos favoritos
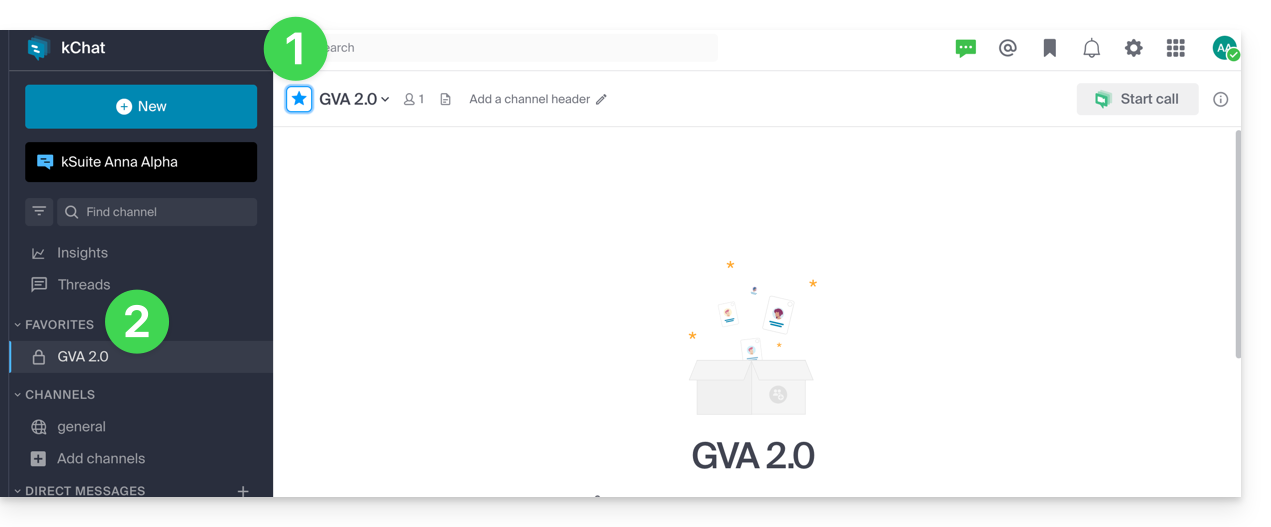
Para adicionar qualquer canal (ou utilizador) aos favoritos:
- No aplicativo web kChat (serviço online ksuite.infomaniak.com/kchat), clique no ícone estrela localizado na parte superior de um canal ou de um usuário.
- Um novo menu Favoritos aparecerá na barra lateral esquerda, agrupando todos os elementos que você adicionou aos favoritos (visível apenas para o seu usuário):
Silenciar um canal
Você pode ocultar as notificações (❓: ajuda) de um canal para não receber mais notificações quando uma nova mensagem for publicada:
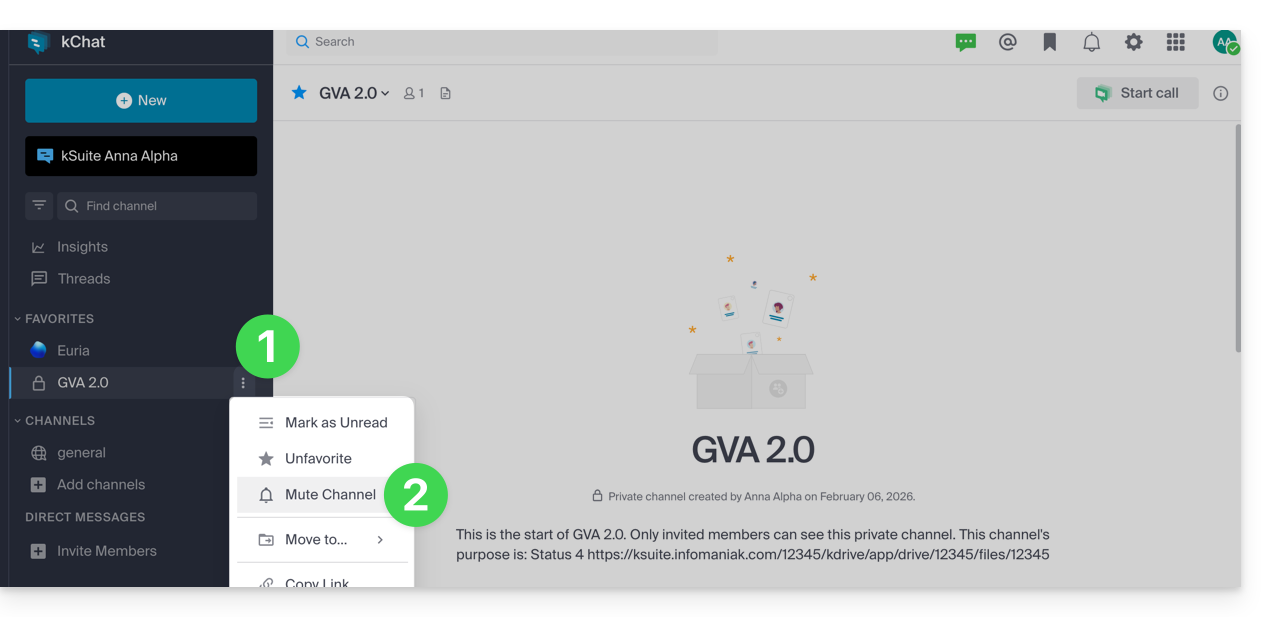
- No aplicativo web kChat (serviço online ksuite.infomaniak.com/kchat), clique no menu de ação ⋮ à direita do canal desejado (na barra lateral esquerda).
- Escolha Silenciar:
Organizar por categorias
Número máximo de categorias (por utilizador):
- kSuite Grátis = 1 (excluindo Favoritos)
- kSuite Standard = ilimitado
- kSuite Business = ilimitado
- kSuite Enterprise = ilimitado
Você pode adicionar uma ou mais categorias para organizar elementos (canal, contato, etc.) dentro delas:
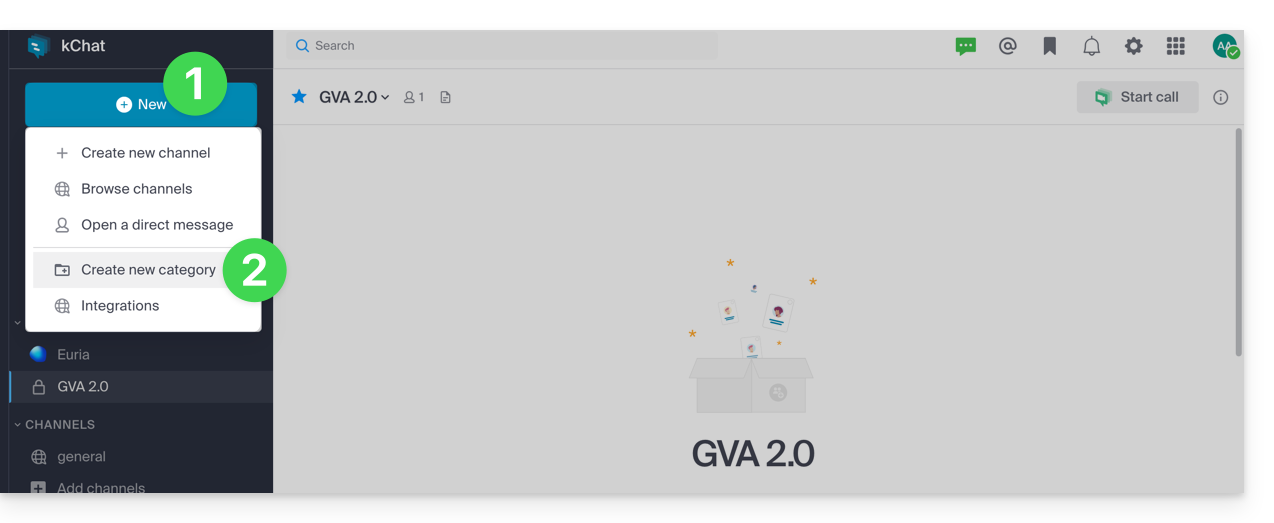
- Clique no botão Novo localizado na barra lateral esquerda do aplicativo web kChat (serviço online ksuite.infomaniak.com/kchat).
- Clique em Criar uma nova categoria:
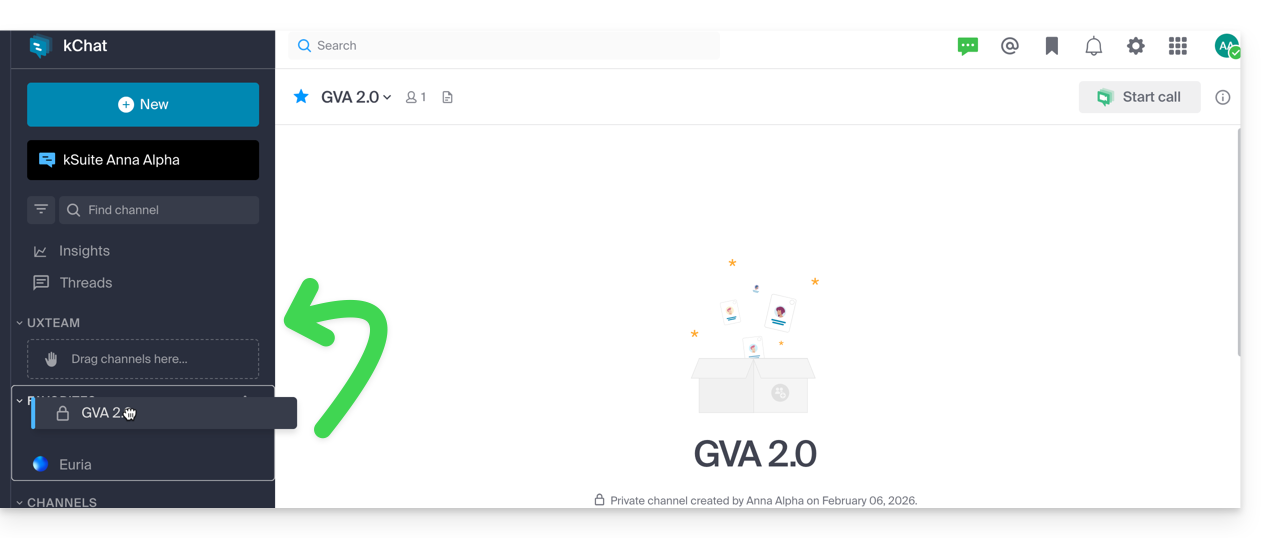
- Em seguida, arraste o canal desejado para a categoria criada (válido apenas para o seu utilizador):
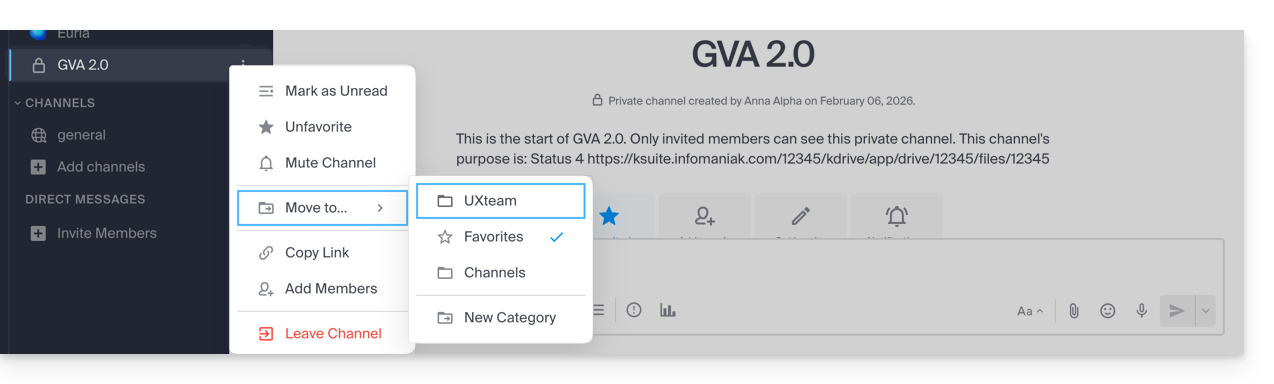
- Você também pode usar o menu de ação ⋮ à direita do canal em questão (na barra lateral esquerda) para realizar estas operações:
Canal de discussão entre utilizadores
As mensagens pessoais (❓: ajuda) são conversas diretas entre duas ou mais pessoas que ocorrem fora dos canais.
Cada utilizador de uma Organização pode criar livremente mensagens pessoais, cujo conteúdo será visível apenas para as pessoas envolvidas: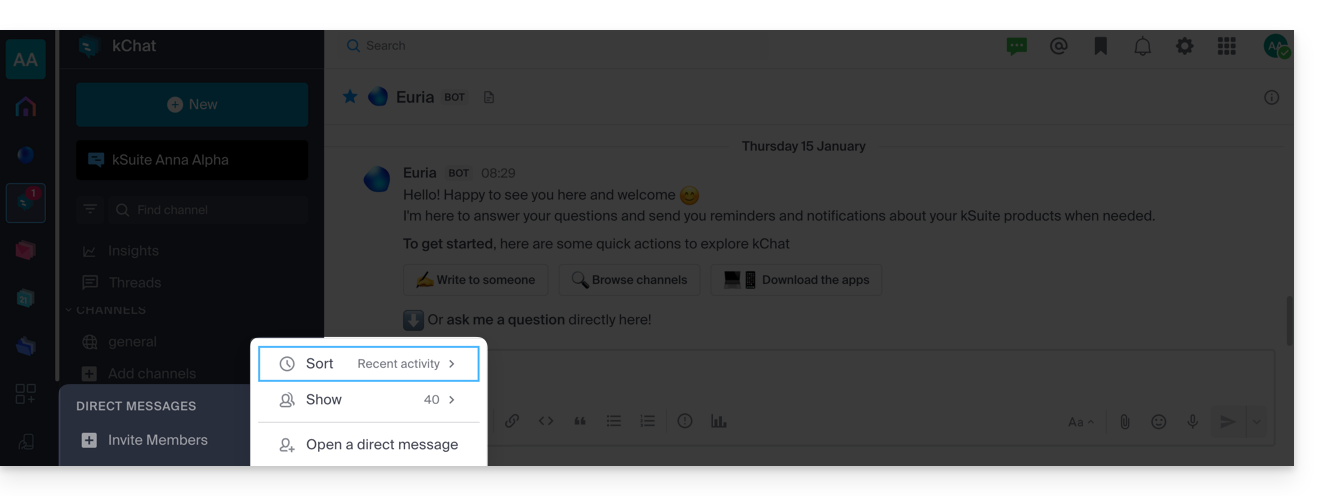
Link para esta FAQ: https://faq.infomaniak.com/2732
Esta seção de perguntas frequentes foi útil?
A Infomaniak é uma empresa suíça certificada pelas normas ISO 27001 e ISO 9001, que cumpre o RGPD.
O seu principal objetivo é garantir a segurança e a confidencialidade dos dados que lhe são confiados.
Diversas medidas são implementadas para garantir a proteção das suas comunicações com o kChat:
- O Painel de Controle Infomaniak permite verificar se os utilizadores da sua Organização ativaram a autenticação de dois fatores.
- Os dados em espera e em trânsito são criptografados, assim como os backups realizados automaticamente pela Infomaniak.
- Os dados são armazenados na Suíça, em centros de dados desenvolvidos e geridos exclusivamente pela Infomaniak.
O kChat evita o spam e outros métodos enganosos que são responsáveis pela maioria dos problemas de segurança e das violações de dados nas empresas.
Ao usar o kChat para se comunicar, você…
- … receba apenas mensagens dos seus colaboradores ou de utilizadores externos que tenha aprovado.
- … pode criar canais privados para restringir informações confidenciais a pessoas específicas.
- … controle permanentemente os direitos de acesso dos utilizadores que podem aceder ao kChat.
Link para esta FAQ: https://faq.infomaniak.com/2733
Esta seção de perguntas frequentes foi útil?