Base de conhecimento
1000 perguntas frequentes, 500 tutoriais e vídeos explicativos. Aqui, você encontra apenas soluções!
Importar as fotos do Google para o kDrive
Este guia explica como exportar as suas fotos do Google Fotos (https://photos.google.com/) e, em seguida, importá-las para o kDrive da Infomaniak.
1. Exportar as suas fotos do Google
Para recuperar as fotos armazenadas no Google Fotos no seu computador, utilize o Google Takeout. Este serviço permite exportar todos os elementos ou selecionar apenas alguns álbuns, caso prefira proceder por etapas:
- Aceda a Google Takeout.
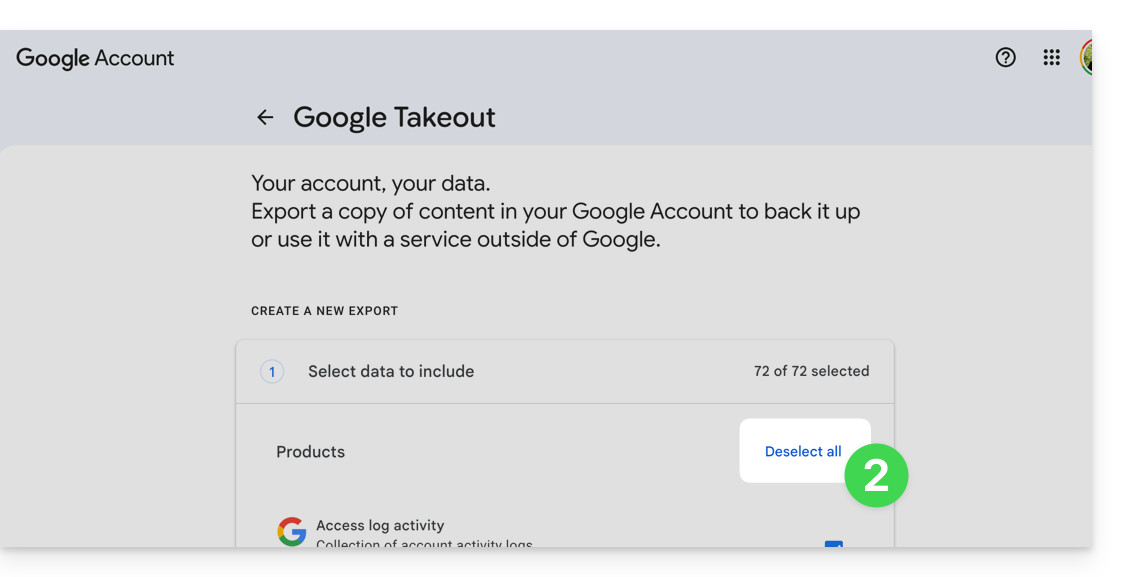
- Desmarque todos os produtos para manter apenas o Google Fotos:
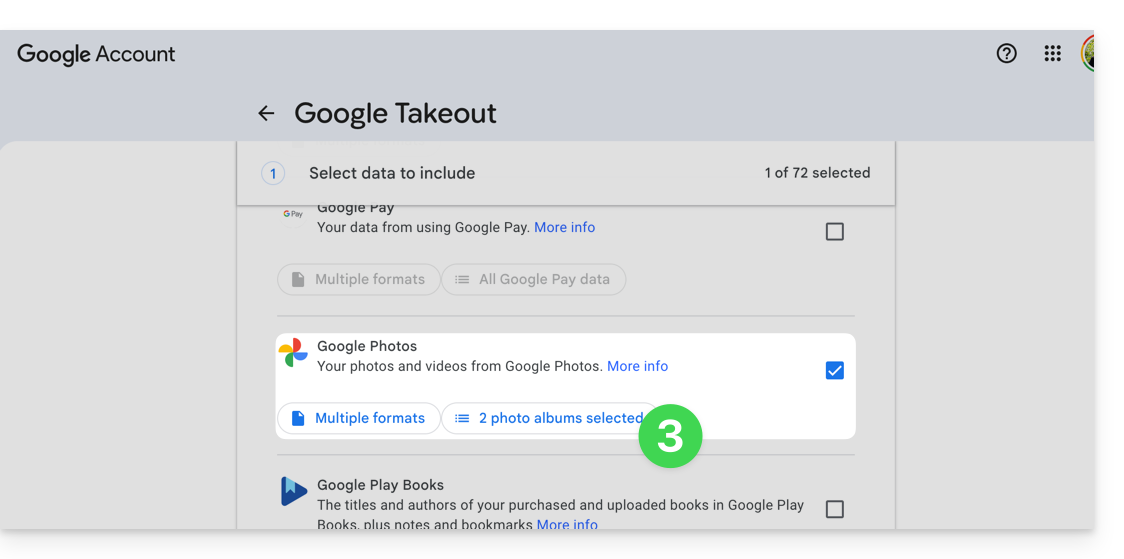
- Se necessário, desmarque os álbuns que não pretende exportar:
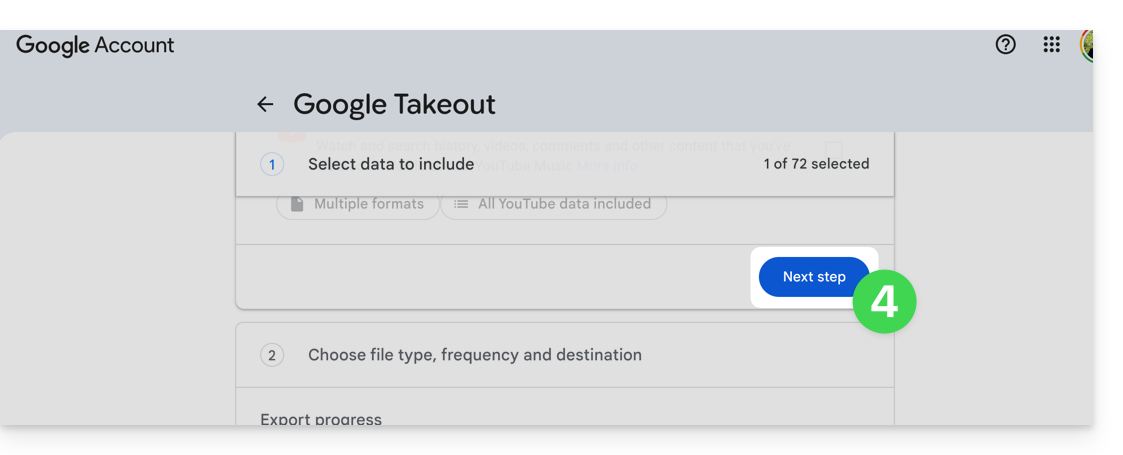
- Passe para o passo seguinte, na parte inferior da página:
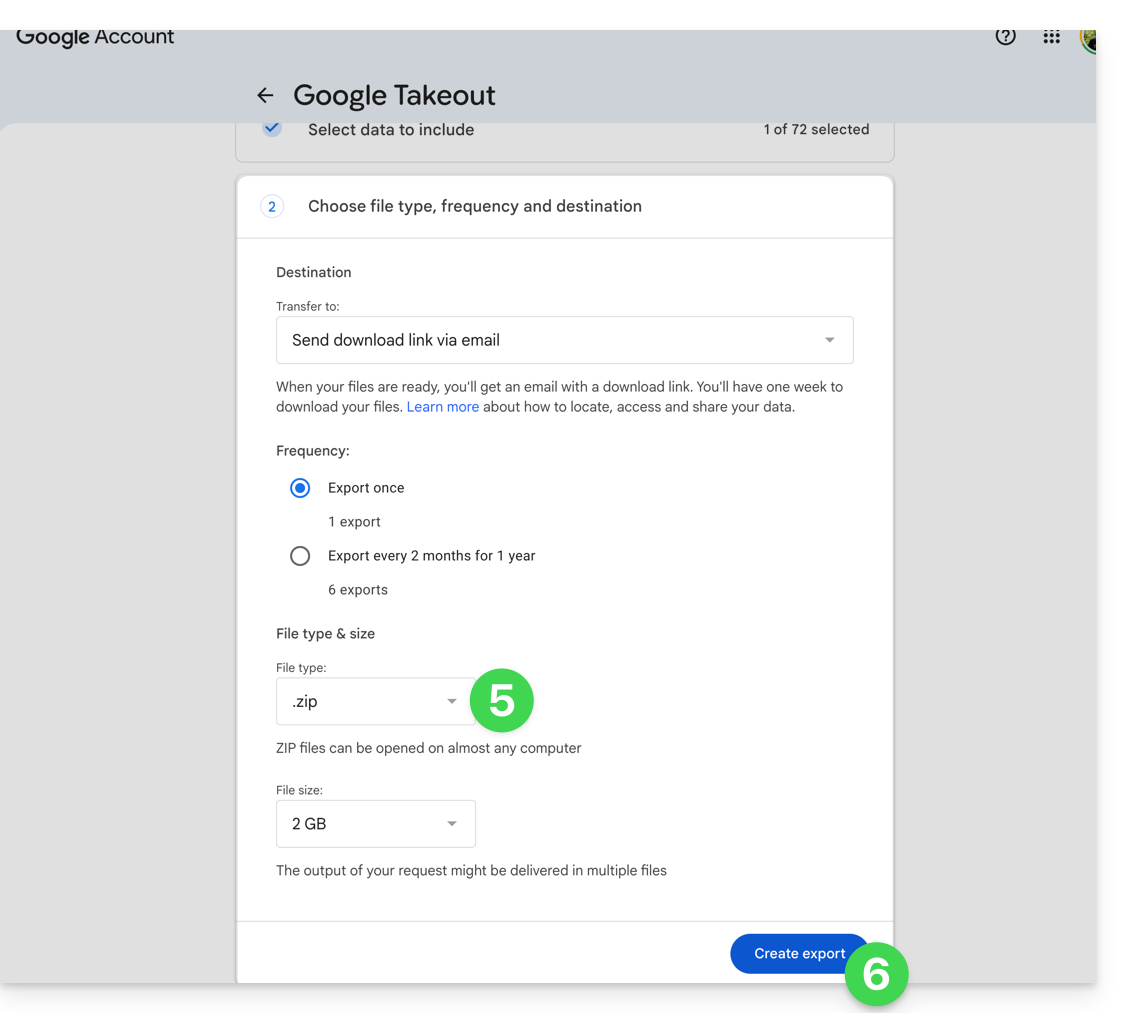
- Configure a exportação para o formato ZIP.
- Clique no botão Criar exportação para iniciar a exportação:
- Aguarde até receber o e-mail com os links de download. Dependendo do volume de dados, a preparação da exportação pode demorar várias horas ou até vários dias.
- Descarregue os arquivos ZIP e, em seguida, descompacte-os no seu computador:
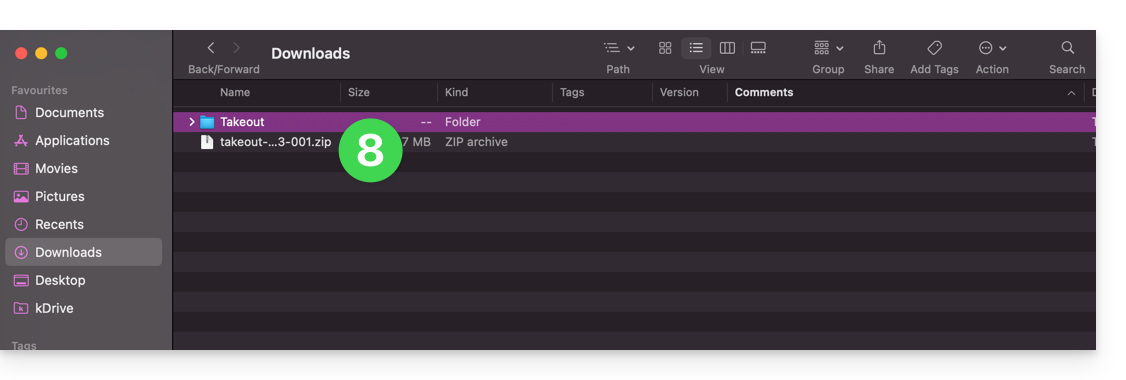
- Se necessário, agrupe as pastas exportadas antes de as importar para o kDrive.
2. Corrigir as datas dos ficheiros exportados
Durante uma exportação, as datas do sistema dos ficheiros podem ser substituídas pela data de exportação em vez da data original da captura. Se a ordem cronológica das fotografias não estiver correta após a exportação, pode corrigir estas datas antes de importar para o kDrive.
Antes de executar um script, trabalhe numa cópia dos seus ficheiros exportados. Não elimine os ficheiros .json fornecidos pelo Google Takeout antes do processamento: estes podem conter a data original quando esta não estiver disponível nos metadados EXIF do ficheiro.
Os scripts abaixo procuram uma data nesta ordem: metadados do ficheiro, ficheiro JSON do Google Takeout associado e, em seguida, a data presente no nome do ficheiro. Os ficheiros sem uma data utilizável são listados num ficheiro DateError.txt criado na área de trabalho. Os ficheiros corrigidos são listados em DateFound.txt.
Para limitar o risco de bloqueios em exportações muito grandes, processe os ficheiros em lotes de alguns milhares de elementos.
Corrigir as datas no macOS
- Descarregue e instale o ExifTool a partir de https://exiftool.org/index.html, escolhendo o pacote macOS.
- Abra a aplicação Terminal na pasta Aplicações > Utilitários.
- Copie e cole o bloco abaixo no Terminal e, se necessário, valide com a tecla Enter.
- Selecione a pasta que contém os ficheiros exportados do Google Takeout.
- Deixe o processamento terminar e, em seguida, consulte os ficheiros
DateFound.txteDateError.txtcriados na área de trabalho.
O script a copiar e colar:
/bin/bash <<'BASH'
#!/bin/bash
set -u

ROOT="$(osascript -e 'POSIX path of (choose folder with prompt "Select the folder containing the files to update")')" || exit 0

DESKTOP="$HOME/Desktop"
LOG_FOUND="$DESKTOP/DateFound.txt"
LOG_ERROR="$DESKTOP/DateError.txt"
: > "$LOG_FOUND"
: > "$LOG_ERROR"

find_exiftool() {
    if command -v exiftool >/dev/null 2>&1; then
        command -v exiftool
        return 0
    fi
    if [ -x "/usr/local/bin/exiftool" ]; then
        printf '%s\n' "/usr/local/bin/exiftool"
        return 0
    fi
    if [ -x "/opt/homebrew/bin/exiftool" ]; then
        printf '%s\n' "/opt/homebrew/bin/exiftool"
        return 0
    fi
    return 1
}

EXIFTOOL="$(find_exiftool)" || {
    printf '%s\n' "ExifTool not found. Install it, then run the script again." >> "$LOG_ERROR"
    printf '%s\n' "ExifTool not found. Check DateError.txt on the desktop."
    exit 1
}

if [ ! -d "$ROOT" ]; then
    printf 'Invalid folder: %s\n' "$ROOT" >> "$LOG_ERROR"
    printf '%s\n' "Invalid folder. Check DateError.txt on the desktop."
    exit 1
fi

get_exif_date() {
    "$EXIFTOOL" -s3 -d "%Y:%m:%d %H:%M:%S" -DateTimeOriginal -CreateDate -MediaCreateDate -TrackCreateDate -CreationDate -ModifyDate -- "$1" 2>/dev/null | awk '/^[0-9]{4}:[0-9]{2}:[0-9]{2} [0-9]{2}:[0-9]{2}:[0-9]{2}/ { print substr($0, 1, 19); exit }'
}

get_json_date() {
    local file="$1"
    local json=""
    if [ -f "$file.json" ]; then
        json="$file.json"
    elif [ -f "${file%.*}.json" ]; then
        json="${file%.*}.json"
    fi
    [ -z "$json" ] && return 1

    /usr/bin/perl -MTime::Piece -0777 -ne 'if (/"photoTakenTime"\s*:\s*\{.*?"timestamp"\s*:\s*"([0-9]+)"/s || /"creationTime"\s*:\s*\{.*?"timestamp"\s*:\s*"([0-9]+)"/s) { print localtime($1)->strftime("%Y:%m:%d %H:%M:%S"); }' "$json"
}

get_name_date() {
    local name
    name="$(basename "$1")"
    if [[ "$name" =~ ([12][0-9]{3})[-_]?([01][0-9])[-_]?([0-3][0-9])([_\ -]?([0-2][0-9])[-_\.]?([0-5][0-9])[-_\.]?([0-5][0-9]))? ]]; then
        local year="${BASH_REMATCH[1]}"
        local month="${BASH_REMATCH[2]}"
        local day="${BASH_REMATCH[3]}"
        local hour="12"
        local minute="00"
        local second="00"
        if [ -n "${BASH_REMATCH[5]:-}" ]; then
            hour="${BASH_REMATCH[5]}"
            minute="${BASH_REMATCH[6]}"
            second="${BASH_REMATCH[7]}"
        fi
        printf '%s:%s:%s %s:%s:%s\n' "$year" "$month" "$day" "$hour" "$minute" "$second"
        return 0
    fi
    return 1
}

is_valid_date() {
    date -j -f "%Y:%m:%d %H:%M:%S" "$1" "+%Y:%m:%d %H:%M:%S" >/dev/null 2>&1
}

to_touch_date() {
    printf '%s' "$1" | sed -E 's/^([0-9]{4}):([0-9]{2}):([0-9]{2}) ([0-9]{2}):([0-9]{2}):([0-9]{2})$/\1\2\3\4\5.\6/'
}

write_metadata() {
    local file="$1"
    local date_value="$2"
    "$EXIFTOOL" -overwrite_original "-DateTimeOriginal=$date_value" "-CreateDate=$date_value" "-ModifyDate=$date_value" -- "$file" >/dev/null 2>&1 || true
}

process_file() {
    local file="$1"
    local date_value=""
    local source=""

    date_value="$(get_exif_date "$file")"
    if [ -n "$date_value" ]; then
        source="EXIF"
    else
        date_value="$(get_json_date "$file")"
        if [ -n "$date_value" ]; then
            source="Google Takeout JSON"
        else
            date_value="$(get_name_date "$file")"
            if [ -n "$date_value" ]; then
                source="file name"
            fi
        fi
    fi

    if [ -n "$date_value" ] && is_valid_date "$date_value"; then
        local touch_value
        touch_value="$(to_touch_date "$date_value")"
        if [ "$source" != "EXIF" ]; then
            write_metadata "$file" "$date_value"
        fi
        if touch -t "$touch_value" "$file" 2>/dev/null; then
            printf '%s | %s | %s\n' "$source" "$date_value" "$file" >> "$LOG_FOUND"
        else
            printf 'Unable to update file date: %s\n' "$file" >> "$LOG_ERROR"
        fi
    else
        printf 'No valid date found: %s\n' "$file" >> "$LOG_ERROR"
    fi
}

while IFS= read -r -d '' file; do
    case "$file" in
        *.json|*_original) continue ;;
    esac
    process_file "$file"
done < <(find "$ROOT" -type f -print0)

printf '%s\n' "Done. Check DateFound.txt and DateError.txt on the desktop."
BASH
Corrigir as datas no Windows
- Descarregue o ExifTool em https://exiftool.org/index.html, selecionando o executável para Windows.
- Coloque-o numa pasta acessível, por exemplo,
C:\ExifTool. - Renomeie o ficheiro
exiftool(-k).exeparaexiftool.exe. - Verifique se o caminho completo é
C:\ExifTool\exiftool.exe.- Se colocar o ExifTool noutro local, modifique a primeira linha de configuração do script abaixo.
- Copie e cole o script abaixo no Bloco de Notas.
- Guarde o ficheiro com a extensão
.ps1, por exemplo,UpdateExifDates.ps1. - Clique com o botão direito no ficheiro
.ps1e execute-o com o PowerShell. - Selecione a pasta que contém os ficheiros exportados do Google Takeout.
- Aguarde que o processamento termine e, em seguida, consulte os ficheiros
DateFound.txteDateError.txtcriados na área de trabalho.
Se o PowerShell bloquear a execução do script, abra o PowerShell e execute o comando Set-ExecutionPolicy RemoteSigned -Scope CurrentUser e, em seguida, confirme a alteração quando o Windows o solicitar.
O script a ser copiado e colado na íntegra:
# === Configuration ===
$ExifToolPath = "C:\ExifTool\exiftool.exe"
$Desktop = [Environment]::GetFolderPath("Desktop")
$LogFound = Join-Path $Desktop "DateFound.txt"
$LogError = Join-Path $Desktop "DateError.txt"
Set-Content -Path $LogFound -Value ""
Set-Content -Path $LogError -Value ""

if (-not (Test-Path -LiteralPath $ExifToolPath)) {
    Add-Content -Path $LogError -Value "ExifTool not found: $ExifToolPath"
    Write-Host "ExifTool not found. Check the path in the script."
    exit
}

# === Folder selection dialog ===
Add-Type -AssemblyName System.Windows.Forms
$FolderBrowser = New-Object System.Windows.Forms.FolderBrowserDialog
$FolderBrowser.Description = "Select the folder to process"
if ($FolderBrowser.ShowDialog() -ne [System.Windows.Forms.DialogResult]::OK) { exit }
$Folder = $FolderBrowser.SelectedPath

function Get-DateFromExif {
    param ([string]$FilePath)

    $Tags = @("DateTimeOriginal", "CreateDate", "MediaCreateDate", "TrackCreateDate", "CreationDate", "ModifyDate")
    foreach ($Tag in $Tags) {
        $Value = (& $ExifToolPath "-$Tag" -s3 -d "%Y:%m:%d %H:%M:%S" -- "$FilePath" 2>$null | Select-Object -First 1)
        if ($Value -match '^(\d{4}):(\d{2}):(\d{2}) (\d{2}):(\d{2}):(\d{2})') {
            try {
                return [datetime]::ParseExact($Matches[0], "yyyy:MM:dd HH:mm:ss", [Globalization.CultureInfo]::InvariantCulture)
            } catch {}
        }
    }
    return $null
}

function Get-DateFromJson {
    param ([string]$FilePath)

    $JsonPaths = @("$FilePath.json", [System.IO.Path]::ChangeExtension($FilePath, ".json")) | Select-Object -Unique
    foreach ($JsonPath in $JsonPaths) {
        if (Test-Path -LiteralPath $JsonPath) {
            try {
                $Json = Get-Content -LiteralPath $JsonPath -Raw -ErrorAction Stop | ConvertFrom-Json -ErrorAction Stop
                $Timestamp = $null
                if ($Json.photoTakenTime -and $Json.photoTakenTime.timestamp) {
                    $Timestamp = [int64]$Json.photoTakenTime.timestamp
                } elseif ($Json.creationTime -and $Json.creationTime.timestamp) {
                    $Timestamp = [int64]$Json.creationTime.timestamp
                }

                if ($null -ne $Timestamp) {
                    return ([DateTimeOffset]::FromUnixTimeSeconds($Timestamp)).LocalDateTime
                }
            } catch {}
        }
    }
    return $null
}

function Get-DateFromFileName {
    param ([string]$FileName)

    if ($FileName -match '([12]\d{3})[-_]?(0[1-9]|1[0-2])[-_]?(0[1-9]|[12]\d|3[01])(?:[ _-]?([01]\d|2[0-3])[-_.]?([0-5]\d)[-_.]?([0-5]\d))?') {
        $Year = $Matches[1]
        $Month = $Matches[2]
        $Day = $Matches[3]
        $Hour = "12"
        $Minute = "00"
        $Second = "00"

        if ($Matches[4]) {
            $Hour = $Matches[4]
            $Minute = $Matches[5]
            $Second = $Matches[6]
        }

        $DateString = "$Year$Month$Day$Hour$Minute$Second"
        try {
            return [datetime]::ParseExact($DateString, "yyyyMMddHHmmss", [Globalization.CultureInfo]::InvariantCulture)
        } catch {}
    }
    return $null
}

function Write-Metadata {
    param (
        [string]$FilePath,
        [datetime]$DateValue
    )

    $ExifDate = $DateValue.ToString("yyyy:MM:dd HH:mm:ss", [Globalization.CultureInfo]::InvariantCulture)
    & $ExifToolPath -overwrite_original "-DateTimeOriginal=$ExifDate" "-CreateDate=$ExifDate" "-ModifyDate=$ExifDate" -- "$FilePath" 2>$null | Out-Null
}

function Set-FileDates {
    param (
        [string]$FilePath,
        [datetime]$DateValue
    )

    [System.IO.File]::SetCreationTime($FilePath, $DateValue)
    [System.IO.File]::SetLastWriteTime($FilePath, $DateValue)
    [System.IO.File]::SetLastAccessTime($FilePath, $DateValue)
}

Get-ChildItem -LiteralPath $Folder -Recurse -File | Where-Object {
    $_.Extension -ne ".json" -and $_.Name -notlike "*_original"
} | ForEach-Object {
    $File = $_
    $FilePath = $File.FullName
    $DateValue = Get-DateFromExif -FilePath $FilePath
    $Source = "EXIF"

    if (-not $DateValue) {
        $DateValue = Get-DateFromJson -FilePath $FilePath
        $Source = "Google Takeout JSON"
    }

    if (-not $DateValue) {
        $DateValue = Get-DateFromFileName -FileName $File.Name
        $Source = "file name"
    }

    if ($DateValue) {
        try {
            if ($Source -ne "EXIF") {
                Write-Metadata -FilePath $FilePath -DateValue $DateValue
            }
            Set-FileDates -FilePath $FilePath -DateValue $DateValue
            Add-Content -Path $LogFound -Value "$Source | $($DateValue.ToString('yyyy-MM-dd HH:mm:ss')) | $FilePath"
        } catch {
            Add-Content -Path $LogError -Value "Unable to update file date: $FilePath"
        }
    } else {
        Add-Content -Path $LogError -Value "No valid date found: $FilePath"
    }
}

[System.Windows.Forms.MessageBox]::Show("Done. Check DateFound.txt and DateError.txt on the desktop.")
3. Importar as fotos para o kDrive
Não altere as suas palavras-passe até que a importação ou a sincronização seja concluída.
Depois de os seus ficheiros estarem prontos, pode importá-los a partir da aplicação Web kDrive, caso o número de ficheiros e a sua ligação à Internet permitam o envio a partir do navegador:
- Aceda à aplicação Web kDrive da Infomaniak.
- Abra o local onde as fotos devem ser importadas.
- Clique no botão Novo no canto superior esquerdo.
- Clique em Importar pasta.
- Selecione a pasta que contém suas fotos no seu computador.
- Aguarde até o final da importação. O registro de atividades é exibido no canto inferior direito:
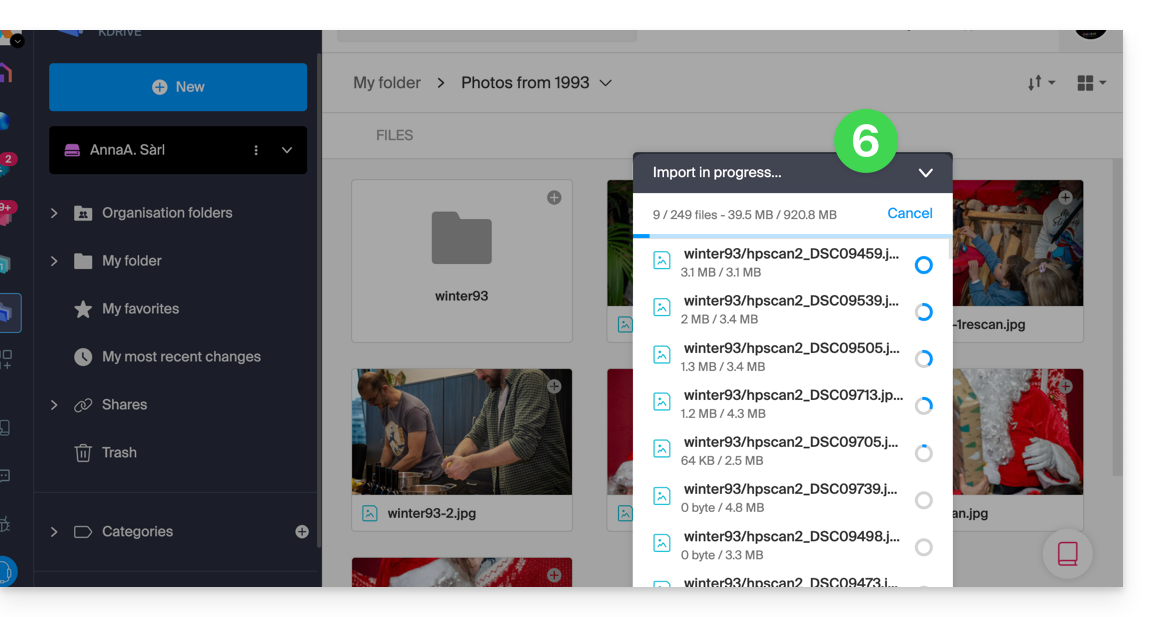
Se você estiver usando o aplicativo desktop kDrive, também pode colocar a pasta que contém suas fotos na estrutura da sua pasta kDrive no computador. A sincronização será iniciada automaticamente e os arquivos serão enviados para os servidores Infomaniak.
4. Acessar as fotos a partir dos seus dispositivos
Após a conclusão da importação ou sincronização, suas fotos estarão acessíveis a partir dos dispositivos conectados ao seu kDrive.
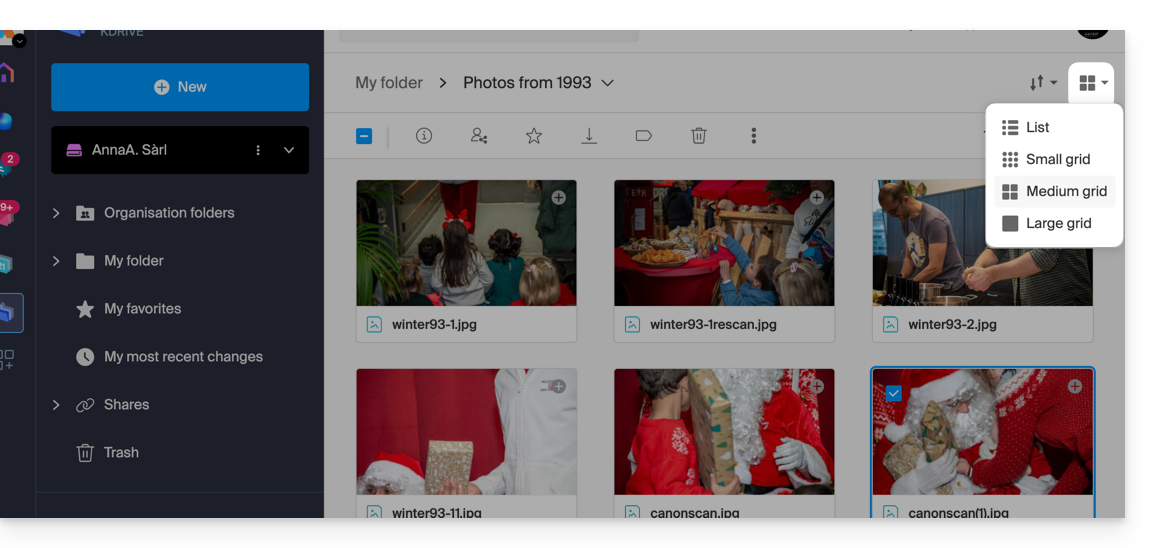
- No aplicativo web kDrive, você pode alterar a exibição para ampliar as miniaturas e navegar mais facilmente pelas suas fotos:
Link para esta FAQ: https://faq.infomaniak.com/2540
Esta seção de perguntas frequentes foi útil?