Base de conhecimento
1000 perguntas frequentes, 500 tutoriais e vídeos explicativos. Aqui, você encontra apenas soluções!
Back up QNAP with rClone or HBS to Swiss Backup (Swift)
This guide details how to back up a QNAP NAS using rClone or HBS via the OpenStack Swift protocol on Swiss Backup, the backup solution in a Swiss independent cloud.
Connecting via rClone
Prerequisites
- Have an Swiss Backup Infomaniak account with an available device quota (minimum 1) for a Cloud backup.
- Add 1 device of type Cloud to obtain the OpenStack Swift parameters.
- Install the rClone application (https://www.qnapclub.eu/en/qpkg/330) or HBS (https://www.qnap.com/en/software/hybrid-backup-sync) on the QNAP.
To configure a new backup:
- Copy the content below into the
rclone.conffile in the user's.config/rclonedirectory (e.g.,/share/homes/backupuser/.config/rclone/rclone.conf). - Verify the configuration with "
rclone config". - Start the copy with the command "
rclone sync /share/to/sync Infomaniak:default".
Replace SBI-XXXXXXXX and "passwd" with the information specific to your device (refer to this other guide):
[sb_project_SBI-XXXXXXXX]
type = swift
user = SBI-XXXXXXXX
key = passwd
auth (1) = https://swiss-backup.infomaniak.com/identity/v3
domain = default
tenant = sb_project_SBI-XXXXXXXX
tenant_domain = default
region = RegionOne
storage_url =
auth_version =
Connecting via HBS (Hybrid Backup Sync)
To configure a new backup:
- Open HBS and go to Backup & Restore, then click on Create new Backup job.
- Select the NAS folder to back up, then click Next.
- Choose OpenStack Swift, then enter the information as indicated below:
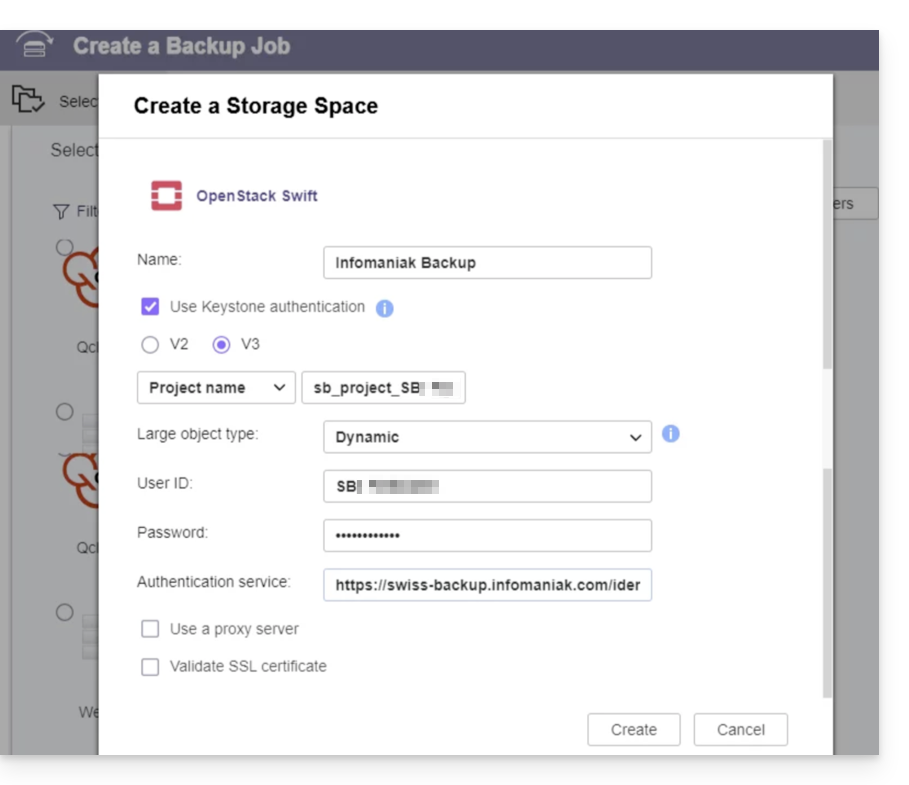
- Name: give the backup a name
- Select “
Use Keystone Infrastructure” - Select “
V3” - Project name:
sb_project_SBI-XXXXXXXX(replaceSBI-XXXXXXXXwith your own ID, same below) - User ID:
SBI-XXXXXXXX - Password: the one generated on Swiss Backup
- Authentication service (1):
https://swiss-backup.infomaniak.com/identity/v3
- Click Create.
- Region name:
RegionOne - Bucket name:
default - Multipart Size: leave
128MB - Click Select.
- Click default under the destination and then click OK.
- Give the task a name.
- Then configure the desired settings, such as the backup frequency and bandwidth limitation.
- Click Create.
(1) The indication "//swiss-backup02", "//swiss-backup03", etc. changes depending on the cluster number indicated in the Manager under Cloud storage information in "Location"; and if your Swiss Backup device was created before October 2020, you will need to use https://swiss-backup.infomaniak.com/identity/v3
Link para esta FAQ: https://faq.infomaniak.com/2319
Esta seção de perguntas frequentes foi útil?