Base de conocimientos
1 000 FAQ, 500 tutoriales y vídeos explicativos. ¡Aquí sólo hay soluciones!
Importar las fotos de Google a kDrive
Esta guía explica cómo exportar sus fotos desde Google Fotos (https://photos.google.com/) y luego importarlas en kDrive de Infomaniak.
1. Exportar sus fotos de Google
Para recuperar en su ordenador las fotos almacenadas en Google Fotos, utilice Google Takeout. Este servicio permite, entre otras cosas, exportar todos los elementos o seleccionar solo algunos álbumes si prefiere proceder por etapas:
- Inicie sesión en Google Takeout.
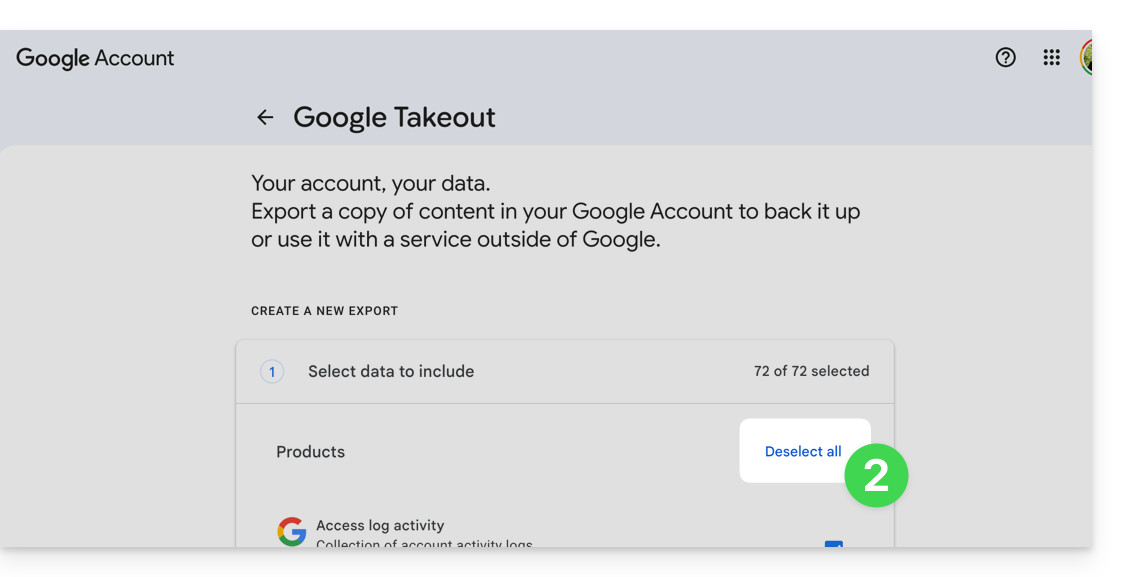
- Desmarque todos los productos para que solo quede seleccionado Google Fotos:
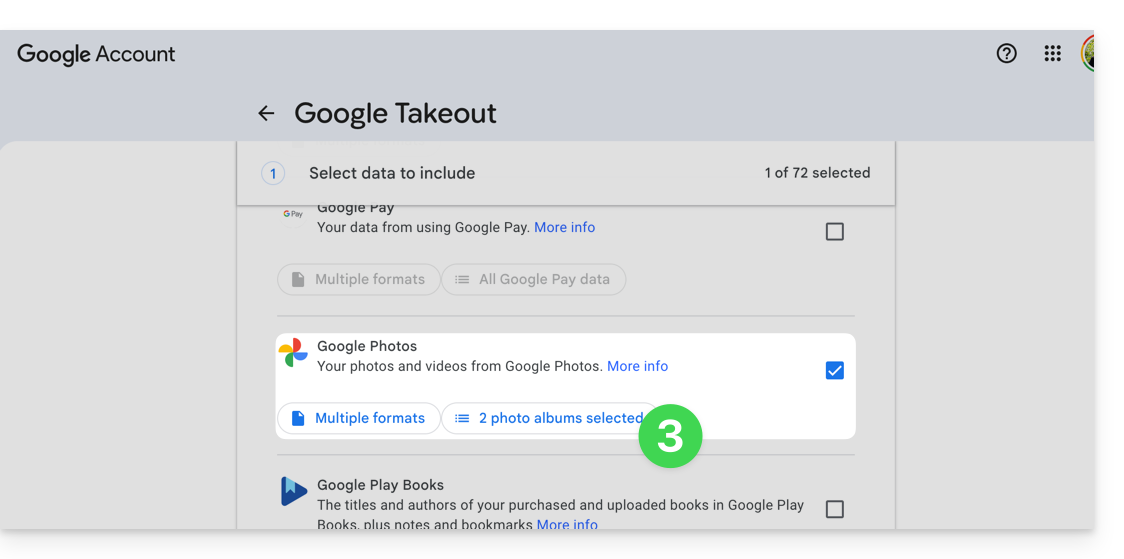
- Si es necesario, desmarque los álbumes que no desea exportar:
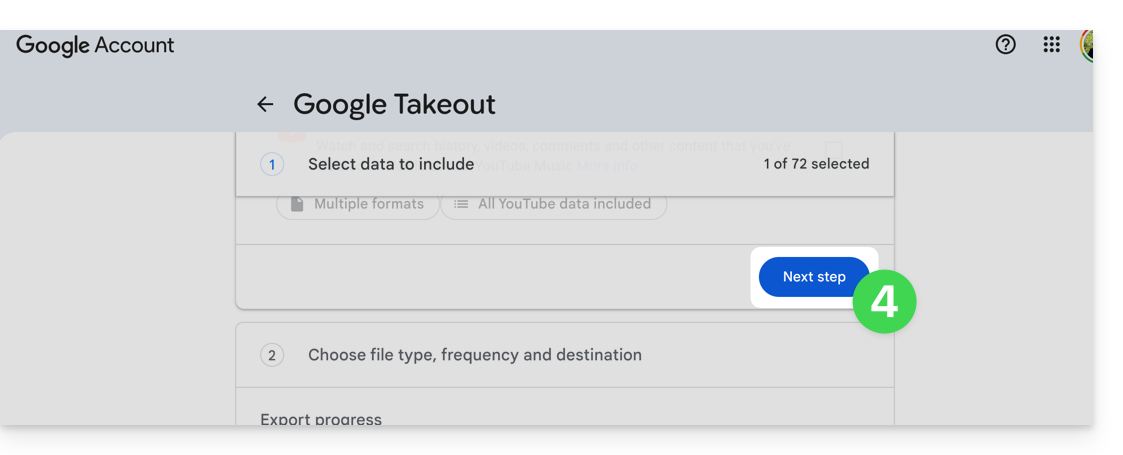
- Pase a la siguiente etapa, en la parte inferior de la página:
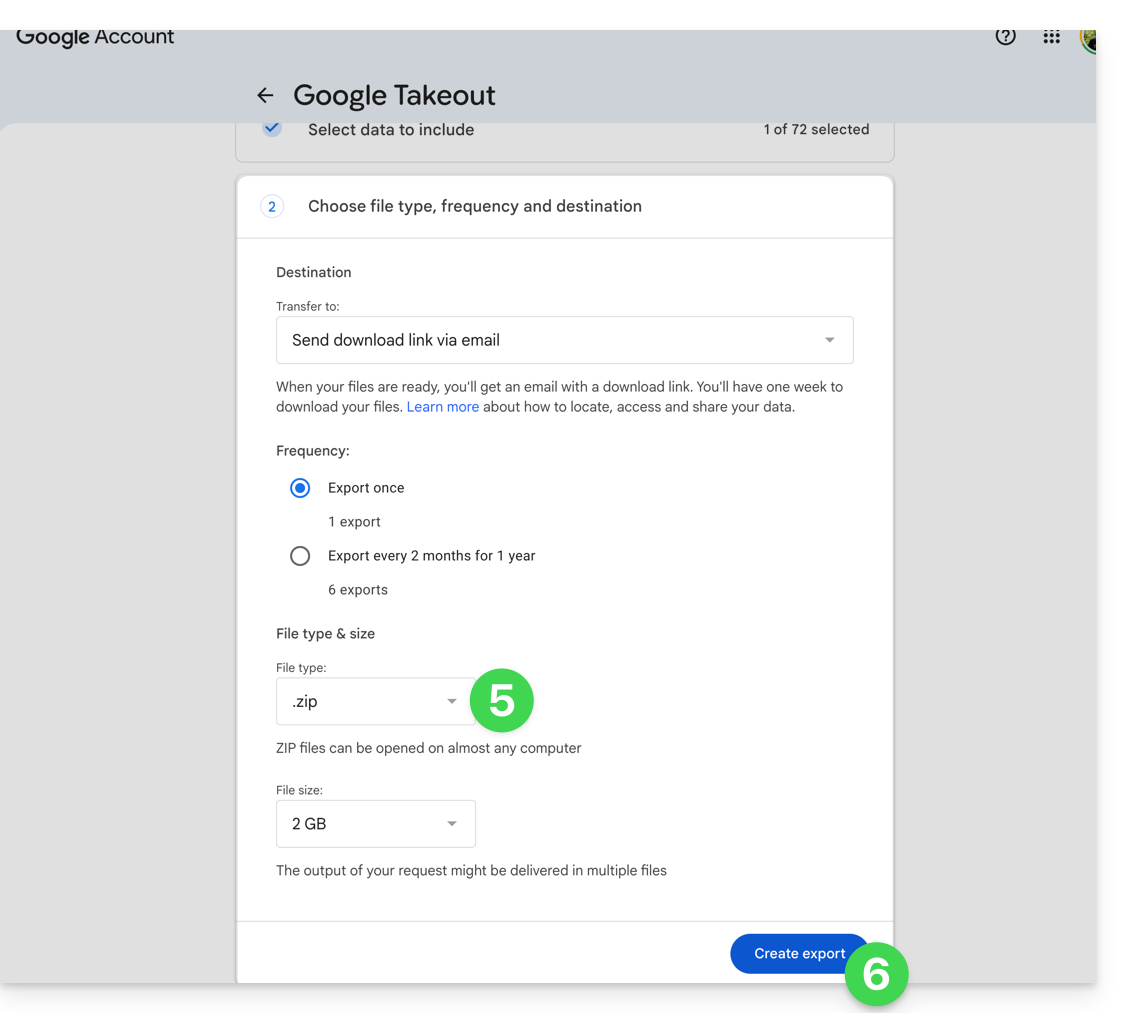
- Configure la exportación en formato ZIP.
- Haga clic en el botón Crear una exportación para iniciar la exportación:
- Espere a recibir el correo electrónico que contiene los enlaces de descarga. Según el volumen de datos, la preparación de la exportación puede tardar varias horas o incluso varios días.
- Descargue los archivos ZIP y, a continuación, descomprímalos en su ordenador:
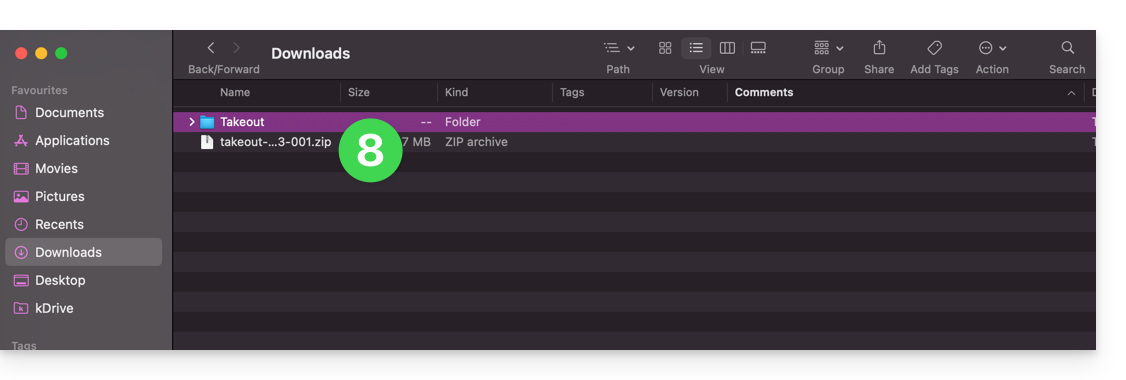
- Si es necesario, agrupe las carpetas exportadas antes de importarlas en kDrive.
2. Corregir las fechas de los archivos exportados
Durante una exportación, las fechas del sistema de los archivos pueden ser reemplazadas por la fecha de exportación en lugar de la fecha original de la captura. Si el orden cronológico de las fotos no es correcto después de la exportación, puede corregir estas fechas antes de la importación en kDrive.
Antes de ejecutar un script, trabaje en una copia de sus archivos exportados. No elimine los archivos .json proporcionados por Google Takeout antes del procesamiento: pueden contener la fecha original cuando esta no está disponible en los metadatos EXIF del archivo.
Los scripts que se muestran a continuación buscan una fecha en este orden: metadatos del archivo, archivo JSON de Google Takeout asociado y, a continuación, la fecha que aparece en el nombre del archivo. Los archivos sin una fecha utilizable se enumeran en un archivo DateError.txt creado en el escritorio. Los archivos corregidos se enumeran en DateFound.txt.
Para limitar el riesgo de bloqueos en exportaciones muy grandes, procese los archivos por lotes de unos pocos miles de elementos.
Corregir las fechas en macOS
- Descargue e instale ExifTool desde https://exiftool.org/index.html, eligiendo el paquete de macOS.
- Abra la aplicación Terminal desde la carpeta Aplicaciones > Utilidades.
- Copie y pegue completamente el bloque que se muestra a continuación en Terminal y, si es necesario, valide con la tecla Intro.
- Seleccione la carpeta que contiene los archivos exportados de Google Takeout.
- Deje que el procesamiento se complete y, a continuación, consulte los archivos
DateFound.txtyDateError.txtcreados en el escritorio.
El script que se debe copiar y pegar completamente:
/bin/bash <<'BASH'
#!/bin/bash
set -u

ROOT="$(osascript -e 'POSIX path of (choose folder with prompt "Select the folder containing the files to update")')" || exit 0

DESKTOP="$HOME/Desktop"
LOG_FOUND="$DESKTOP/DateFound.txt"
LOG_ERROR="$DESKTOP/DateError.txt"
: > "$LOG_FOUND"
: > "$LOG_ERROR"

find_exiftool() {
    if command -v exiftool >/dev/null 2>&1; then
        command -v exiftool
        return 0
    fi
    if [ -x "/usr/local/bin/exiftool" ]; then
        printf '%s\n' "/usr/local/bin/exiftool"
        return 0
    fi
    if [ -x "/opt/homebrew/bin/exiftool" ]; then
        printf '%s\n' "/opt/homebrew/bin/exiftool"
        return 0
    fi
    return 1
}

EXIFTOOL="$(find_exiftool)" || {
    printf '%s\n' "ExifTool not found. Install it, then run the script again." >> "$LOG_ERROR"
    printf '%s\n' "ExifTool not found. Check DateError.txt on the desktop."
    exit 1
}

if [ ! -d "$ROOT" ]; then
    printf 'Invalid folder: %s\n' "$ROOT" >> "$LOG_ERROR"
    printf '%s\n' "Invalid folder. Check DateError.txt on the desktop."
    exit 1
fi

get_exif_date() {
    "$EXIFTOOL" -s3 -d "%Y:%m:%d %H:%M:%S" -DateTimeOriginal -CreateDate -MediaCreateDate -TrackCreateDate -CreationDate -ModifyDate -- "$1" 2>/dev/null | awk '/^[0-9]{4}:[0-9]{2}:[0-9]{2} [0-9]{2}:[0-9]{2}:[0-9]{2}/ { print substr($0, 1, 19); exit }'
}

get_json_date() {
    local file="$1"
    local json=""
    if [ -f "$file.json" ]; then
        json="$file.json"
    elif [ -f "${file%.*}.json" ]; then
        json="${file%.*}.json"
    fi
    [ -z "$json" ] && return 1

    /usr/bin/perl -MTime::Piece -0777 -ne 'if (/"photoTakenTime"\s*:\s*\{.*?"timestamp"\s*:\s*"([0-9]+)"/s || /"creationTime"\s*:\s*\{.*?"timestamp"\s*:\s*"([0-9]+)"/s) { print localtime($1)->strftime("%Y:%m:%d %H:%M:%S"); }' "$json"
}

get_name_date() {
    local name
    name="$(basename "$1")"
    if [[ "$name" =~ ([12][0-9]{3})[-_]?([01][0-9])[-_]?([0-3][0-9])([_\ -]?([0-2][0-9])[-_\.]?([0-5][0-9])[-_\.]?([0-5][0-9]))? ]]; then
        local year="${BASH_REMATCH[1]}"
        local month="${BASH_REMATCH[2]}"
        local day="${BASH_REMATCH[3]}"
        local hour="12"
        local minute="00"
        local second="00"
        if [ -n "${BASH_REMATCH[5]:-}" ]; then
            hour="${BASH_REMATCH[5]}"
            minute="${BASH_REMATCH[6]}"
            second="${BASH_REMATCH[7]}"
        fi
        printf '%s:%s:%s %s:%s:%s\n' "$year" "$month" "$day" "$hour" "$minute" "$second"
        return 0
    fi
    return 1
}

is_valid_date() {
    date -j -f "%Y:%m:%d %H:%M:%S" "$1" "+%Y:%m:%d %H:%M:%S" >/dev/null 2>&1
}

to_touch_date() {
    printf '%s' "$1" | sed -E 's/^([0-9]{4}):([0-9]{2}):([0-9]{2}) ([0-9]{2}):([0-9]{2}):([0-9]{2})$/\1\2\3\4\5.\6/'
}

write_metadata() {
    local file="$1"
    local date_value="$2"
    "$EXIFTOOL" -overwrite_original "-DateTimeOriginal=$date_value" "-CreateDate=$date_value" "-ModifyDate=$date_value" -- "$file" >/dev/null 2>&1 || true
}

process_file() {
    local file="$1"
    local date_value=""
    local source=""

    date_value="$(get_exif_date "$file")"
    if [ -n "$date_value" ]; then
        source="EXIF"
    else
        date_value="$(get_json_date "$file")"
        if [ -n "$date_value" ]; then
            source="Google Takeout JSON"
        else
            date_value="$(get_name_date "$file")"
            if [ -n "$date_value" ]; then
                source="file name"
            fi
        fi
    fi

    if [ -n "$date_value" ] && is_valid_date "$date_value"; then
        local touch_value
        touch_value="$(to_touch_date "$date_value")"
        if [ "$source" != "EXIF" ]; then
            write_metadata "$file" "$date_value"
        fi
        if touch -t "$touch_value" "$file" 2>/dev/null; then
            printf '%s | %s | %s\n' "$source" "$date_value" "$file" >> "$LOG_FOUND"
        else
            printf 'Unable to update file date: %s\n' "$file" >> "$LOG_ERROR"
        fi
    else
        printf 'No valid date found: %s\n' "$file" >> "$LOG_ERROR"
    fi
}

while IFS= read -r -d '' file; do
    case "$file" in
        *.json|*_original) continue ;;
    esac
    process_file "$file"
done < <(find "$ROOT" -type f -print0)

printf '%s\n' "Done. Check DateFound.txt and DateError.txt on the desktop."
BASH
Corregir las fechas en Windows
- Descargue ExifTool desde https://exiftool.org/index.html y elija el archivo ejecutable de Windows.
- Colóquelo en una carpeta accesible, por ejemplo,
C:\ExifTool. - Cambie el nombre del archivo
exiftool(-k).exeaexiftool.exe. - Verifique que la ruta completa sea
C:\ExifTool\exiftool.exe.- Si coloca ExifTool en otra ubicación, modifique la primera línea de configuración del script que se muestra a continuación.
- Copie y pegue el script que se muestra a continuación en el Bloc de notas.
- Guarde el archivo con la extensión
.ps1, por ejemplo,UpdateExifDates.ps1. - Haga clic derecho en el archivo
.ps1y ejecútelo con PowerShell. - Seleccione la carpeta que contiene los archivos exportados desde Google Takeout.
- Espere a que finalice el procesamiento y, a continuación, consulte los archivos
DateFound.txtyDateError.txtque se crearán en el escritorio.
Si PowerShell bloquea la ejecución del script, abra PowerShell y ejecute el comando Set-ExecutionPolicy RemoteSigned -Scope CurrentUser y, a continuación, confirme la modificación cuando Windows lo solicite.
El script que debe copiar y pegar en su totalidad:
# === Configuration ===
$ExifToolPath = "C:\ExifTool\exiftool.exe"
$Desktop = [Environment]::GetFolderPath("Desktop")
$LogFound = Join-Path $Desktop "DateFound.txt"
$LogError = Join-Path $Desktop "DateError.txt"
Set-Content -Path $LogFound -Value ""
Set-Content -Path $LogError -Value ""

if (-not (Test-Path -LiteralPath $ExifToolPath)) {
    Add-Content -Path $LogError -Value "ExifTool not found: $ExifToolPath"
    Write-Host "ExifTool not found. Check the path in the script."
    exit
}

# === Folder selection dialog ===
Add-Type -AssemblyName System.Windows.Forms
$FolderBrowser = New-Object System.Windows.Forms.FolderBrowserDialog
$FolderBrowser.Description = "Select the folder to process"
if ($FolderBrowser.ShowDialog() -ne [System.Windows.Forms.DialogResult]::OK) { exit }
$Folder = $FolderBrowser.SelectedPath

function Get-DateFromExif {
    param ([string]$FilePath)

    $Tags = @("DateTimeOriginal", "CreateDate", "MediaCreateDate", "TrackCreateDate", "CreationDate", "ModifyDate")
    foreach ($Tag in $Tags) {
        $Value = (& $ExifToolPath "-$Tag" -s3 -d "%Y:%m:%d %H:%M:%S" -- "$FilePath" 2>$null | Select-Object -First 1)
        if ($Value -match '^(\d{4}):(\d{2}):(\d{2}) (\d{2}):(\d{2}):(\d{2})') {
            try {
                return [datetime]::ParseExact($Matches[0], "yyyy:MM:dd HH:mm:ss", [Globalization.CultureInfo]::InvariantCulture)
            } catch {}
        }
    }
    return $null
}

function Get-DateFromJson {
    param ([string]$FilePath)

    $JsonPaths = @("$FilePath.json", [System.IO.Path]::ChangeExtension($FilePath, ".json")) | Select-Object -Unique
    foreach ($JsonPath in $JsonPaths) {
        if (Test-Path -LiteralPath $JsonPath) {
            try {
                $Json = Get-Content -LiteralPath $JsonPath -Raw -ErrorAction Stop | ConvertFrom-Json -ErrorAction Stop
                $Timestamp = $null
                if ($Json.photoTakenTime -and $Json.photoTakenTime.timestamp) {
                    $Timestamp = [int64]$Json.photoTakenTime.timestamp
                } elseif ($Json.creationTime -and $Json.creationTime.timestamp) {
                    $Timestamp = [int64]$Json.creationTime.timestamp
                }

                if ($null -ne $Timestamp) {
                    return ([DateTimeOffset]::FromUnixTimeSeconds($Timestamp)).LocalDateTime
                }
            } catch {}
        }
    }
    return $null
}

function Get-DateFromFileName {
    param ([string]$FileName)

    if ($FileName -match '([12]\d{3})[-_]?(0[1-9]|1[0-2])[-_]?(0[1-9]|[12]\d|3[01])(?:[ _-]?([01]\d|2[0-3])[-_.]?([0-5]\d)[-_.]?([0-5]\d))?') {
        $Year = $Matches[1]
        $Month = $Matches[2]
        $Day = $Matches[3]
        $Hour = "12"
        $Minute = "00"
        $Second = "00"

        if ($Matches[4]) {
            $Hour = $Matches[4]
            $Minute = $Matches[5]
            $Second = $Matches[6]
        }

        $DateString = "$Year$Month$Day$Hour$Minute$Second"
        try {
            return [datetime]::ParseExact($DateString, "yyyyMMddHHmmss", [Globalization.CultureInfo]::InvariantCulture)
        } catch {}
    }
    return $null
}

function Write-Metadata {
    param (
        [string]$FilePath,
        [datetime]$DateValue
    )

    $ExifDate = $DateValue.ToString("yyyy:MM:dd HH:mm:ss", [Globalization.CultureInfo]::InvariantCulture)
    & $ExifToolPath -overwrite_original "-DateTimeOriginal=$ExifDate" "-CreateDate=$ExifDate" "-ModifyDate=$ExifDate" -- "$FilePath" 2>$null | Out-Null
}

function Set-FileDates {
    param (
        [string]$FilePath,
        [datetime]$DateValue
    )

    [System.IO.File]::SetCreationTime($FilePath, $DateValue)
    [System.IO.File]::SetLastWriteTime($FilePath, $DateValue)
    [System.IO.File]::SetLastAccessTime($FilePath, $DateValue)
}

Get-ChildItem -LiteralPath $Folder -Recurse -File | Where-Object {
    $_.Extension -ne ".json" -and $_.Name -notlike "*_original"
} | ForEach-Object {
    $File = $_
    $FilePath = $File.FullName
    $DateValue = Get-DateFromExif -FilePath $FilePath
    $Source = "EXIF"

    if (-not $DateValue) {
        $DateValue = Get-DateFromJson -FilePath $FilePath
        $Source = "Google Takeout JSON"
    }

    if (-not $DateValue) {
        $DateValue = Get-DateFromFileName -FileName $File.Name
        $Source = "file name"
    }

    if ($DateValue) {
        try {
            if ($Source -ne "EXIF") {
                Write-Metadata -FilePath $FilePath -DateValue $DateValue
            }
            Set-FileDates -FilePath $FilePath -DateValue $DateValue
            Add-Content -Path $LogFound -Value "$Source | $($DateValue.ToString('yyyy-MM-dd HH:mm:ss')) | $FilePath"
        } catch {
            Add-Content -Path $LogError -Value "Unable to update file date: $FilePath"
        }
    } else {
        Add-Content -Path $LogError -Value "No valid date found: $FilePath"
    }
}

[System.Windows.Forms.MessageBox]::Show("Done. Check DateFound.txt and DateError.txt on the desktop.")
3. Importar las fotos en kDrive
No cambie sus contraseñas hasta que la importación o la sincronización se hayan completado.
Una vez que sus archivos estén listos, puede importarlos desde la aplicación web kDrive si el número de archivos y su conexión a Internet permiten enviarlos desde el navegador:
- Acceda a la aplicación web kDrive de Infomaniak.
- Abra la ubicación en la que se deben importar las fotos.
- Haga clic en el botón Nuevo en la esquina superior izquierda.
- Haga clic en Importar una carpeta.
- Seleccione la carpeta que contiene sus fotos en su ordenador.
- Espere hasta que finalice la importación. El registro de actividad se muestra en la esquina inferior derecha:
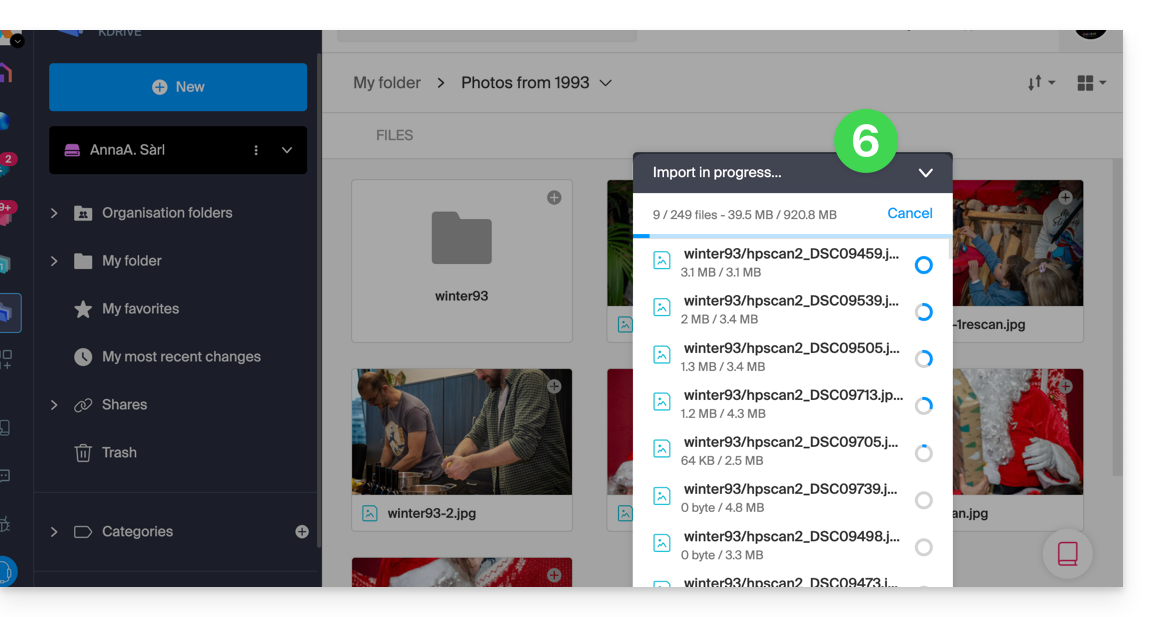
Si utiliza la aplicación de escritorio kDrive, también puede colocar la carpeta que contiene sus fotos en la estructura de carpetas de su kDrive en el ordenador. La sincronización se iniciará automáticamente y los archivos se enviarán a los servidores de Infomaniak.
4. Acceder a las fotos desde sus dispositivos
Una vez finalizada la importación o la sincronización, podrá acceder a sus fotos desde los dispositivos conectados a su kDrive.
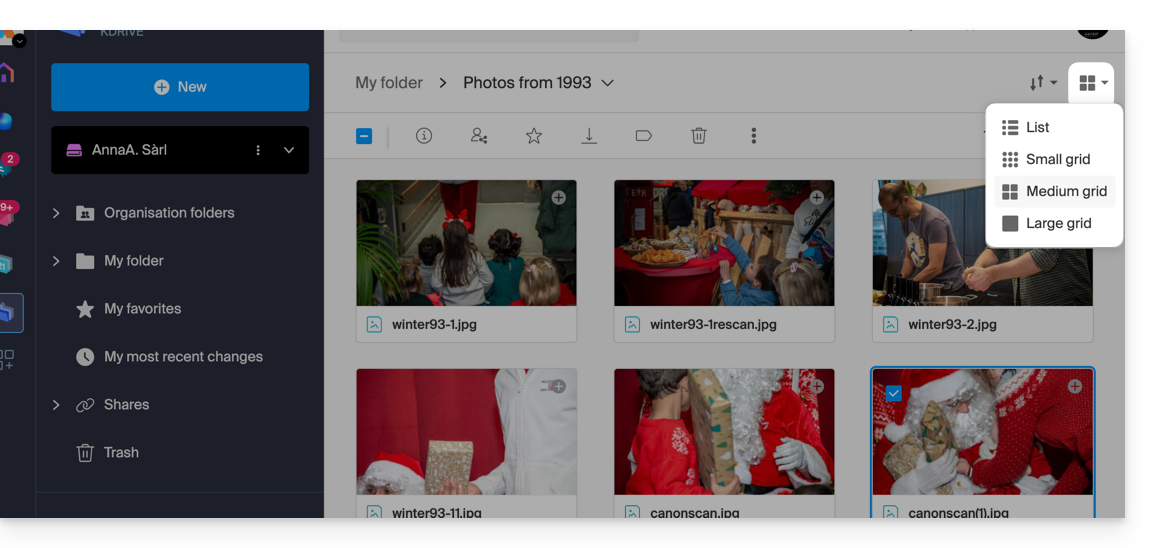
- En la aplicación web kDrive, puede modificar la visualización para ampliar las miniaturas y facilitar la navegación por sus fotos:
Enlace a esta FAQ: https://faq.infomaniak.com/2540
¿Le ha sido útil esta FAQ?